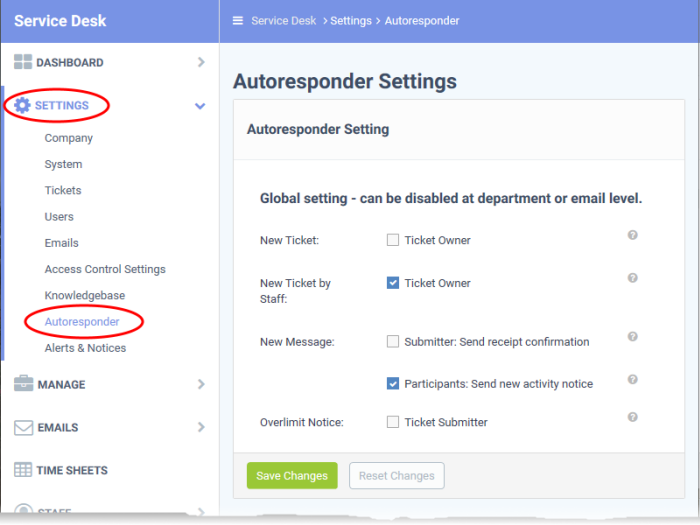
Autoresponder Settings
Click 'Admin
Panel' > 'Settings' > 'Autoresponder'
- An autoresponder is an email which is automatically sent to users immediately after certain events. For example, autoresponders are sent to users after they submit a ticket to confirm receipt of their request.
- You can also send out autoresponders when staff create a new ticket, when a new reply is posted to a ticket, and when a user exceeds the maximum number of open tickets.
- The 'Autoresponder Settings' interface lets you choose global autoresponder settings
- You can also choose autoresponder settings for specific ticket categories, departments or email addresses. Category / department / email settings override the global setting.
- You can view and edit the content of autoresponders at 'Admin Panel' > 'Emails' > 'Templates'.
- See Email Templates for help to create and manage email templates.
Configure global autoresponder settings
- Open the admin panel (see the last link on the left)
- Click 'Settings' > 'Autoresponder'

- New Ticket: A confirmation email is sent to users immediately after they submit a new ticket. This might be over-ridden by category specific responder settings.
- See Ticket Categories to read more about categories.
- New Ticket by Staff: A confirmation email is sent to users after a staff-member creates a ticket on their behalf. Note - staff have the option to disable the responder when creating the ticket.
- See Create a new ticket on behalf of a user for more on this.
- New Message - Emails sent out when a new comment/reply is posted to a ticket.
- Submitter: Send receipt confirmation - A confirmation mail is sent to the person who posted the reply.
- Participants: Send new activity notice - All collaborators on the ticket receive email notification of the new post.
- Overlimit Notice: Notifies the user that their ticket was rejected because they already have the maximum number of open tickets. You can set the max. number at ‘Admin Panel’ > ‘Settings’ > ‘Tickets’.
- See Ticket Settings and Options if you want to read more about ticket settings.
Click 'Save
Changes' for your settings to take effect.


