Manage Users
- Click 'Staff Panel' > 'Users' > 'User Directory'
- 'Users' are the individuals who submit tickets to your support team. They can submit tickets via your support center, by email, or direct from an Endpoint Manager device.
- The user directory area lets you add and manage users.
- Users can be manually added to service desk or imported from .csv. You can also assign users to customers as required.
- Admins/staff can create tickets for a new user. The new user will be automatically enrolled as a guest. Non-registered users that create tickets are also added as guests.
- Guests must become registered if they are to login into your support portal to create tickets.
- Admins need to enable login abilities in 'Admin Panel' > 'Settings' > 'Access Control Settings'. See Access Control Settings in Service Desk admin guide for more details.
- There are two ways you can register a user:
- Send an enrollment email with an account activation link
- Set a temporary password for the user to login to the support portal
- See Register a User for help with this.
Endpoint Manager integration – Users can submit a ticket direct from a managed endpoint by right-clicking on the Endpoint Manager tray icon.
The device user is added as a guest if they have not already been registered. You need to manually register them if you want them to login to your portal to submit tickets.
Manage users
- 'Staff Panel' > 'Users' > 'User Directory'
-
The user directory shows all registered users and guest users. Staff can add, remove and update users as required.
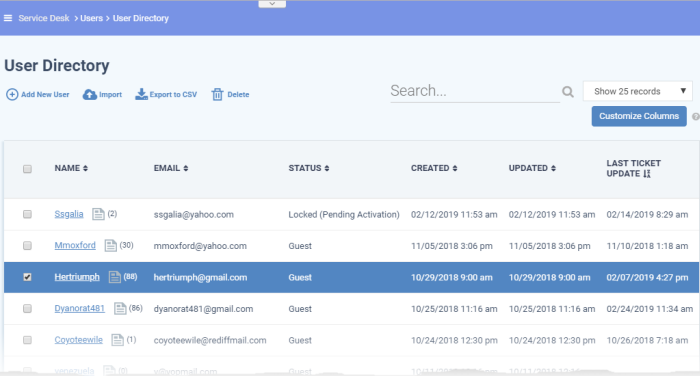
Staff can perform the following tasks in the user directory:
- The user directory shows basic details about each user in six columns. You can add or remove columns by clicking 'Customize Columns'. See Modify Table Columns if you need help with this.
- The
following is a list of all possible columns:
|
Column Header |
Description |
|---|---|
|
Name |
The label of the user. The number beside a username shows the number of tickets they have submitted. Click on the user's name to view the tickets they have created. |
|
|
The email address of the user. |
|
Status |
Indicates whether the user is a registered or guest user. The relative privileges of guest and registered users can be configured in 'Admin Panel' > 'Settings' > 'Access'. |
|
Created |
The date on which the user was added to Service Desk. |
|
Updated |
Date and time of the most recent update to the user's details. You can quickly view/edit user details by placing your mouse cursor over a user name. |
|
Last Ticket Update |
Date and time of the most recent update to a ticket submitted by the user. |
|
The following columns can be added by clicking the 'Customize Columns' button. See the explanation of Modify Table Columns for more guidance on this. |
|
|
Customer |
The company to which the user belongs. |
|
Phone Number |
The contact phone number of the user as registered with service desk. |
|
Internal Notes |
Comments about the user as entered by the administrators while adding or editing the user, for internal reference. |
- Users can be added manually or imported from a list
- A non-registered user that raises a ticket is added as a guest.
- You can create support tickets on behalf of new users. These users are also added as guests.
- Guests can become registered users by activating their account. Only registered users can login to your support portal to manage/create tickets.
- Endpoint Manager (EM) users can submit a ticket direct from a managed endpoint by right-clicking the EM tray icon. If not already registered, the device user is added as a guest in Service Desk. You should manually register their account to allow them to manage their tickets in your web portal. See Register a User for more details.
- Admins can configure the privileges of guest and registered members in 'Admin Panel' > 'Settings' > 'Access'
- Once added to service desk, users can be assigned to one of your customers in the 'Customers' screen.
- Click 'Users' > 'User Directory'
- Click
the 'Add New User' link at the top
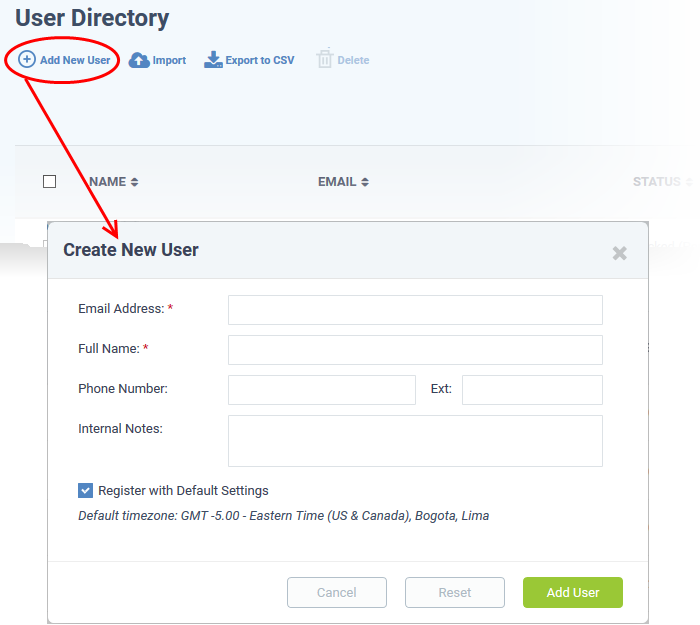
The 'Create New User' screen will open:
The fields available in the form shown above are fetched from the built-in contact information. Contact information can be configured in 'Admin Panel' > 'Manage' > 'Forms' > 'Contact Information'. See 'Forms' in Service Desk admin guide if you need more details on this.
- Email Address: Enter the email address of the user. The user can login to the your support web portal using the email address as username, after registration.
- Full Name: The name of the user.
- Phone Number: The contact number of the user.
- Internal Notes: Enter any notes regarding the user.
- Register with Default Settings: Select whether the registration should use the settings in 'Admin Panel' > 'Settings' > 'Users'
- Admins can configure how new user accounts are to be registered from the Admin Panel > Settings > Users interface. SeeUser Registration Settings in Service Desk admin guide for more details.
- Leave selected if you want to use the default settings.
- Deselect to choose a different registration method.
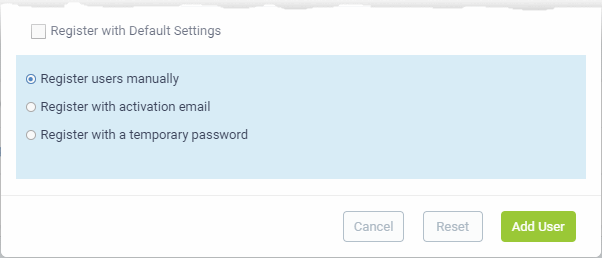
- Register users manually - The user is initially added a guest and needs to be manually registered afterwards. You can register a guest as follows:
- Click ‘Users’ > ‘User Directory’ > click on the name of the guest > Click the ‘Register’ button
- See Register a user for more details.
- Register with activation email - The user is initially added as a guest and sent a mail which contains a link to register their account.
The link leads to your support web portal where the user will create a password and so register their account. After registration, the user can login and manage/view their tickets.
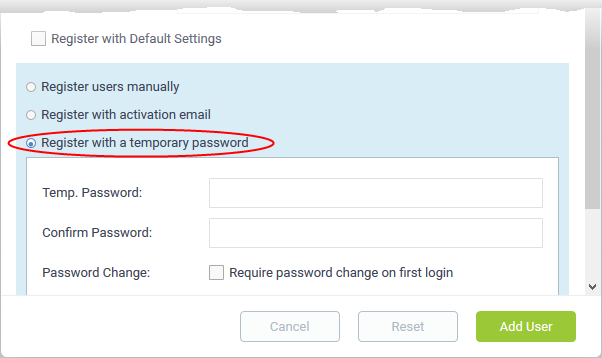
- Register with a temporary password - Create a temporary account password which registers the user immediately.
You need to send the password and URL of your support portal to the user. This allows them to login and manage their tickets.
- 'Require password change on first login' - Enable to force the user to create a new password after first login (recommended):
- Click 'Add User'.
The user is added as a guest or registered user depending on your selection above. After a user is registered, you can manage their account and assign them to a customer company.
- Click 'Users' > 'User Directory'
- Click 'Import' at the top
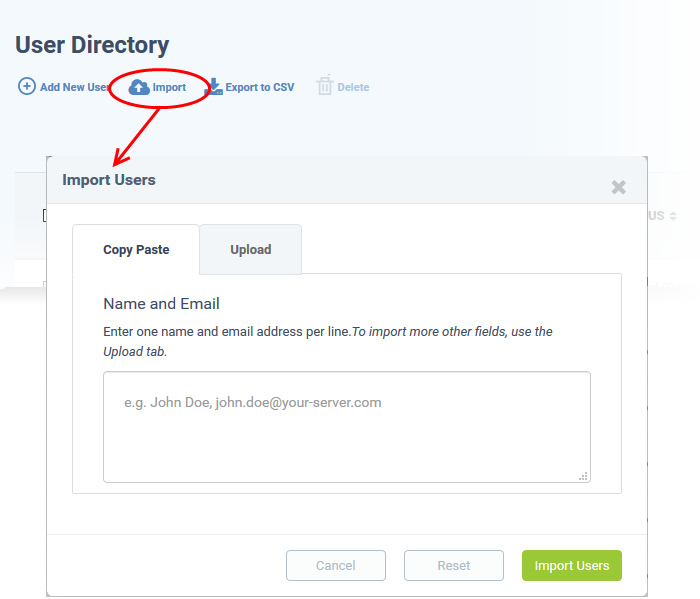
There are two ways to import users:
1. Copy Paste - Import users with name and email address only.
- Enter the user's full name, followed by a comma, then their email address.
- Add more users in subsequent lines.
- Click Import Users' to add the users as guests.
2.Upload - Import users from a .csv file. More details can be added about a user with this method.
- Create a .csv file of users that you want to import. The file should have the following column headers:
Email,Name,Phone,Notes,"Customer ID (Optional)
- Each line should contain the contact information of a single user
- Save the .csv, then click 'Browse' to upload the file to Service Desk:
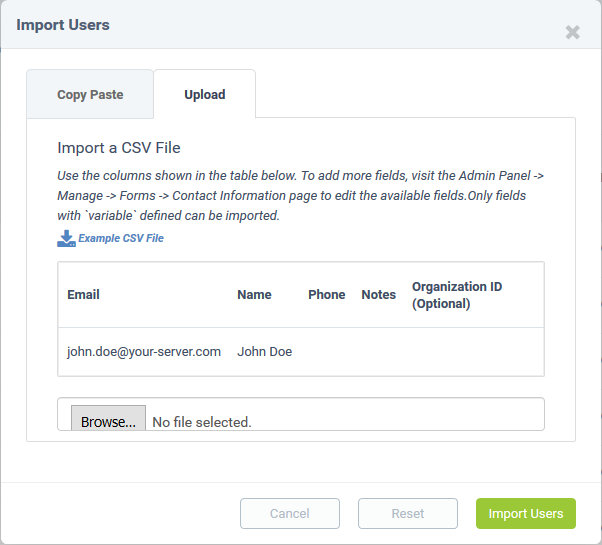
- Depending on your settings, imported users will be added as guests, or their account activation started.
- Admins can configure default registration settings in 'Admin Panel' > 'Settings' > 'Users'. See User Registration Settings in Service Desk admin guide if you need further help with this.
- Admins can add more fields to the upload tab in 'Admin Panel' > 'Manage' > 'Forms' > 'Contact Information'. See 'Forms' in Service Desk admin guide if you need more details on this.
Guests can be registered by staff in the 'User Details' screen. Users can also register by themselves by signing up for an account at your support center page.
Register a guest user
- Click 'Users' > 'User Directory'
- Click on the name of the guest user that you want to register
- Click the 'Register' button
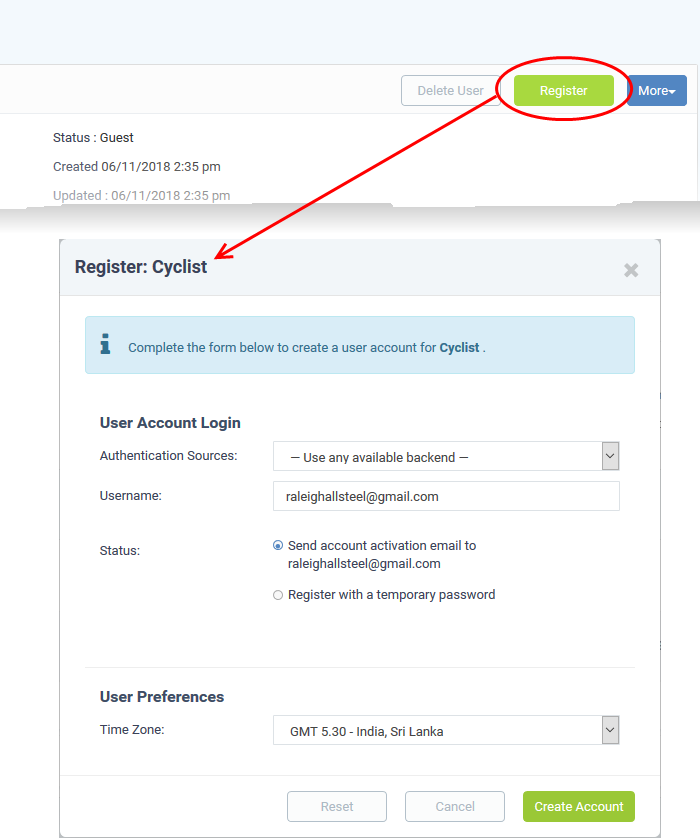
The user registration screen will open:
- Complete all required fields then click the 'Create Account' button. The account will be created with the status 'Locked (Pending Activation)'. The account needs to be activated for the user to access the portal and create support tickets.
Activation can be done in two ways:
User
Account Activation through Activation Email
- Select 'Send account activation email...'
- Select the time zone wto which the user belongs
- Click 'Create Account'
The user will be added with the status Locked (Pending). An activation email will be sent to the user. After clicking the activation link in the mail, the user will be asked to configure his/her password. Once activation is complete, their status will change to 'Active (Registered)'.
User Account Activation using a temporary password
- Select 'Register with a temporary password'
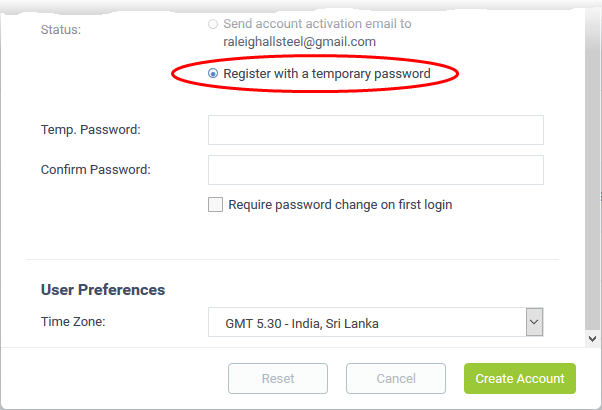
- Enter a temporary password and re-enter it in the respective fields
- Select 'Require password change on first login' if you want the user to reset their password on their first login
- Timezone - Select the time zone to which the user belongs
- Click 'Create Account'
The user will be registered. You should communicate the URL of your web-portal and the password to the user. The user can login to the portal using their email as user name and the password you sent. If 'Require password change on first login' is enabled, the user will be asked to change the password on his/her first login.
|
Tip: Your Service Desk web portal can be accessed through the URL [your_subdomain_name].servicedesk.comodo.com. |
- Click 'Users' > 'User Directory'
- Click the name of the user:
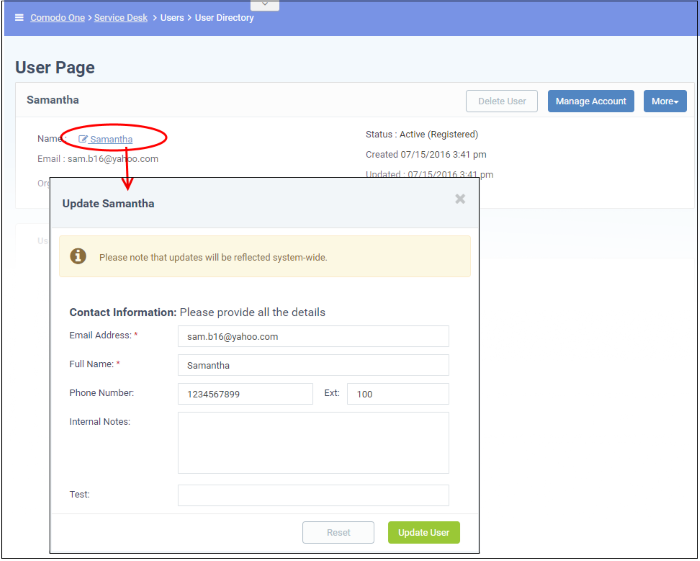
- Edit the details as required and click the 'Update User' button.
|
Note: You can also add internal notes about the user in the 'Update User' dialog. |
You can remove users associated with an organization at anytime. Once a user has been removed, you have the option to reassign their tickets to other users or to delete them from service desk.
|
Tip: The tickets added to knowledgebase will not be removed. |
- To remove a user, click their name then click 'Delete User' in the 'User Details' screen.
- The confirmation dialog gives you the option to remove the tickets associated with the user.
- Click the '[NN]
tickets' link in the confirmation dialog to reassign their tickets to a different user before removing them. For more details, see explanation of reassigning tickets in the section Ticket Details.
|
Note: You cannot remove a user who still has tickets associated with them. |
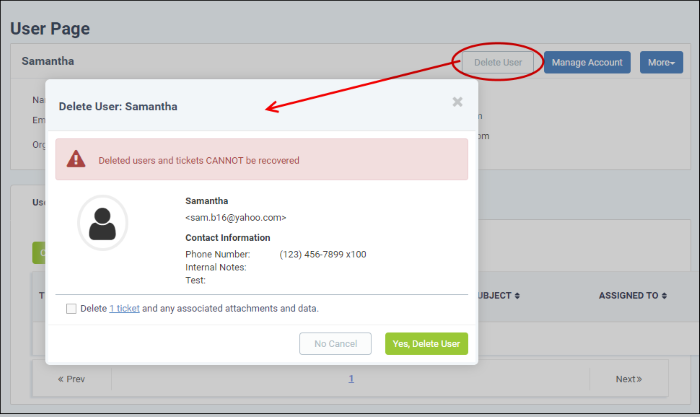
- Click 'Yes, Delete User'
Deleted users cannot be 'restored'. If required, you can re-create the user by creating a new user account.
- To delete multiple users, select the check-boxes beside them in the 'User Directory' interface and click the 'Delete' button at the top.
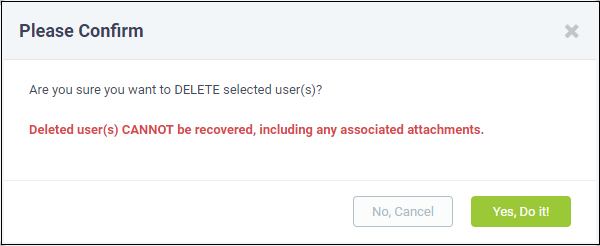
- Click the 'Yes, Do it!' to confirm the deletion
- 'Delete all tickets and any associated attachments and data' - Enable this if you also want to remove any tickets created by the user
Send password reset /activation email to the user
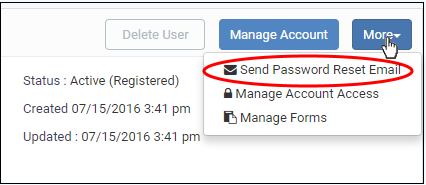
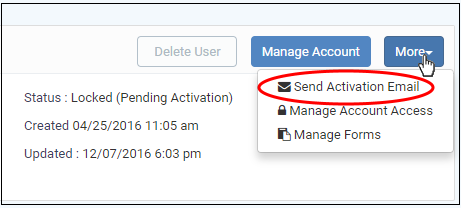
The 'More' drop-down lets you reset passwords for active users and send activation emails to unregistered users.
- Click 'Staff Panel' (if required) > 'Users' > 'User Directory'
- Click the name of the user whose password you wish to reset/to whom you wish to send an activation mail
- Click the 'More' button on the upper-right of the user details screen:
Registered Users
Locked (Pending Activation) Users
For reset password
- Click the 'Send Password Reset Email' link
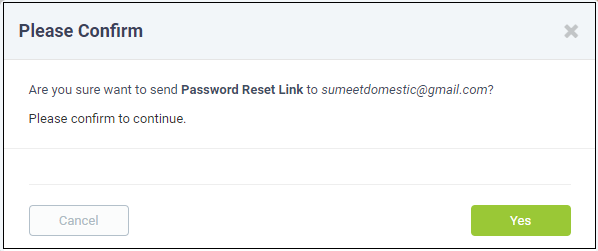
- Click 'OK' to confirm sending the password reset email to the user.
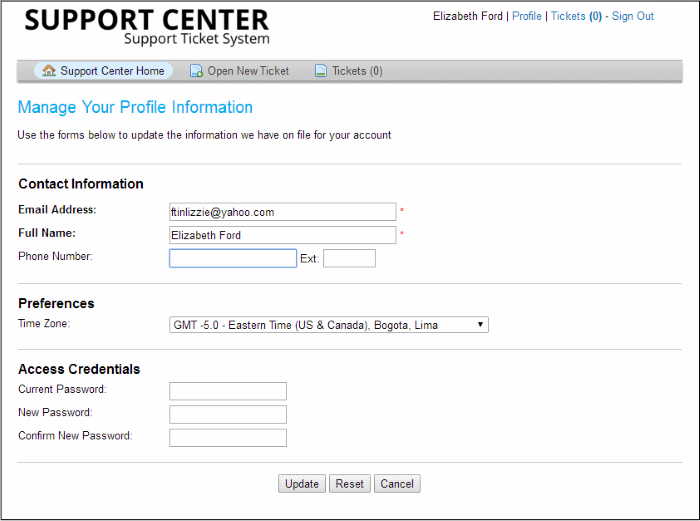
An email containing the password reset link will be sent to the user. The user has to click the link then enter their registered email address in the 'Forgot My Password' page. The user can reset his/her password In the 'Manage Your Profile Information' page.
To activate a user
- Click the 'Send Password Reset Email' link
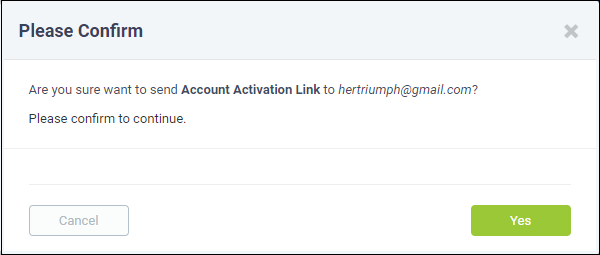
- Click
'Yes' to confirm send the activation mail
An activation email will be sent to the user. After clicking the activation link, the user can configure their password in the 'Manage Your Profile' Information page. Once activation is complete their status will change to 'Active (Registered)'.
Manage
account access /User Information
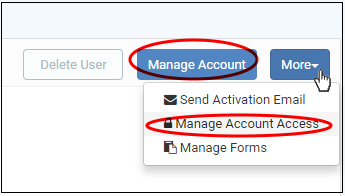
- To manage account access for a user, click their name then the 'More' button. Alternatively, click the 'Manage Account' button:
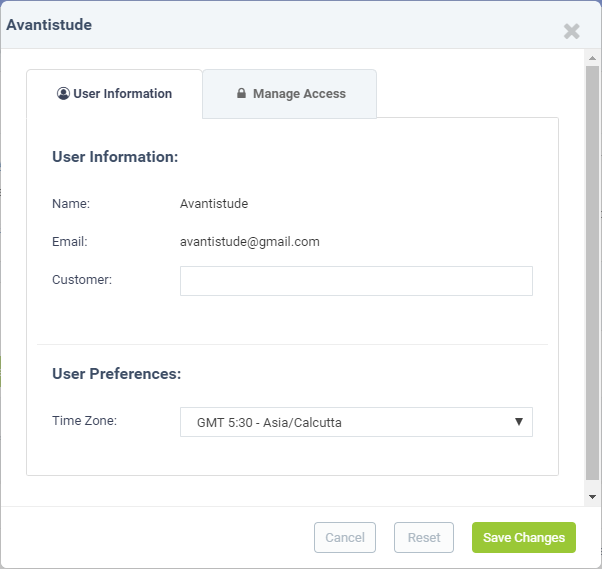
The 'User
Information' tab lets staff change a user's company and time zone:
The 'Manage Access' tab allows staff to configure a user's access to his/her account:
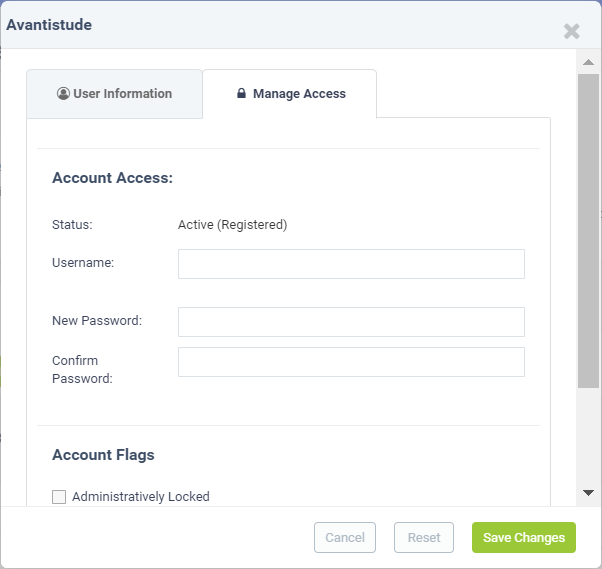
Account Access
- Username: Edit the user email if required.
- Password Fields: Enter the new password and confirm it.
Account Flags
- Administratively Locked: If enabled, the user cannot access the web portal. However, the user can raise tickets via email.
- Password Reset Required: If enabled, a reset password screen will be displayed when the user logs into the web portal.
- User Cannot Change Password: If enabled, the user cannot change his/her password.
By default, the contact information of the user is mandatory and staff members can add more forms to include more details about the user.
-
To add more forms for a user, click on the name link in the 'User Details' interface, then click the 'Manage Forms' link from the 'More' button at the right side.
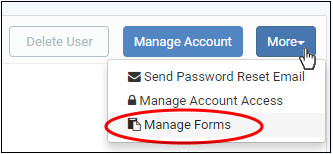
The 'Manage Forms' for the selected user screen will be displayed.
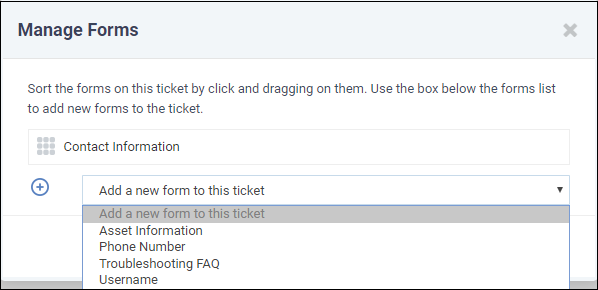
- Select the required form to be added for the user from the drop-down. The forms that are listed here are configured in 'Admin Panel' > 'Manage' > 'Forms' >' Add Custom Form'. See 'Forms' in Service Desk admin guide if you need more details on this.
- Click the 'Save Changes' button.
After adding the new form, staff can update a user's details by clicking their user name in the 'User Details' interface.
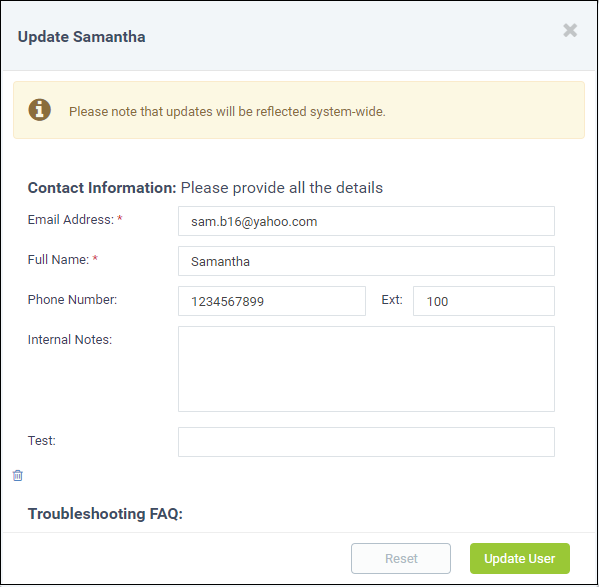
- Fill the details and click the 'Update User' button at the bottom.
- To remove a form for the user, click the 'Manage Form' button and then the trash can icon.
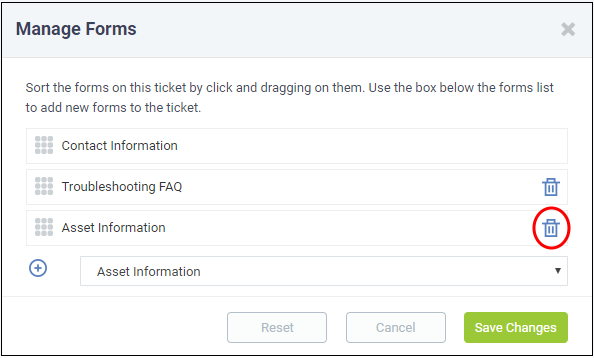
- Click the 'Save Changes' button at the
bottom.
Add a user to a customer company
- You can assign users to a customer to keep track of billable items associated with the user.
- Cost reports in the admin panel show billing details for tickets assigned to a customer
- There are two methods to add users to companies:
- 'User Details' screen – Add users here then assign them to a customer
- Create a customer - Then add users to the customer afterwards. You can create a customer in the ITarian console as follows:
Login to ITarian > Click 'Management' > 'Customers' > 'New Customer'See Manage Customers if you'd like more help with this.
The following example show how to assign users to an existing customer:
Add a user to a company
- Click 'Users' > 'User Directory'
- Click on the name of a user to open their details page.
- Click the 'Add Customer ' link as shown:
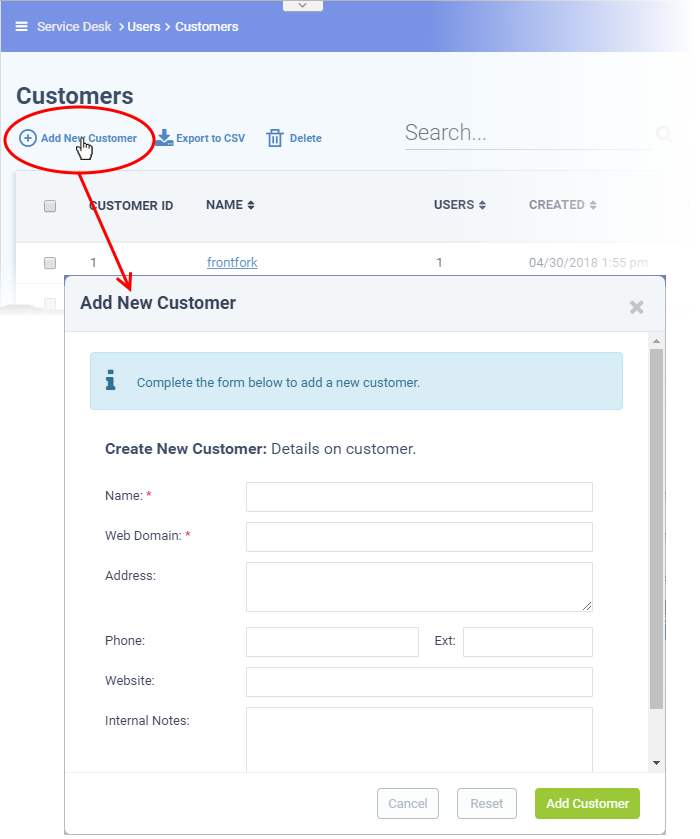
You can assign the user to an existing customer or to a new customer
- Add user to an existing customer - type the first few letters of the customer name in the search field. Select from the suggestions.
After choosing a customer, a confirmation dialog appears with the details of the customer:
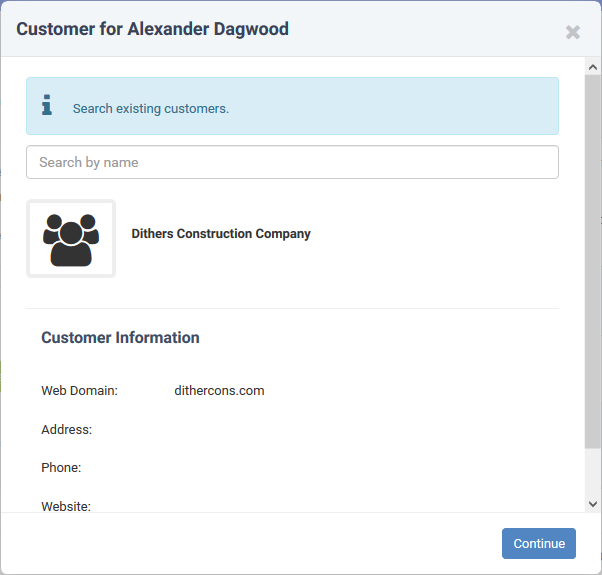
- Click 'Continue'.
The user will be added to the customer.
- Alternatively, complete all fields to create a new customer, then click 'Add Customer':
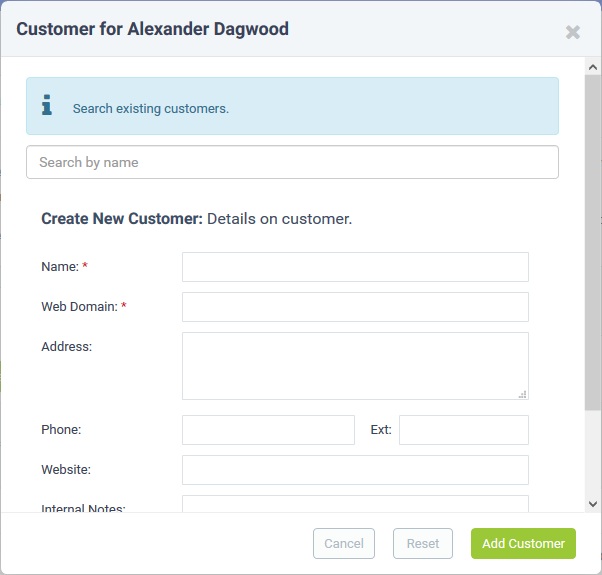
- See 'Manage Customers' if you need help to create a new customer.
Manage tickets raised by a user
Tickets that are raised by a user can be managed from the 'User Directory' interface. This screen enables staff members to view and manage tickets created by users.
- Click 'Users' > 'User Directory' > Click the user name > Open the 'User Tickets' tab to view and manage tickets created by a user.
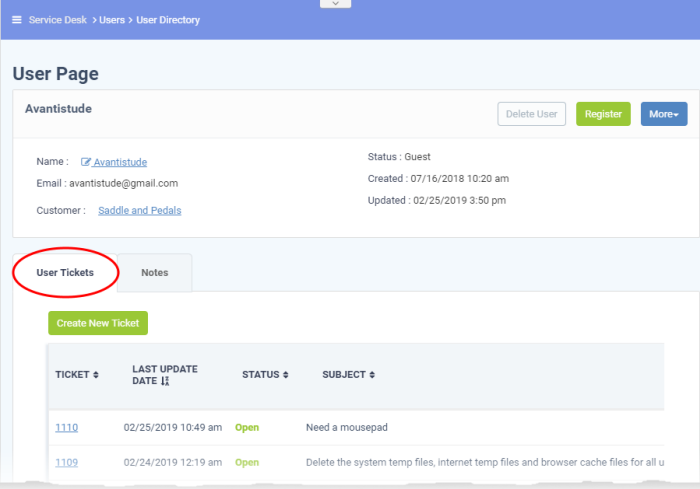
The screen shows tickets created by the user. The most recently created tickets are shown at the top.
Column Headers
- Ticket: The number assigned to the ticket. Clicking on the ticket number will open the 'Ticket Details' screen. See 'Manage Tickets' for more details.
Last Update Date: The date and time the ticket was last updated.
- Status: Indicates the current status of the ticket whether open, closed, overdue or paused.
- Subject: The summary of the issue entered in the Issue Summary text field in the web portal by the user.
- Assignee: The name of the staff member to whom the ticket is assigned.
-
Place your mouse over a ticket to view ticket details.
Create new ticket on behalf of a user
Users may contact staff over the phone about an issue. Afterwards, the staff member has the option to create a ticket on behalf of the user to track the issue.
To create a ticket on behalf of a user:
- Click 'Users' > 'User Directory' > Click the user name > Open the 'User Tickets' tab > Click 'Create New Ticket' button
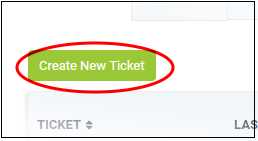
The 'Open New Ticket' screen will open:
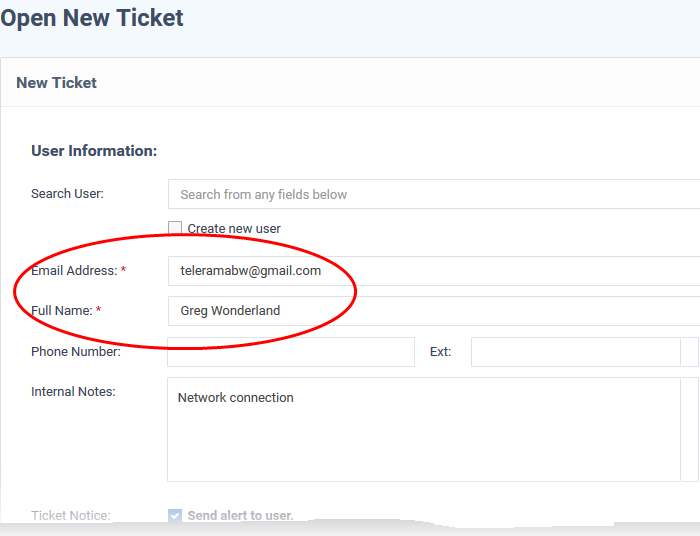
- With the exception that the user name is pre-selected, the form is the same as when creating a new ticket using the normal process.
- See 'Create
a new ticket on behalf of a user' in Manage
Tickets if you need help to complete this form.
Export users list to a CSV file
-
To download a full list of current users, click the Export to CSV' link at the top of the 'User Directory' interface.
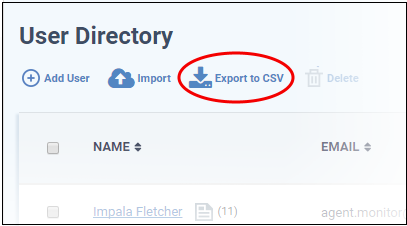
The file be downloaded and can be opened with applications such as Excel or Open Office Calc.
Six columns are displayed by default in the 'User Directory' interface. You can add more columns if you want to view additional details or hide columns that you do not want to be displayed.
- To add or remove columns, click the 'Customize Columns' button:
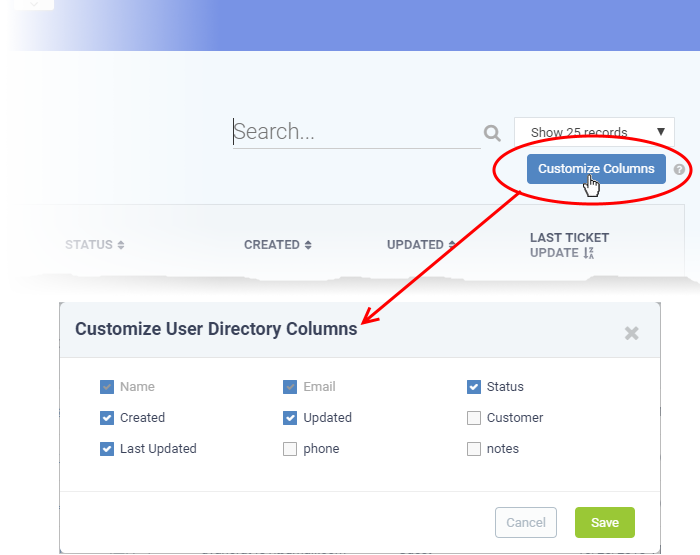
- Use the check-boxes to enable or disable columns as required
|
Note: Mandatory columns appear gray and cannot be disabled. |
- Click
'Save' to add/remove the selected columns to the list.


