Find the desired product help
Select product
SOCaaP
ITarian
Managed AI
ITarian Cloud
IT Endpoint Manager
Secure Internet Gateway
Web Protection
Email Protection
Select version
Auto Discovery And Deployment Tool
Comodo Cleaning Essentials
CRM Admin Guide
Endpoint Manager Guide
ITarian Admin Guide
ITarian Mobile Guide
ITarian Remote Access User Guide
Network Assessment Tool - Admin Guide
Network Assessment Tool - Quick Start Guide
Partner Documentation - Acronis Backup
Quote Manager - Admin Guide
Quote Manager - Quick Start Guide
Service Desk Admin Guide
Service Desk End User Guide
Service Desk Quick Start Guide
Service Desk Staff Guide
Service Desk V2 Admin Guide
Service Desk V2 End User Guide
Service Desk V2 - Quick Start Guide
Service Desk V2 Staff Guide
Technology Assessment Platform User Guide
Select language
English
ITarian
Service Desk Quick Start Guide
English
Itarian Service Desk - Quick Start Guide
>
Step 2 - Create New User Roles (optional)
Itarian Service Desk - Quick Start Guide
Step 1 - Login To The Admin Console
Step 2 - Create New User Roles (optional)
Step 3 - Create New Departments (optional)
Step 4 - Add New Support Staff
Step 5 - Add Ticket Categories
Step 6 - Enroll Users
Step 7 - Create New Customers And Assign Users To Customers
Step 8 - Create Service Contracts For Organizations
Step 9 - Manage Tickets
Step 10 - Manage The Knowledgebase
Step 11 - Access Control Settings
Step 12 - Configure Auto-response Emails
Step 13 - View Reports
About ITarian
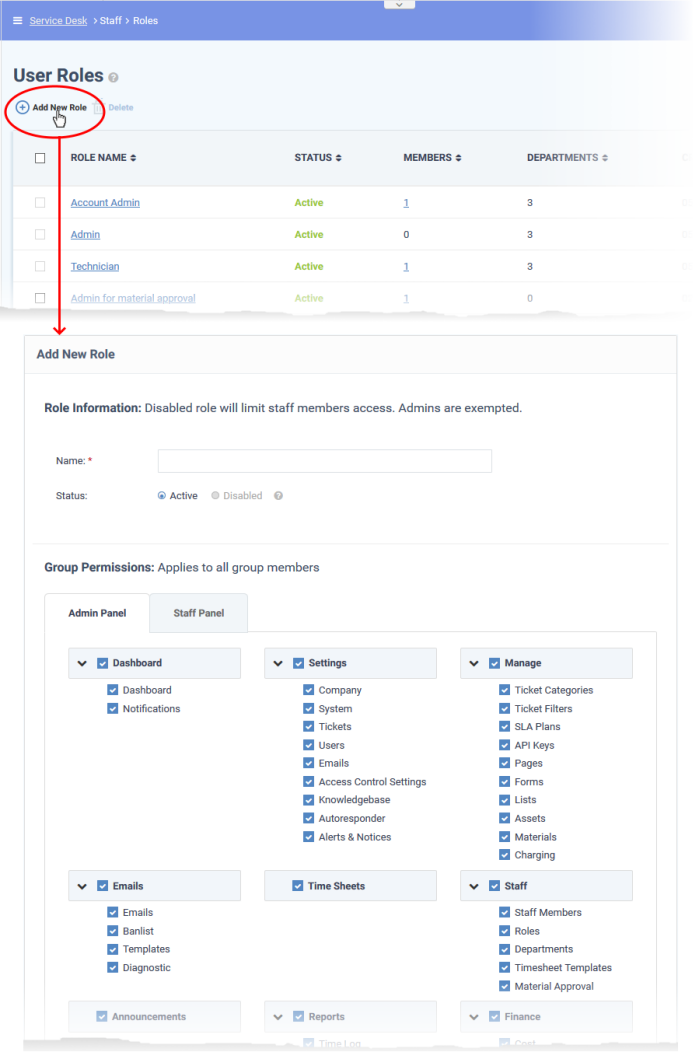
Step 2 - Create New User Roles (optional)
Click 'Admin Panel' > 'Staff' > 'Roles'
Roles determine the permissions and access rights that staff members have within the Service Desk interface.
Click 'Admin Panel' > 'Staff' > 'Roles'
Roles determine the access rights of staff members and administrators in
Service Desk
.
You can add new roles and change the role of a staff member at any time, so you may skip this step for now if required.
However, before adding new support staff members, you may wish to create custom roles for them.
By default, service desk inherits three roles from ITarian:
Account Administrator
Administrator
Technician
Staff members added through ITarian are imported into Service Desk with the role assigned to them in ITarian. You can change this role as required.
You can assign one of the default 'Administrator' or 'Technician' roles to your new Service Desk staff.
You can also create custom named roles with different permissions:
Create a new role
Open the admin panel (see the last link on the left)
Click 'Staff' > 'Roles'
Click 'Add New Role' at the top:
Enter the name for your new role and specify the permissions that should apply to its members in the 'Admin Panel' and 'Staff Panel' tabs.
Select the permissions and privileges that can be given to the members assigned with the role.
The 'Department Access' section allows you choose which departments can be accessed by members with this role.
Add admin notes if required then click 'Create Role' to add your new role.
The new role is listed in the 'User Role' interface and can be applied to new staff members at any time.