


Step 6 - Enroll Users
- 'Users' are the individuals who submit tickets to your support team. They can submit tickets via your support center, by email, or direct from an Endpoint Manager device.
- Your client portal URL has the format https://company-name.servicedesk.comodo.com
- Users that self-enroll will be sent an account activation mail
- Admins can also manually enroll new users:
- Click 'Staff Panel' > 'Users' > 'User Directory' > 'Add New User' OR 'Import'
- All users, regardless of enrollment method, can be added to a customer as explained in step 7.
- You can set the default registration method for manually enrolled users in 'Admin Panel' > 'Settings' > 'Users'. See the online help page at https://help.itarian.com/topic-452-1-949-13131-User-Registration-Settings.html for more details.
Enroll new users
- You can add users individually or import them from a .csv file.
- Users must be registered in order for them to login Service Desk to create and track tickets.
- You can assign users to customers in the 'Customers' screen (‘Staff Panel’ > ‘Users’ > ‘Customers’).
- Open the 'Staff Panel'
- Click 'Users' > 'User Directory'
- Click the 'Add New User' link:

The fields available in the form shown above are fetched from the built-in contact information. Contact information can be configured in 'Admin Panel' > 'Manage' > 'Forms' > 'Contact Information'. See https://help.itarian.com/topic-452-1-949-13143-Forms.html for more details.
Email Address: Enter the email address of the user. After registration, this email address acts as their username to log into your support portal.
Full Name: Enter the user’s first and last names.
Phone Number: Enter the user’s contact number.
Internal Notes: Type any remarks you feel you need to add about the user.
Register with Default Settings: Enable to enroll the user with the default registration method. Disable to register with a different method.
- You can view/change the default registration method at ‘Admin Panel’ > ‘Settings’ > ‘Users’. See https://help.itarian.com/topic-452-1-949-13131-User-Registration-Settings.html if you need more help with this.
- It may be ‘Register users manually’, ‘Register users with an activation mail’, or ‘Register with a temporary password’.
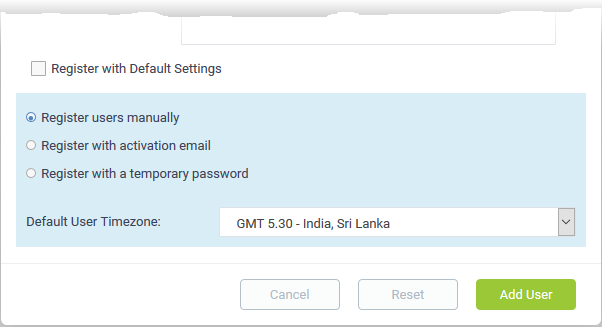
- Register users manually - The user is initially added a guest and needs to be manually registered afterwards. You can register a guest as follows:
- Click ‘Users’ > ‘User Directory’ > click on the name of the guest > Click the ‘Register’ button
- See Register a user for more details.
- Register with activation email - The user is initially added as a guest and sent a mail which contains a link to register their account.
- The link leads to your support web portal where the user will create a password and so register their account. After registration, the user can login and manage/view their tickets.
- Register with a temporary password - Create a temporary account password which registers the user immediately.
- You need to send the password and URL of your support portal to the user. This allows them to login and manage their tickets.
- 'Require password change on first login' - Enable to force the user to create a new password after first login (recommended):
- Default User Timezone - Select the time zone to which the user belongs from the drop-down
- Click 'Add User'.
The user is added as a guest or registered user depending on the registration method. Once registered, you can manage their account and assign them to a customer company.
- Open the 'Staff Panel' if it isn't open already (last link in the left-hand menu)
- Click 'Users'
- Click 'Import' at the top

There are two ways to import users:
1. Copy Paste - Import users with name and email address only.
- Enter the user's full name, followed by a comma, then their email address.
- Add more users in subsequent lines.
- Click Import Users' to add the users as guests.
2. Upload - Import users from a .csv file. More details can be added about a user with this method.
- Create a .csv file of users that you want to import. The file should have the following column headers:
Email,Name,Phone,Notes,"Customer ID (Optional)
- Each
line should contain the contact information of a single user
- Save the .csv, then click 'Browse' to upload the file to Service Desk:
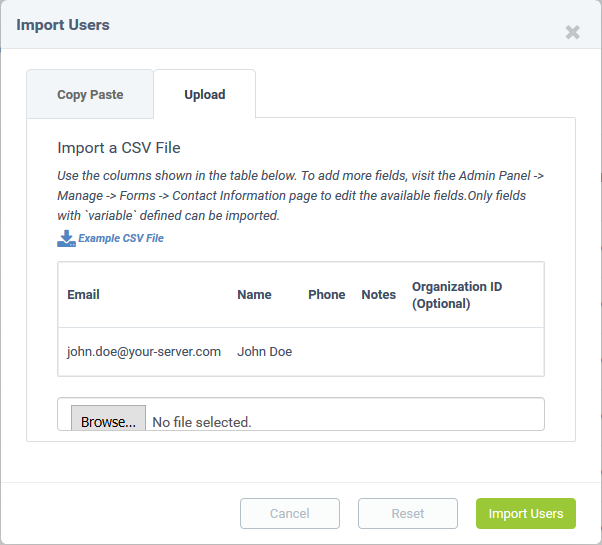
|
Tip : Click 'Example CSV File' to download a sample file. |
Depending on
your settings, imported users will be added as guests, or their
account activation started.
You can
configure default registration settings in 'Admin Panel' >
'Settings' > 'Users'. See https://help.itarian.com/topic-452-1-949-13131-User-Registration-Settings.html if you need further help with this.