

Configure Agent Profile
- Agents are the Technicians/Staff's who work in your company/organization. An Agent is the one who is going to handle the various dimensions of your support portal and the tickets of the end-users.
- This module shall enable you to create and view list of all the agents, to whom you have provided access of the Faveo system. When you create a user, you can give them a username and signature and assign them to a role (either agent or administrator), then assign them to department and team.
- Go to Admin panel > Staff > Agent > Create agent
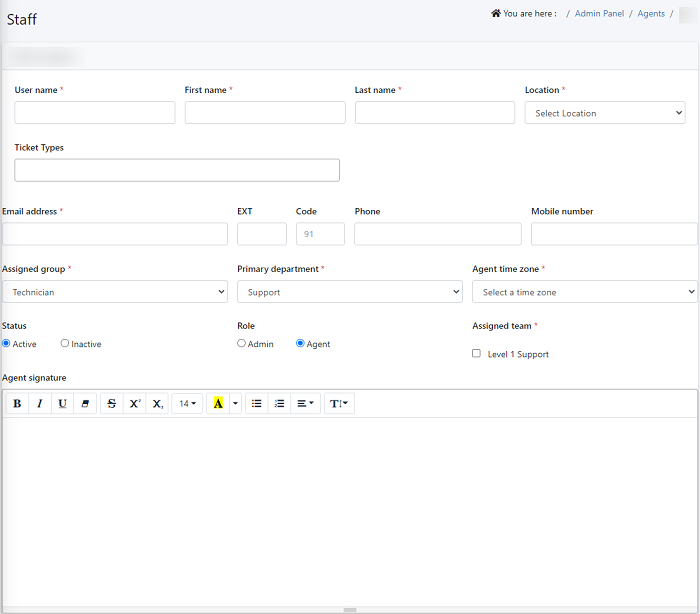
- User name, first name,last name and loacation are mandatory fields, to be filled in the Agent information. When the location is recorded for the agent it is used in auto assigning tickets for the agent.Every field marked with * is mandatory.
- Add the ticket types you want to assign to an agent
- Specify the email address of the agent in the email section . Here you can also have a user email id as user name. The specified user name is used while login.
- Once you enter the email address, the system will check if this is an existing user on your account. If so, you will be notified with the validation message.
- You can add the mobile number of an agent.
Primary Department: You can assign your agent/ admin to a specific group or department by selecting a department from the drop down menus or create one. (refer to department section).
Agent Time zone: Select the user’s time zone in the drop-down menu.
Status: Ensure to keep the agent's status set to Active -- this will allow the user(agent/ admin) in this case to use the system
Role: You have an option to make the user role as an admin or agent. Kindly do so by clicking on the corresponding radio button.
- Admin: An admin can access the entire system and make the necessary changes.
- Agent: While an agent can work on the tickets only.
Agent Signature: Create an Agent Signature, to give every agent a unique identity. This signature will be attached to their reply in a ticket.
- Click on 'Submit' to retain the agent details and continue.
Modifying and deactivating agent's profile
Admin and the authenticated agent is allowed to create, edit, view, and deactivate the agent's profile.
There are a few rules when it comes to modifying or deactivating an agent's profile:
- You cannot delete yourself (your access).
- If you’re an Admin or authenticated agent, you can edit or deactivate the profile of other Admins and agents.
- Here agents are allowed to edit and update their own profile. Authenticated Agents are allowed to access another agent's profile.
To edit an agent profile
- Go to Admin Panel > Staff > Agents
- Click on the edit icon in the 'Actions' column and Update the agent's profile and save it.
To edit my profile (Agent Panel):
- The agent can log in to the support portal as an Agent.
- Click on the user name (Agent Name) at the upper right corner of the page.
- Click on the Profile button.
- Your (Agent) Profile page is displayed, click on the Edit icon.
- Edit the details and click on the Update button to save the updated changes.
Example:
Once a ticket is created by the requester, the agent to which the ticket is assigned will receive an email notification. As an agent, you can view the list of tickets assigned to you or your departments, once you logging into the system. If the ticket is assigned to the agent, he/she can reply to the ticket and resolve it on time.