Service Level Agreements (SLA)
- Service Level Agreement (SLA) plans are an agreement between you and your customer. They define the length of time before a first response must be sent on a ticket, and the length of time by which the ticket must be closed.
-
When customers submit a ticket with some priority, the tickets should be responded and resolved within the specific time frame.We can select when we need to respond and resolve tickets depending on priorities
-
Admins can set alerts if the SLA plan is breached.
- Click 'Admin Panel' > 'Manage' > 'SLA Plan'


- Name: The name of the SLA. For example, you could name plans after the customer to whom they apply.
- Status: Indicates whether the SLA is enabled or disabled. Only active plans have an effect on tickets.
- Grace Period: This indicates the number of hours needed to resolve the ticket. For example: 6 hours, 12 hours, 18 hours and so on.
- Created: The date on which the SLA was created.
- Last Updated: The date and time the SLA was most recently updated.
- Actions: Used to edit or delete a added SLA
Create a new SLA
- Click 'Admin Panel' > 'Manage' > 'SLA Plans'
- Click 'Create a SLA Plan' at the top:

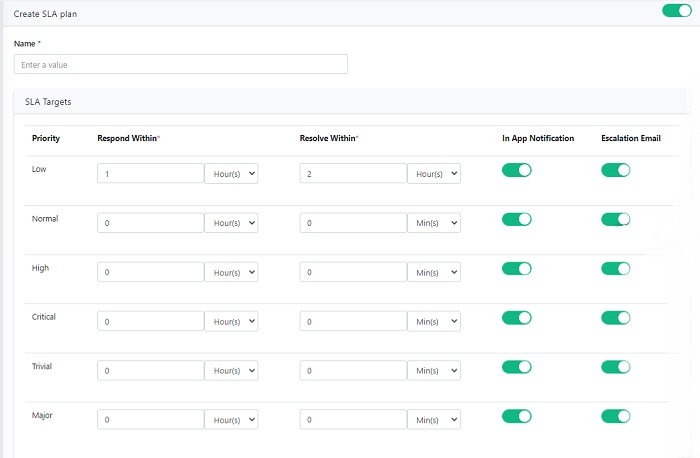
- Add the Name of the SLA. You will have to define SLA targets for each ticket priority like low,normal,critical with different response and resolution Time. You can also set different times for different SLA Target.

- You can also enable/disable the every SLA In-App notification and Escalation Emails by a toggle on the button.
- Respond Within: Set the time within which the agent is supposed to send the first response about the ticket to the user, intimating him regarding tickets and reply on the ticket.
- Resolve Within: Set the time by when the ticket is expected to get resolved. If the ticket is not resolved at the specified time it will be marked as Over Due.
- In-App Notification:
- By toggling on the “In-App Notification”, an in-app notification will be sent in the application.
- If you make this OFF in-app notification is disabled.
- Escalation Email:
- By toggling on the option escalation email is sent to the concerned recipients.
- If you make this OFF, escalation email will not be sent.
- Click 'Add New Rule' to create a new SLA condition
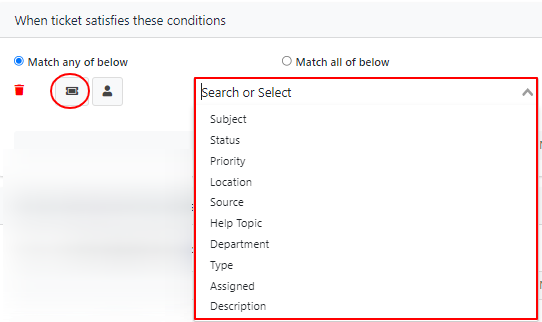
- Set up the conditions based on when you want this particular policy to be triggered. Here are the various conditions you can use to trigger a specific SLA.
- Select 'Match any of the below' or 'Match all of below' to deffine the conditions.If we select 'Match all of below' and configure the SLA condition according to this,the ticket check this condition while meeting the SLA
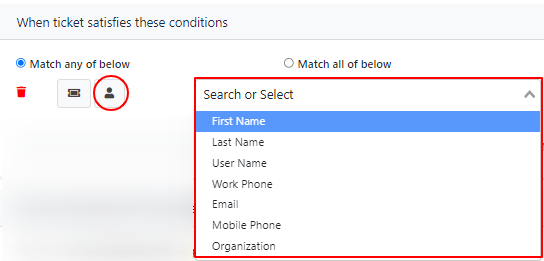
- You can set different conditions based on Ticket Properties or Requester Properties to enforce it on the ticket.
- Click the 'Ticket field' annd select the ticket categories from the drop down list.Set the conditions according to the categories you have selected

- Click 'User field' and select the user details like first name,email etc from the drop down list and set the conditions

Set due date approaching alerts
- When ticket first response time approaches, notify: You can specify the timing in Hours/Minutes/Days/ and the specific members to whom it should be notified.
- When ticket first resolution time approaches, notify: You can specify the timing in Hours/Minutes/Days/ and the concerned members to whom it should be notified.
Set due date viloation alerts
- When ticket first response time is violated, notify: Escalation time can be set, when the ticket is not responded even after the response reminder, escalation reminder is sent for the selected members
- When the resolution time is violated, notify: This rule can be given for the tickets which are not resolved on time even after the resolve reminder is sent.
- Click 'Add New Rule' to add multiple SLA rules
- Enter a Admin note for ex : SLA 1
- Click on the 'Create' button to save the newly created SLA Plan.
- You will need to define at least one trigger condition for each SLA Plan. Remember - the order of your SLA policies is important. If you have multiple SLA plans, the first one with matching conditions will be applied to a ticket based on the order of the SLA.
- When no conditions are matching to a ticket default SLA is added.
- Click 'Admin Panel' > 'Manage' > 'SLA Plans' > click 'Edit'
- Edit the details where you need to change,Click 'update' to save your changes
- Click 'Admin Panel' > 'Manage' > 'SLA Plans' > click 'Delete'
- When you delete an SLA which is added on a ticket, Default SLA is Picked and enforced.You are allowed to reorder the SLA based on the conditions set.

