

Manage Users
Click 'Agent Panel' > 'Users' > 'User
Directory'
- The user directory area lets you add and manage
users. Users can be manually added to
service desk or imported from .csv. You can also assign users to customers as
required.
- There are two ways you can register a user:
- Send an enrollment email with an account
activation link
- Set a temporary password for the user to login
to the support portal
- The user directory shows all registered users. Agent
can add, remove and update users as required.

- Search
field - You can view the details of a particular user by entering his/her
name, username, email id or phone number in the search field.
- View
Options - You can view the users on the screen based on the number of Agent
users, Client users, Active users, Inactive users, deleted users and Banned
users
- Export: This helps you export the list of users to an excel sheet based on the range you select. It creates a separate CSV File. Click Export User detailsto know more about this
Agents can perform the following tasks in the user directory:
- Create User
- Edit a user
- View and manage user profile
- Export User details
The user directory shows basic details about each user in six columns. The following is a list of all possible columns:
|
User Directory - Table of Column Descriptions |
|
|
Column Header |
Description |
|
Name |
The label of the user. Click on the users name to view the tickets
they have created |
|
Email |
The email address of the user |
|
Phone |
The contact phone number of the user as registered with service desk |
|
Status |
Indicates whether the added user is active or inactive. If a user is
active it will show as ‘true’ if not will display as ‘false’ |
|
Last Login |
Date and time of last login activity of a user |
|
Role |
Displays the role of registered user. To change a role click ‘view’
> ‘Change role to user’ or Change role to agent’ |
|
Actions |
This tab helps to edit the user profile and view the user profile.
Click ‘Edit’ to edit the user details and click ‘update’ to save your
changes.
|
Create User
- Click 'Users' > 'User Directory'
- Click the Create User' link at the top

- Enter the First name, Last name and User name in
the specified boxes.
- Choose the organization name from the list, which the user belongs to.
- The Email and Mobile Phone details that are
specified are accessed for user verification and sending email alerts and
notifications.
- Select the Status as ‘Active’ if you want to
enable your user profile or select ‘Inactive’ to disable the profile
- You can add the ‘Internal notes’ in the
mentioned filed. Here the notes written can be shared with the agents/admins.
- Once the user details are filled click on the ‘Submit’ button to save the details.
- When the user mail id is registered in the system, A registration confirmation email and an email verification mail with password is sent to the user. Once the users access the link their details are verified then the user is activated. Now they’ll be able to log in and access the system.
Edit a user
- Click 'Users' > 'User Directory'
- Click ‘Edit’ button of a user which you want to edit details.
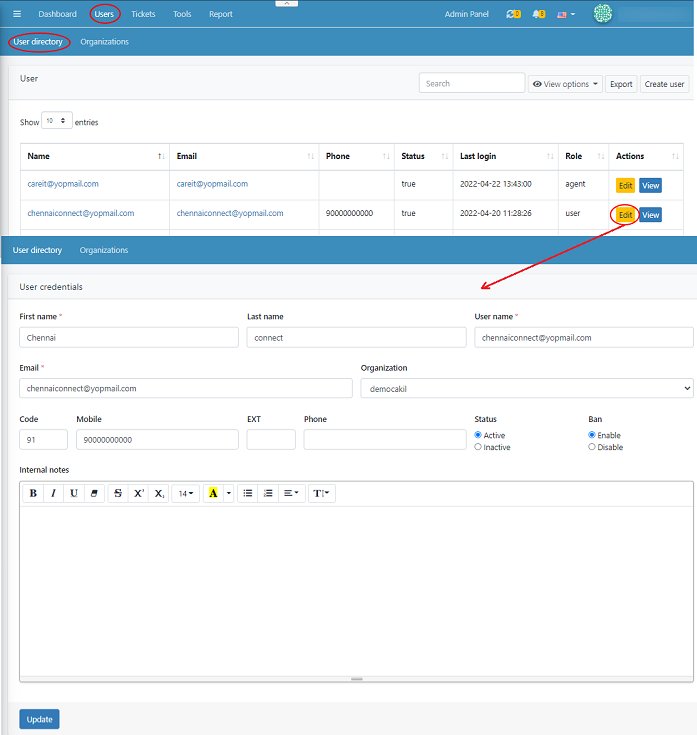
- In case if you want to edit the user role, you
can change the desired filed added here.
- If the user is not active you can deactivate the user profile in ‘Status’ > ‘Active’/’Inactive’ When the deactivated user tries to create a ticket, it will move automatically to the Spam folder.
- Click ‘Update’ to save your changes.
View and manage user
profile
To view and manage user's profile:
- Users > User directory >
Select the user whose profile you wish to view > click ‘view’
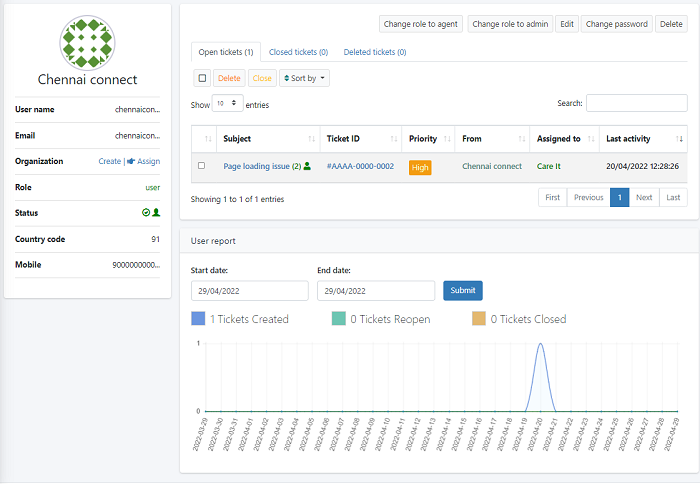
- This gives an overall view of the user, which
includes the number of tickets opened, closed and deleted.
- You can change the role of the user to either Admin or Agent by selecting ‘Change role to agent’/ ’Change role to admin’ and merge them accordingly. Also, the password can be changed in the user profile.
- You can manually verify a user’s email id and
phone number. The green tick symbol pointed out by the arrow mark can be used
to activate/inactive the user.
- We also have an option to delete the user from
the system. Deleted users will not be allowed to login to the system or create
tickets.
- Clicking on edit will take you take the create user page where you can edit the details.
View Ticket Details
- You can view the number of ‘Open ticket’, ‘Closed tickets’ and ‘Deleted tickets’ of a user. This area describes about the ticket subject, id, priority, from, assigned to and last activity of a user

- To delete a ticket > Select a ticket you want
to remove >click ‘Delete’
- To close a ticket > Select a ticket you want
to close >click ‘Close’
- You can sort the ticket by ‘created at’ date of ticket created and ‘Last activity’
Agent Report
- Click ‘Users’ > ‘User directory’ > Click 'View' > ‘Agent report’

- You can get the user report in graphs by
entering the start date and end date.
- The blue colour denoted for ‘Assigned tickets’,
green shows the ‘Reopened tickets’ and orange colour used for total number of
closed tickets.
- Move the cursor in the chart to view the tickets created in a particular day
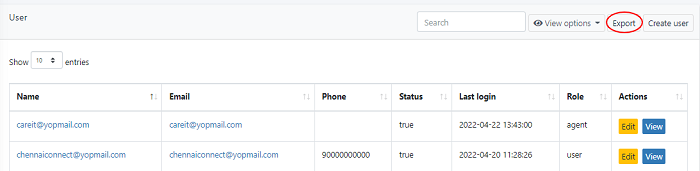
Export User details
- Click Users > User> click Export at
the upper right of the page
- This helps you export the list of users to an
excel sheet based on the range you select. It creates a separate CSV File
- This will display a page where you can select
the data range for which the user details are to be exported. The user details
are exported only for the selected date range and between the date range
registered users’ details.
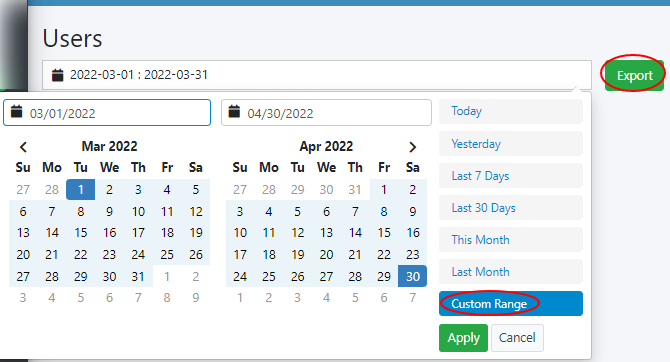
- You can select your custom range dates from the given calendar > click ‘Apply’
- Click on the ‘Export’ button to get the users details as exported .xlsx format. Your exported file gets downloaded and available in your system.