View and Manage Departments
- Departments are the administrative service groups of the company, created to organize the tickets. You can organize field technicians(Agents) into different service groups(Departments)
- A manager can be assigned to each department, choose the email account that each department will use to communicate with customers. Any communication/ticket received via email will be assigned to a relevant department.
- When you have different departments, it is easy to categorize and assign the tickets of your end-users to agents for resolving. Here, Admin is allowed to create, edit, delete and view the department details.

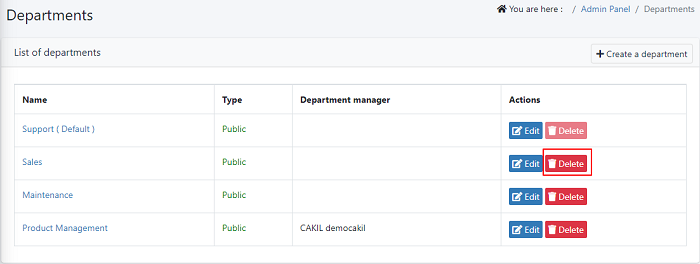
- A list of available departments can be seen here.
- Click ‘Create a department’ button to create a new department.

Name - Add a name to your department in name text field for ex: Support, Sales, etc.
Type - You can set the department type as Public/Private. The department visibility in the drop-down is shown for the agent or client when they create tickets based on the option selected here.
- "Private" - Department will not show in the create ticket form when the client is creating a ticket from the portal.
- "Public" Department is visible in ticket forms for everyone i.e, admins, agents as well as clients.
Outgoing email - Enter the email id that the department will use to send an email to the clients. whenever any activities are made on the ticket. It can either be a system default email or you can select any email id from the drop-down to send outgoing emails.
- There is an option to have a system's default department signature by selecting the checkbox just below the department signature box.
- Click on 'Submit' to retain the department details and continue.
Edit a department details:
- Navigate to Admin Panel > Staff > Department.
- Click on the edit icon in the 'Actions' column and update the department details and save it.
Delete a department
- Navigate to Admin Panel > Staff > Department.
- Click on the Delete icon in the Actions column to delete the department.


