

Email Configuration
Click 'Admin Panel' > 'Emails' > 'Emails'
- This area lets you add and manage your support addresses.You can also choose a protocol for incoming emails (IMAP or POP3) and the transfer protocol you want to use for outgoing emails. Before you create a department email on your Faveo systems, it is mandatory that you have existing email account of any domain that is functional and accessible.
- You can view the added email list here.The system default email cannot be edited or deleted
Create a new email
- 'Admin Panel' > 'Emails' > 'Emails'

Here you can view the added email list
- To create a new email > click 'Create email'
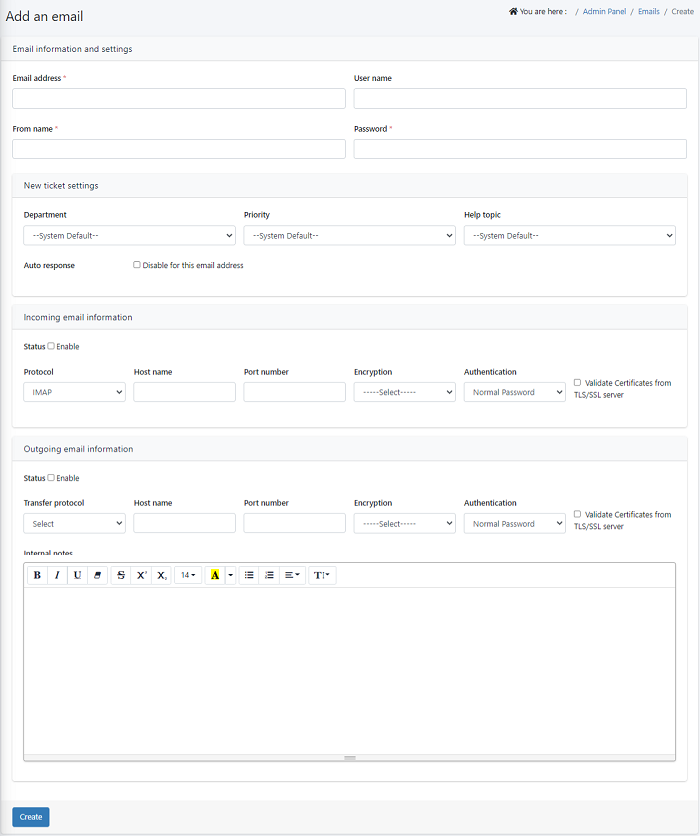
Email address: Enter your existing email id
Username: Add a user name in the specified boxes.
From name: Provide the name that you wish to share with the clients, this will be visible in the subject line of the email sent to the client.
Password: Enter the password that you use to login into your existing Email account.
New Ticket Settings
Department: Select a department from the existing list to assign the emails.
Priority: This helps to prioritize the tickets. Select priority (such as low, normal, high, or emergency) that will be set as system default for this Email Id. However you can edit this anytime.
Help topic: This helps to categorize the incoming tickets for example you can assign help topic as “support query”.
NOTE1: If you do not provide “NewTicketSettings”, the email will be assigned to the system’s default department and incoming tickets will be given a default priority and category.
NOTE2: If you do not want your user to receive an auto generated response on submitting the ticket, you can disable the auto response for this email address by clicking the checkbox next to auto response.
Incoming Email Information
You can configure the email protocol for your incoming emails
- IMAP
- POP3

- You need to select your protocol IMAP/POP3 server name for incoming emails.
- Specify the Hostname, Port number in the text box and select the encryption, authentication method from the drop down list box.
- Also click on the checkbox if you want to validate certificates from TLS/ SSL server.
Outgoing Email Information
You can choose the outgoing mail protocol to send out automated response emails for your customers.
Under Outgoing Emails, you need to select the transfer protocol from the drop-down list to configure the email for outgoing emails.

- To send outgoing emails to client's you can use different transfer Protocols given below .When you select the different protocols you have to configure different hosts, ports, encryptions, and authentication
- Specify the outgoing email details to receive the emails from the drop-down list.
- Click on the checkbox if you want to validate certificates from TLS/ SSL server.
Internal Notes: You can add any personal notes to refer in the future for “this” particular Email account.
- After completion of the Email configuration, click “Create”. And you have successfully created your Email.