

Manage Tickets
Click 'Agent Panel' > 'Tickets'
- The 'Tickets' tab allows agents to respond to tickets created by users.
Tickets can be submitted to Service Desk using the following interfaces:
- Web portal - Registered users can login to the web portal at the helpdesk URL and create a ticket.
- Email - Users can create tickets by sending a mail to the default 'System Email' for your help desk.
- Agent Panel - Staff and admins can create tickets on behalf of end-users. This may be useful, for example, for requests that were made over the phone or by another communication method. You can also create tickets for issues resolved in the past, but for which no ticket was created. Back-dated tickets are added with a 'Closed' status.
The 'Tickets' interface will have:
- Inbox – Shows the total created or assigned ticket in that agent name
- My tickets - Tickets that are assigned to the person that is currently logged-in. Click the ticket subject to answer, edit, reassign, or add time-spent on a ticket.
- Unassigned - Tickets that have not yet been assigned to an agent. You can assign tickets to agent by clicking the ticket subject then the 'Assign' link at the top.
- Overdue - Tickets that are not completed or closed within the limited period as per the SLA plan.
- Trash – The unwanted or duplicate ticket which is deleted will move to trash
The following sections explain more about managing tickets and creating a new ticket:
- View inbox summary
- Assign tickets to an agent
- To Change a ticket status
- Edit a ticket
- Change owner of a ticket
- Create a new ticket
- View deleted tickets
- Sort and filter the ticket interface
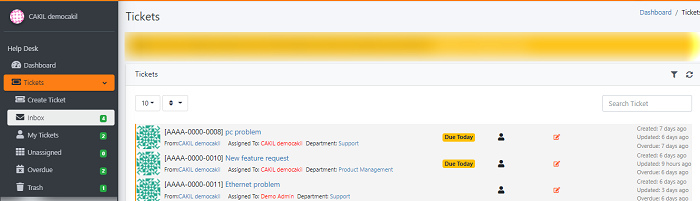
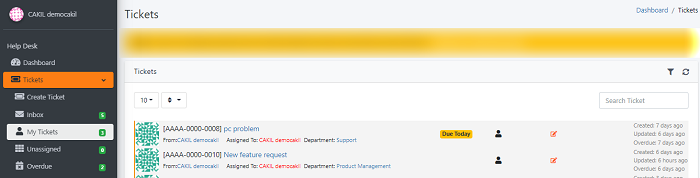
- Go to Agent Panel > Tickets > Inbox
-
Inbox is the area where you can view all the tickets. Each ticket have the ticket id and the subject .
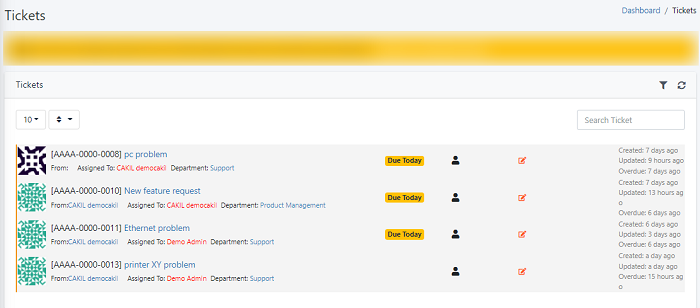
- The ‘From’ denotes that which agent/user is created the ticket.
- Assigned To - The name of the staff member to whom the ticket is assigned
- Department - The name of the department to which to the ticket is currently assigned.
- Due Today Tickets – The due today tickets count of the logged in agents is displayed in the dashboard that shows the implied ticket SLA is due which needs act urgently.
- Created Date - The date which the ticket was submitted.
- Updated at – The date in which agents last action was performed or most recently updated days
- Click a ticket name to view and manage a ticket. When you open a ticket you can view the entire ticket details and conversation between the agent and the user in a particular time period.
- Agent can edit a ticket details ,able to change the ticket status if needed they can assign the tickets to some other agents.
- At actions part, the agent can reply to the ticket with new reply or canned response. The agent can write an internal note for other agents.
- Click on the 'Filter' icon given at the upper right corner of the inbox. Here various fields are given to apply the filter on the specific data.
Here you can specify the properties like Subject/Ticket ID, Requester, Category, Organization, Department, Help Topic, etc…
For example,
- When an agent is trying to filter the ticket only for the specific requester. The filter is applied to the specific fields and click on Apply. The report is displayed for the filters applied in the tickets
- Click Agent Panel > Tickets > Unassigned
- Select an unassigned ticket name which need to be assigned to your agent. It will open to the page of the ticket details.
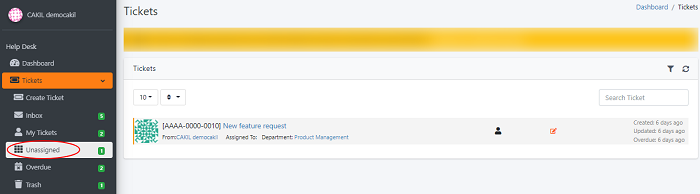
- Here you can view the ticket id, name and the user who created this ticket.
- Click on ‘Assign’
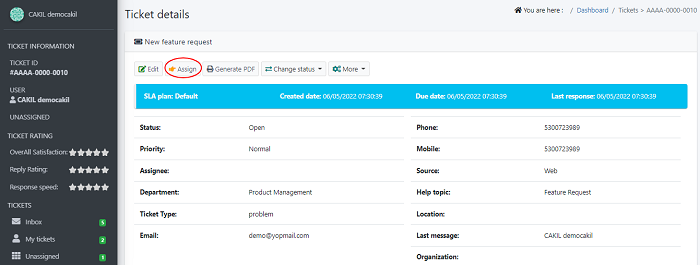
- Select an agent name from the drop sown list that you need to assign a ticket. You can also assign a ticket to a team like ‘support ‘ or click ‘Assign to me’ to assign the ticket to yourself

- Select the name and click ‘Assign’. When the ticket is assigned to an agent it will move to Tickets > My Tickets
- Agents can assign any tickets which is assigned to you to any other agents and you can assign multiple tickets from the inbox or unassigned/assigned and assign them to different agents or teams
- Click Agent panel > Ticket > Select a ticket which you want to change status

- Click ‘Change status’. Now the ticket status is set as open. You can select any status from the drop-down list. If you selected as ‘resolved’ the ticket status will change as resolved.
- Agents have the permissions to edit a ticket details, Click Agent panel > Ticket > Select a ticket which you want to edit
- Click ‘Edit’
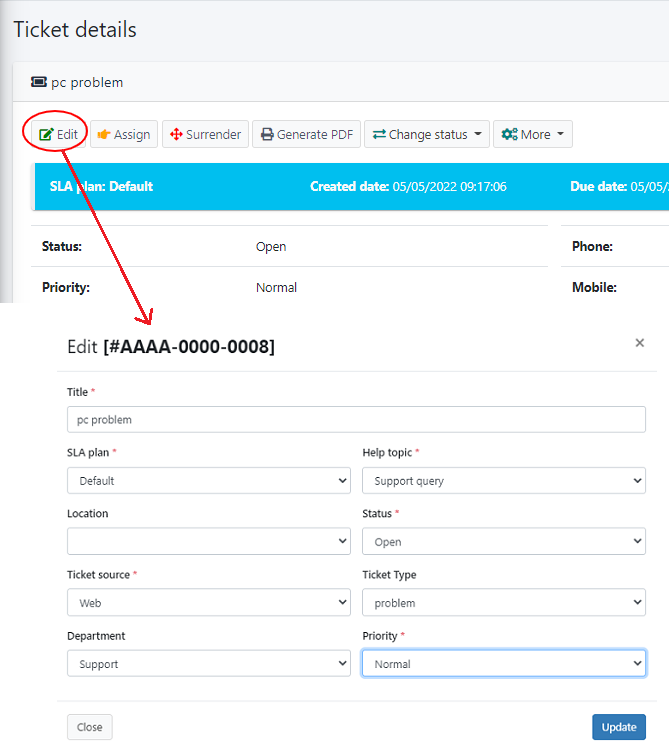
The edit tab shows the ticket id and name of the ticket which you are editing. Select the filed need to edit and choose from the drop down added here.
- Click ‘Update’ to save your changes
- Go to Agent Panel > ‘Ticket’ tab > Select a ticket to change an owner.
- This will display the ticket details interface.

- In the ticket filed click 'More' > Select 'Change owner for ticket'

- Start type the user it will show the list of existing user’s ,you can select from the drop down list
- If user is not added in support system,You can create a new user
- Click 'Add new user'
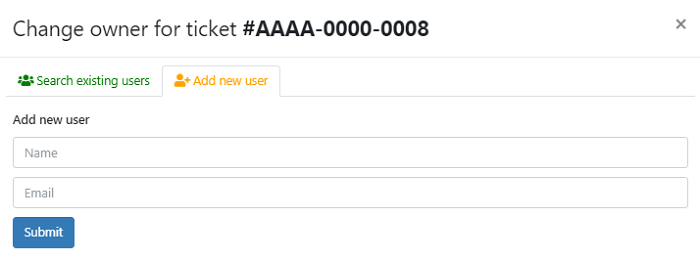
- Add a name and email id in the specified boxes
- Once you add a new owner click 'submit' button to save your changes.When you change the owner the owner details aslo changed in the ticket.The new user details are registered in the system Agent Panel > Users > User Directory.
Create a new ticket
- Agent and admins can create tickets on behalf of users from the 'Tickets' interface.
- Agents can also create tickets for issues that they resolved, but which had no ticket.
- Click 'Agent Panel' > 'Tickets' >click ‘Create Ticket’ Option.
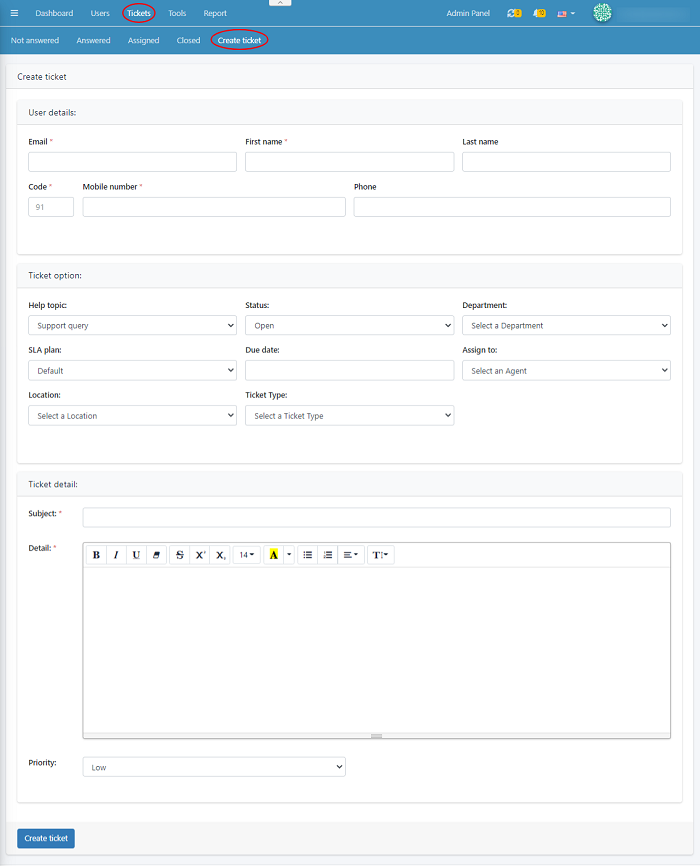
User Details
It will shows details of the user on behalf of whom the ticket is created
- To create a ticket for an existing user:
- Start typing the email ID in the search field and choose the user from the suggestions.
- The details like email address, firstname,last name, phone number will be auto-populated.
- To create a ticket for a new user
- Enter the email address, full name and phone number of the user in the respective fields.
Ticket Option
This tab shows ticket information like department,SLA plan,status and staff to whom the ticket is to be assigned and more.
- Select the help topic from the list for ex: sales or support
- Select the status as open,close,resolved as your requirements
- Department - Select the department to which the new ticket should be assigned. The option chosen here will set even if the 'Department' for the selected 'Ticket Category' is different. If required, staff can change the department.
- SLA Plan - The service level plan associated with the ticket. Use the drop-down menu to change the plan if required.
- Due Date - The date by which the ticket should be closed. You can change the date and time as required.
- Assign To - Select the staff member to whom the ticket should be assigned.
- Select the location of a user and a ticket type
Ticket details
- Add a subject of your issue so it can identify and resolve it quickly
- Enter a brief description about the issue and add the priority Level
- Agent can change the priority while the ticket is in-progress
- Click 'Agent Panel' > 'Tickets ' > 'Trash'
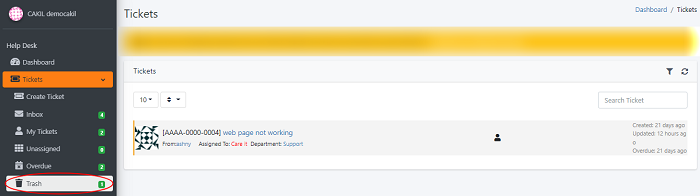
- Select a ticket to view the ticket details.here you can view the status as deleted
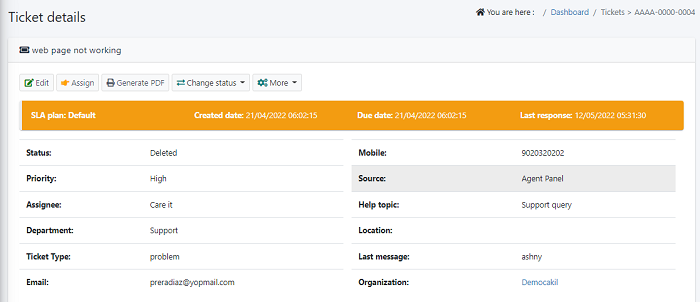
- You can also open a deleted ticket in 'Change status' > click 'open'.OPnce the ticket is reopned it will view in Tickets > My tickets
Sort and filter the ticket interface
The ticket interface lets you to sort advanced search on tickets.The filter field lets you sort tickets by the following criteria :Requester,organization,department,help Topic,type,source,priority and more
- To sort Click 'Agent panel' > open any 'Ticket' interface > click 'filter' button
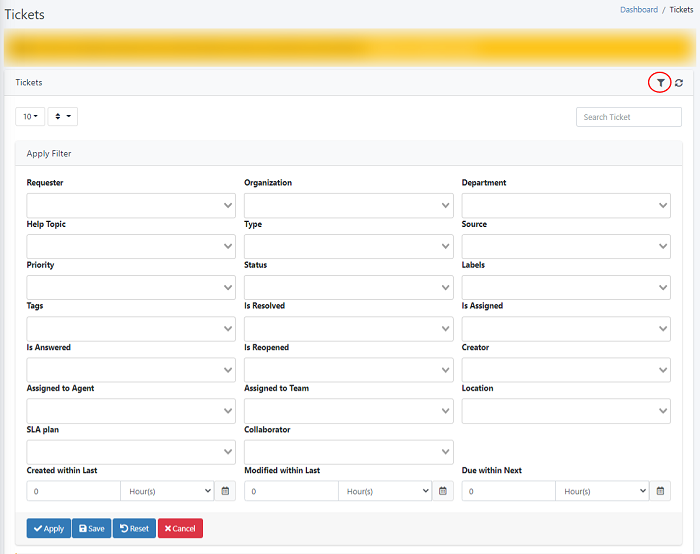
- Start typing your search term matching your criteria will be automatically displayed.
- Select the parameters that you want to use as search criteria.
- Click the 'Reset' button to clear the fields.
- Click 'Apply' button after filling the required search parameters.
- The number of tickets that matches the search parameters will be displayed in the screen.
- Click the name of the tickets to open that matches the search criteria
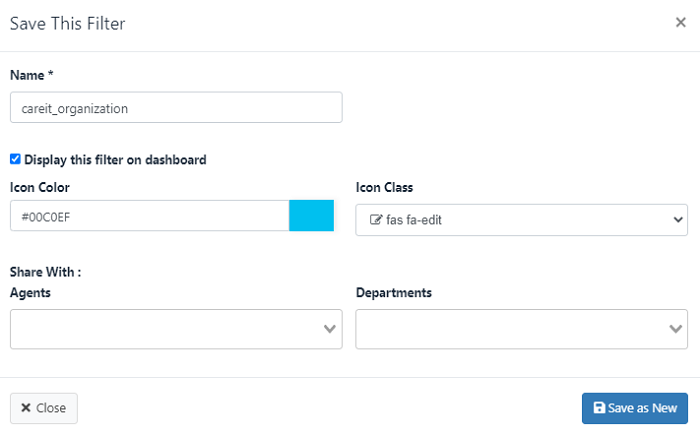
- Add a name in the text filed to save the filter.
- Select the check box if you need to add this filter to ticket dashboard.
- You can aslo customize your icon colour and class from the drop down list.
- Select the agents and department from the list if you need to share the filter with them.
- Click 'Save as new' to save your changes