Import and Export Records
Customer Relationship Management (CRM)
lets you import and export records to and
from various modules.
Import opportunity records
You can import records in .csv or .vcf format.
Prerequisites
- Make sure your imported file contains all mandatory information. For example, 'Opportunity Name' and 'Assigned To' are mandatory for importing opportunities records
- The maximum size of imported files is 3MB
- Make sure you have permissions to import. Administrators may have disabled import functionality at the profile level
Import opportunities records
- Click 'All' > 'Opportunities' to open the 'Opportunities List' interface
- Click the 'Actions' drop-down (above the table opportunities)
- Click 'Import'. The 'Import Opportunities' page will open:
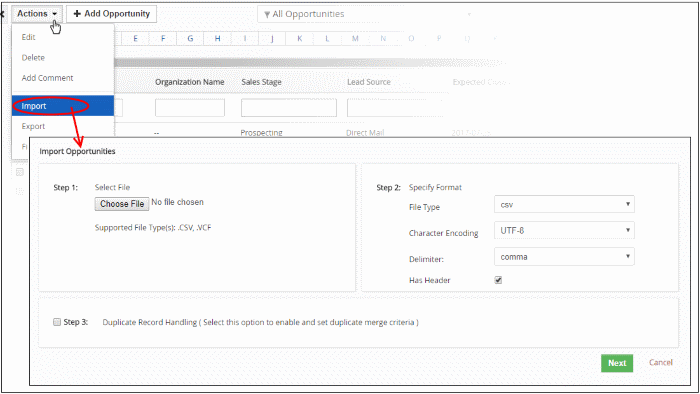
- Select and upload your .csv or .vcf file in step 1
- Specify the format of your import file in step 2:
- File Type - CRM can import .csv or .vcf files
- Character Encoding - Select the character set in which your import file has been encoded
- Delimiter - Choose whether the fields in your imported file are separated by commas or by semi-colons. CRM will not recognize fields that are not separated by a delimiter.
- Header - A header row contains the data labels for the columns in your spreadsheet or text file. For example, 'First Name', 'Last Name', 'Organization Name'. It is usually the first row in the file.
- Select 'Has Header' if your file has headers. You will be asked to map the headers in your file to existing CRM headers in step 4.
- Deselect this option if your file doesn't have a header row.
- Duplicate Record Handling - If enabled, you can specify how duplicate records are handled. The system will compare fields in existing CRM records with those in the file you wish to import. If duplicates are found you can instruct the CRM to skip, overwrite or merge the opportunity record.
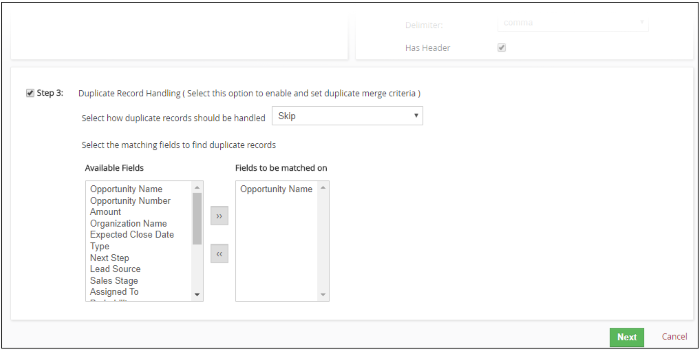
First select the fields you want the CRM to use for duplicate checking. An opportunity that has data in these fields which matches data in the corresponding field of an existing opportunity will be classed as a duplicate. Next, choose a response if a duplicate is found:
- Skip - The CRM will not import the duplicate opportunity
-
Overwrite - The existing opportunity in CRM will be replaced by the imported opportunity
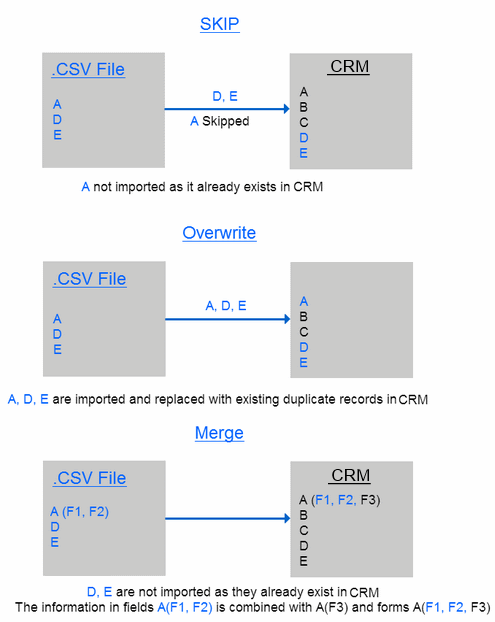
- Merge – Checks the opportunity as a whole and uses information from both records to create a single record in the CRM
If all fields are the same then the opportunity will not be imported as there is no new data
If data in a particular field is different in both opportunities, then the data from the .csv will be imported, overwriting the data in the existing opportunity
If a .csv field contains data, but the corresponding field in the existing opportunity is blank, then the data from the .csv will be imported
- Click 'Next'.
- Map CRM Fields - Map the headers in your .csv to headers in CRM. This is only necessary if you selected 'Has Headers' earlier.
- Fields are automatically mapped if your .csv's headers match an existing CRM field label. Here's a list of helpful tips before you get started.
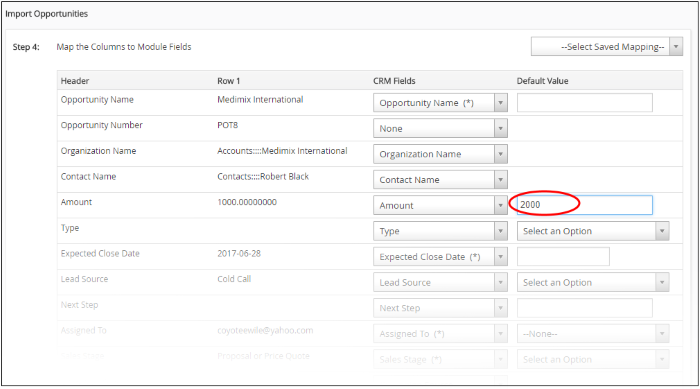
- When there is null value in any of the 'Header' fields in step 4, the default value that you enter is populated automatically in the record in CRM
- You need not have to follow any syntax to relate the records of your 'Contacts' module to the existing records of 'Opportunities' module. While importing contacts, if the opportunity name matches the existing record in 'Opportunities' module, contact is automatically related to it. CRM does spell check across existing opportunity records to avoid redundant data. Also, it is not case sensitive.
- To save and re-use this map, select 'Save as Custom Mapping' and create a short name for it.

- To delete a saved map, select it from the drop-down on the top-right of the 'Import Opportunity' page and click the trash icon.

- Click 'Import'
The results of the import procedure are displayed as follows:
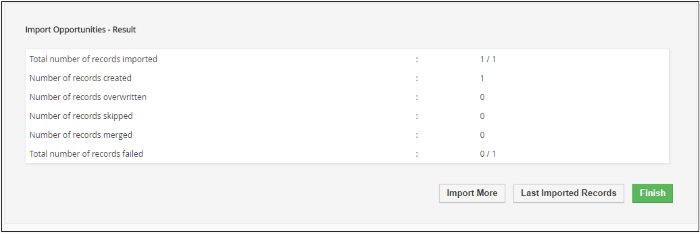
- 'Import More' - start another import process
- 'Last Imported Records' - view recently imported opportunities
- Click 'Finish' to close the results window
Export an opportunity record
- Click 'All' > 'Opportunities' to open the ' Opportunities List' interface
- Click the 'Actions' drop-down (above the opportunities table)
- Click 'Export'. The 'Export Records' page will
open:
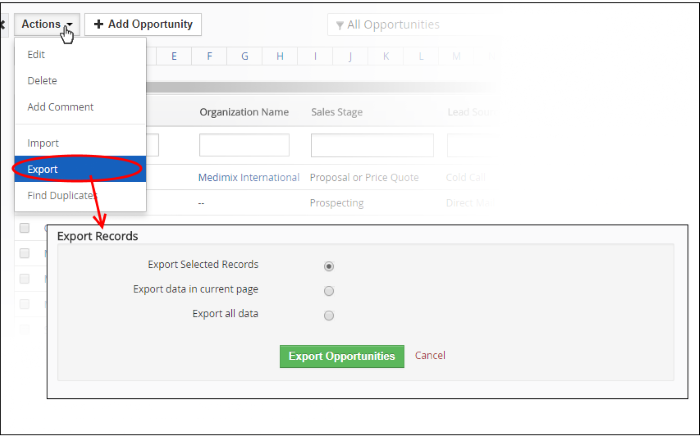
- If you have not selected any records in the 'Opportunity List' page then a 'No record selected' message will be shown.
- Use the radio buttons to choose which data to export. You can export records you selected in the previous step, export all visible records on the current page (default=20), or export all opportunities in the module.
- Click 'Export Opportunities'. Records will be exported in .csv format.


