Add Campaign Records
- CRM allows you to track the progress of any marketing campaign.
- Campaign details can include the product/service promoted, the medium or channel of the campaign, target audience, budgets, expected sales results, return on investment (ROI) and more.
- These details can be dynamically updated as the campaign progresses.
You
can create campaign records in three ways:
- Create a new campaign record manually - See Create a New Campaign Record for details.
- Quick create a record - Create a campaign record with minimal details. Other details can be added later as the campaign gains momentum. See Quick Create a Campaign Record for details.
- Cloning a record - Duplicate an existing record and use it as a starting point to create a new record. See Clone a Campaign Record for details.
Once a Campaign record is added to the 'Campaign List', you can:
- Track the progress and the responses to the campaign and update the details till the completion. See Track Campaigns for more details.
- Add activities like scheduling events, meetings and more for the campaign. The scheduled activities will be reflected in the calendar of the staff member to whom the campaign is assigned for effective tracking. See the explanation under Adding Activities for a Campaign in the section Track Campaigns for more details.
- Associate contacts, leads, organizations and opportunities based on campaign responses and initiate automated emails to them as a part of the campaign activities. See Associate Records from other Modules to a Campaign for more details.
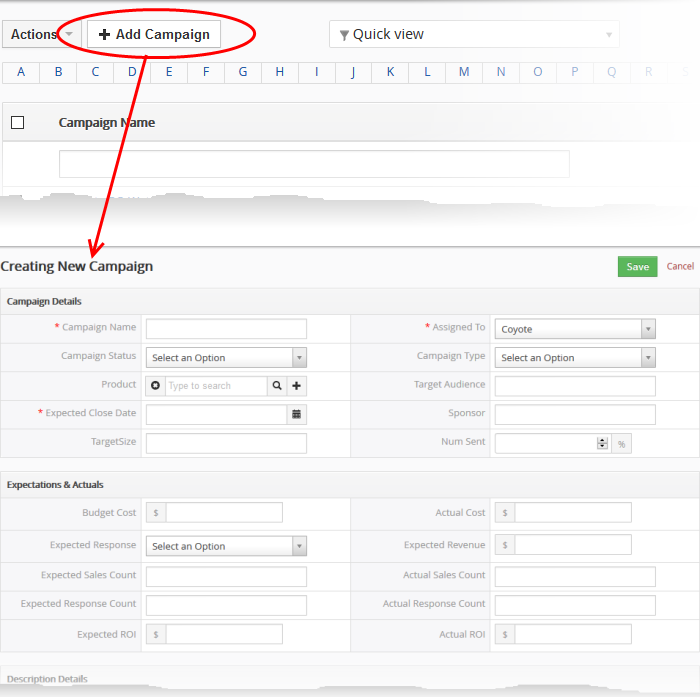
- Click 'All' on the title bar and choose 'Campaigns' under 'Marketing and Sales' to open the 'Campaign List' interface
- Click the 'Add Campaign' button
The 'Create New Campaign' dialog will open to fill in the campaign details and create the campaign record.

|
Form Parameter |
Description |
|---|---|
|
Campaign Details |
|
|
Campaign Name |
Specify a name for the campaign record, shortly describing the campaign. |
|
Assigned to |
Choose the staff member assigned to coordinate the campaign. The selected staff member will be able to access the campaign and update the details along the progress and associate records like leads, contacts and opportunities for further campaign activities like sending automated emails and more. |
|
Campaign Status |
Select the current state of the campaign. The available options are:
Administrators or the assigned staff member can change the status along the progress of the campaign. See Track Campaigns. |
|
Campaign Type |
Choose the channel or medium through which the campaign is conducted. |
|
Product |
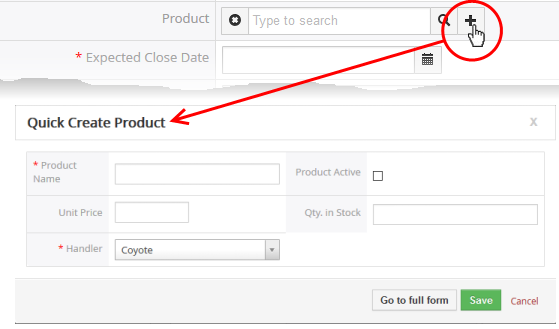
Specify the product or service being promoted
by this campaign. For products already added to CRM:
For new products/services:
See Add a Product for more details. The newly added product will also be added to the 'Products' module for management. |
|
Target Audience |
Specify the type of target audience in the target market, to which the campaign is aimed. |
|
Expected Closing Date |
Specify the tentative date at which the campaign is planned to be concluded. |
|
Sponsor |
Specify the sponsor who has made financial commitment for the campaign. |
|
Target Size |
Specify the number of audience count, to whom the campaign is expected to reach. |
|
Num Sent |
Number of emails sent for the campaign. |
|
Expectations & Actuals |
|
|
Budget Cost |
Enter the amount of money allotted to be spent fro the campaign. |
|
Actual Cost |
Enter the cost incurred so far for the campaign. The cost can be updated along with the progress of the campaign. See Track Campaigns. |
|
Expected Response |
Choose the degree of response you expect to receive for the campaign from the audience |
|
Expected Revenue |
Enter the amount of money you expect to generate as revenue at the end of campaign. |
|
Expected Sales Count |
Enter the number of products that you plan to sell during this campaign. |
|
Actual Sales Count |
Enter the number of products that were actually sold because of this campaign. The count can be updated along with the progress of the campaign. See Track Campaigns. |
|
Expected Response Count |
Enter the number of responses you expect to receive from the audience for this campaign. |
|
Actual Response Count |
Enter the number of responses you actually received from the audience for this campaign. The count can be updated along with the progress of the campaign. See Track Campaigns. |
|
Expected ROI |
Specify the ROI that you expect from the campaign. |
|
Actual ROI |
Specify the actual ROI you received from this campaign. The ROI can be updated at anytime along with the progress of the campaign. See Track Campaigns. |
|
Description Details |
|
|
Description |
Enter a description for the campaign. |
- Fill up the form with the details of the campaign and click 'Save'
Quick Create a Record
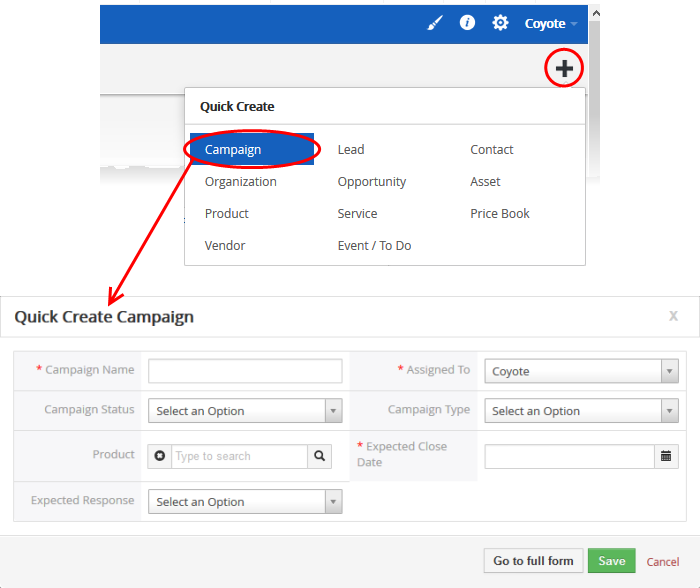
The 'Quick Create' option allows you to create a campaign record from any interface, within a short time. It requires you to enter only the basic details.
- Click the '+' button at the top right from any interface of CRM and choose 'Campaign' from the options.

- Fill-in the campaign details in the Quick Create Campaign dialog. Descriptions of the form parameters are available in the table above.
- If you want to view and enter all details, click 'Go to the full form'
- Click 'Save'
CRM allows you to create a new campaign record using an existing record as a template. You can then edit the cloned record according to the requirements of your new campaign. This is useful when you are creating a campaign record for a product/service for which a campaign exists already, for a new type of audience, using a new campaign type and more.
To clone a campaign record
- Click 'All' on the title bar and choose 'Campaigns' under 'Marketing and Sales' to open the 'Campaign List' interface
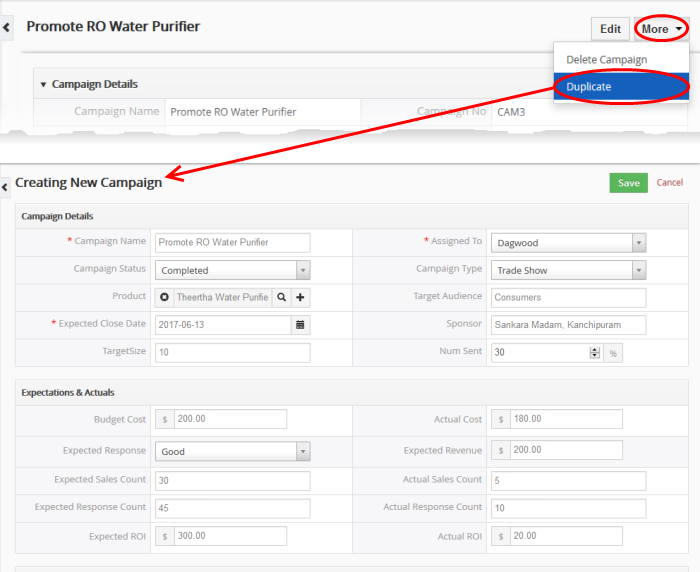
- Click on the name of the campaign record you want to clone to open the the 'Campaign Details' interface
- Click 'More' on the top right and choose 'Duplicate'

The 'Creating New Campaign' form will open with the details populated from the original record.
- Enter a new name for the new campaign
- Edit the details as required. Descriptions of the form parameters are available in the table above.
- Click 'Save'.
The campaign record will be saved and added to the list of campaign records in the 'Campaigns' interface.


