Manage Alerts
- You can create procedures and monitors to track certain activities and generate an alert if their conditions are met. For example, 'Generate an alert if CPU usage exceeds 90%', or 'Alert me when all Windows patches have been installed.'
- The 'Alerts' section contains templates of settings for these alerts. For example 'Send a notification to these recipients...', or 'Create a service desk ticket from the issue'.
- You apply the alert template to the procedure, monitor or discovery scan. You can have multiple templates to address different types of events. For example, you might want the alert for a failed patch to be different to the alert for a system restart.
- In the standard workflow, all procedures, monitors and discovery scan tasks have the 'Default Alert' template applied to them.
- Click 'Configuration Templates' > 'Alerts' > 'Default Alert' to view these settings.
- You can activate or deactivate alerts as per your requirement.
- If you want different alert settings for a specific event then you must create a new alert in this interface. For example, you may want the alert to be sent to specific recipients, or certain metrics to be included in the alert.
- Example:
- Click 'Procedures' > 'Predefined Procedures' > 'Monitors' > 'Alert if a new scheduled Task is Created'. You will notice the 'Default Alert' is used if the procedure fails. If you want to implement different alert settings then:
- Click 'Clone' to make a copy of the procedure. The procedure will be saved in the 'My Procedures' section as '[cloned] Alert if a new scheduled task is created'.
- Go to the alerts section and click 'Create Alert'. Name the alert and configure its settings as required.
- Next, open your cloned procedure and click 'Edit'. Type the name of the alert settings you want to use in the 'Use alert settings...' field. Click 'Save'.
- You can also specify that your new alert settings are used in the 'Monitoring' section of a profile.
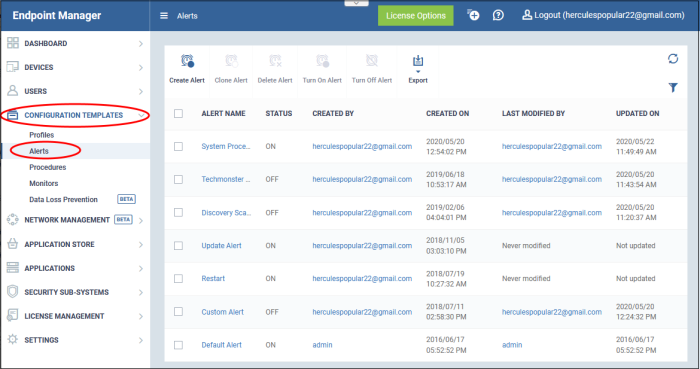
|
Column Heading |
Description |
|---|---|
|
Alert Name |
Label of the alert.
|
|
Status |
Indicates whether the alert is enabled or disabled. |
|
Created on |
The date and time at which the alert was created. |
|
Created by |
The administrator who created the alert.
|
|
Created on |
The date and time at which the profile was created. |
|
Last Modified by |
The administrator who recently edited the alert.
|
|
Updated on |
The date and time at which the alert was last updated. |
|
Controls |
|
|
Create Alert |
Add a new alert. See 'Create a New Alert' for more details. |
|
Clone Alert |
Create a new alert by cloning an existing alert and modifying its settings as required. See 'Create a New Alert' for more details. |
|
Delete Alert |
Remove selected alert(s). The control will appear only if one or more alerts are selected. See Edit / Delete an Alert for more details. |
|
Turn on Alert |
Enable alerts. Alerts are shown only if they are enabled. See Enable Alerts for more details. |
|
Turn off Alert |
Disable alerts. Alerts are not shown if they are disabled. See Disable Alerts for more details. |
|
Export |
Save the list of alerts as a comma separated values (CSV) file. See Export the List of Alerts for more details. |
- Click on any of the column headers to sort the items in ascending/descending order of entries in that column.
- Click the funnel icon to search for alerts based on the filter parameters
- To display all alerts again, clear all filters and click the 'Apply' button.
- Click the funnel icon again to close filter options
Alerts are shown only if they are enabled. When an alert is created, it is activated by default.
Activate disabled alerts
- Click 'Configuration Templates' > 'Alerts'
- Select a deactivated alert and click ‘Turn On Alert’ above
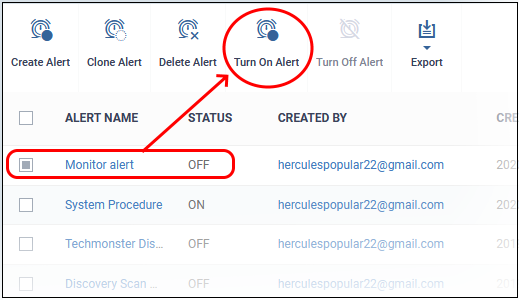
The alert is activated.
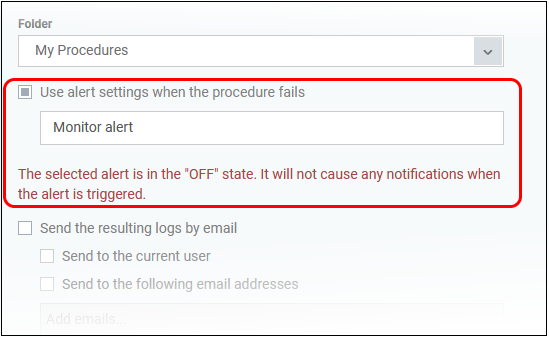
Deactivated alerts are not shown when triggered. Default alert is always turned on. The following message is shown if you select a deactivated alert during a component configuration.
Deactivate enabled alerts
- Click 'Configuration Templates' > 'Alerts'
- Select an activated alert and click ‘Turn off Alert’ above
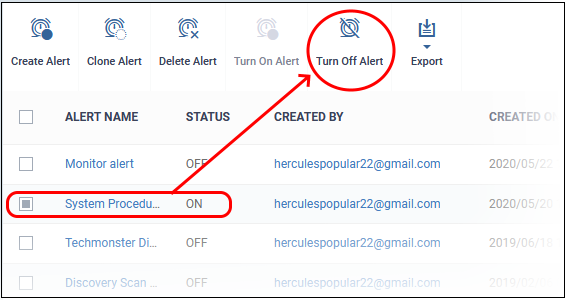
Export the list of alerts to a .csv file as follows:
- Click 'Configuration Templates' on the left then choose 'Alerts'.
- Click the 'Export' button above the table then choose 'Export to CSV':
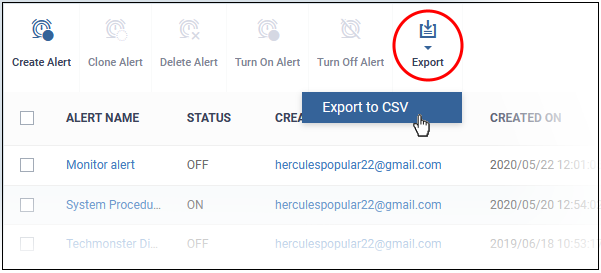
- The CSV file will be available in 'Dashboard' > 'Reports'
- See Reports in The Dashboard for more details.


