HIPS Settings
- The host intrusion prevention system (HIPS) constantly monitors system activity. It only allows processes to run if they comply with the security rules in the profile on the endpoint.
- For example, HIPS protects system-critical files and registry keys from unauthorized modification by malware.
- Xcitium Client Security (XCS) ships with a default HIPS ruleset that provides extremely high levels of protection 'out of the box'. You can also create custom rulesets as required.
- You can configure the feature by adding a HIPS section to a Windows profile.
Configure HIPS
- Click 'Section'> 'XCS'>’’ > Click 'Edit
- Select ‘HIPS Settings’ 'if it does not configure yet.
You can use the default HIPS settings or import them from a predefined profile:
- The default settings differ slightly from those in the various profiles. For example, there are two HIPS rules in the security level 1 profile, but there are no rules in the default settings.
- In either case, you can always modify the HIPS settings later as required.
- Make
your selection then click ‘Ok’.
The HIPS settings screen contains four tabs:
- HIPS Settings - Configure settings that govern the overall behavior of the HIPS component.
- HIPS Rules - View and create rules that control the behavior of applications on the managed computer.
- Rulesets - View predefined rulesets and create new rulesets. Rulesets can be applied to applications on managed computers.
- Protected Objects – A protected object is a collection of items which can be referenced as the target of a HIPS rule. For example, 'Registry Keys' and 'COM Classes'. This interface lets you view and create new protected objects.
|
HIPS Settings - Table of Parameters |
|
|---|---|
|
Form Element |
Description |
|
Enable HIPS |
Activate or deactivate HIPS protection on managed
computers to which the profile is applied.
If enabled, you can configure the HIPS security level and monitoring settings. (Default=Enabled in safe mode) |
|
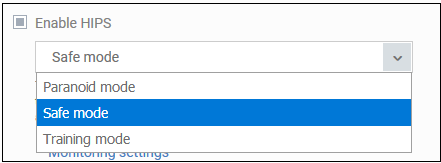
Hips Security Level |
If HIPS is enabled, you can choose the security
level for the HIPS to provide at the managed computer from the
drop-down below 'Enable HIPS'.
The available options are:
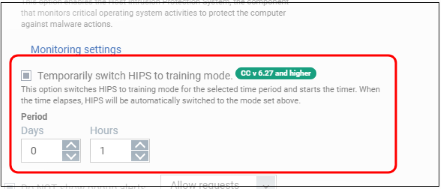 After the countdown is over, XCS will switch back to previous mode and Windows Communication Client continues to synchronize training mode configuration settings that can't change locally. |
|
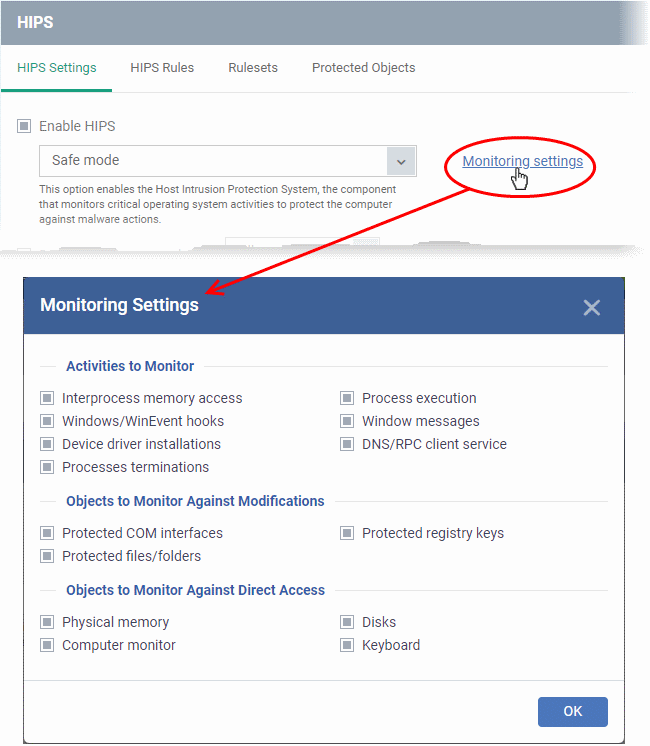
Monitoring Settings |
If HIPS is enabled, you can configure the activities, entities and objects that should monitored by it at the managed endpoint by clicking the 'Monitoring Settings' link.
Objects To Monitor Against Modifications:
Objects To Monitor Against Direct Access: Determines whether or not Xcitium Client Security should monitor access to system critical objects on the managed computer. Using direct access methods, malicious applications can obtain data from a storage device, modify or infect other executable software, record keystrokes and more. Xcitium advises the average user to leave these settings enabled:
Note:
The settings you choose here are universally applied. If you
disable monitoring of an activity, entity or object using this
interface it completely switches off monitoring of that activity
on a global basis - effectively creating a universal 'Allow' rule
for that activity . This 'Allow' setting over-rules any Ruleset
specific 'Block' or 'Ask' setting for that activity that you may
have selected using the 'Access Rights' and 'Protection Settings'
interface. |
|
Do NOT show popup alerts |
Configure whether or not the HIPS alerts are to be displayed at the managed computer for the end-user to respond. Choosing 'Do NOT show popup alerts' will minimize disturbances but at some loss of user awareness (Default = Enabled). If you choose not to show alerts, then you have a choice of default responses that XCS should automatically take - either 'Block Requests' or 'Allow Requests'.
|
|
Set popup alerts to verbose mode |
Enabling this option instructs XCS to display
HIPS alerts in verbose mode, providing more more informative
alerts and more options for the user to allow or block the
requests (Default
= Enabled). |
XCS will auto-create allow rules for known-safe applications. (Default = Disabled) . It is disabled by default for all predefined Endpoint Manager profiles.
|
|
| Erase automatically created rules when settings are updated | When this option is enabled, if any HIPS configuration is updated and pushed on the endpoint, all automatically generated HIPS rules on the endpoint will be deleted. (Default = Disabled) |
|
Set new on-screen alert timeout to |
Determines how long the HIPS shows an alert for without any user intervention. By default, the timeout is set at 60 seconds. You may adjust this setting to your own preference. |
|
Advanced
Settings |
|
|
Enable adaptive mode under low system resources |
Very rarely (and only in a heavily loaded system), low memory conditions might cause certain XCS functions to fail. With this option enabled, XCS will attempt to locate and utilize memory using adaptive techniques so that it can complete its pending tasks. However, the cost of enabling this option may be reduced performance in even lightly loaded systems. (Default = Enabled) |
|
Block unknown requests when the application is not running |
Selecting
this option blocks all unknown execution requests if Xcitium
Client Security is not running/has been shut down. This is option
is very strict indeed and, in most cases, should only be enabled on
seriously infested or compromised machines while the user is
working to resolve these issues. If you know the managed computer
machine is already 'clean' and are looking just to enable the
highest XCS security settings, then it is OK to leave this option
disabled. (Default
= Disabled) |
|
Enable enhanced protection mode (Requires a system restart) |
64-bit
systems only. Activate additional
protections which counteract sophisticated malware that tries to
bypass regular HIPS protection. Because of limitations in
Windows 7/8 x64 systems, some HIPS functions in previous versions of XCS could theoretically be bypassed by malware. Enhanced Protection
Mode implements several patent-pending ways to improve HIPS. The
endpoint requires a restart to enable enhanced protection mode.
(Default = Disabled) |
The 'HIPS Rules' screen allows you to view the list of active HIPS rulesets applied to different groups of or individual applications and to create and manage rules for the profile. You can change the ruleset applied to a selected application or application group.
|
Note: HIPS Rulesets are to be created before applying them to an individual application or an application group. Refer to the next section Rulesets for details on creating new rulesets. |
|
HIPS Rules – Column Descriptions |
|
|---|---|
|
Column Header |
Description |
|
Application |
Name of the individual application or the application group to which the ruleset is applied. |
|
Treat As |
The ruleset applied. For more details on the rulesets, refer to the next section Rulesets. |
|
Actions |
Contains control buttons to edit or remove the rule |
To begin defining an application's HIPS rule, you need take two basic steps.
Step 1 - Select the application that you wish the ruleset is to be applied
- To define a ruleset for a new application (i.e., one that is not already listed), click the 'Add Rule' button at the top of the list in the 'HIPS Rules' interface.
The 'HIPS Rule' interface will open as shown below:
Because this is a new application, the 'Name' field is blank. (If you are modifying an existing rule, then this interface shows the individual rules for that application's ruleset).
- To create a rule for a single application, enter the file name of it in the 'Name' field
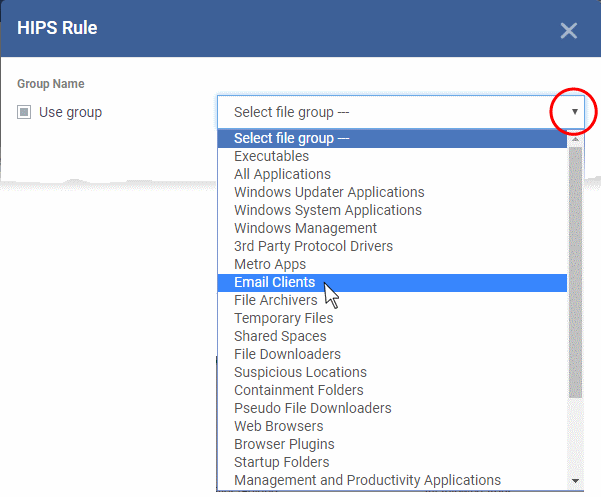
- To create a rule for an application group, select 'Use Group' and choose the file group from the drop-down
|
Note: Endpoint Manager ships with a set of predefined file groups containing collections of files under respective categories. Admins can also create custom file groups with required applications. All the pre-defined and the custom file groups will be available in the drop-down. The custom file groups can be created under 'Settings' > 'System Templates' > 'File Groups Variables' interface. See Create and Manage File Groups for more details. for more details. |
Step 2 - Configure the rules for this application's ruleset
There are two broad options available for creating a ruleset that applies to an application - Use a Predefined Ruleset or Use a Custom Ruleset.
-
Use a Predefined Ruleset - Allows you to quickly deploy an existing HIPS ruleset on to the target application. Choose the ruleset you wish to use from the drop-down menu. The name of the predefined ruleset you choose is displayed in the 'Treat As' column for that application in the 'HIPS Rules' interface.
|
Note: Predefined Rulesets, once chosen, cannot be modified directly from this interface - they can only be modified and defined using the Ruleset interface. If you require the ability to modify components of the rule set, then you are effectively creating a new, custom ruleset and should choose the more flexible Use Custom Ruleset option instead. |
- Use a Custom Ruleset - Designed for more experienced administrators, the 'Custom Ruleset' option grants full control over the configuration of each rule within that ruleset. The custom ruleset has two main configuration areas - Access Rights and Protection Settings. (Default = Enabled)
In simplistic terms 'Access Rights' determine what the application can do to other processes and objects whereas 'Protection Settings' determine what the application can have done to it by other processes.
-
Access Rights - The 'Process Access Rights' area allows you to determine what activities can be performed by the applications in your custom ruleset.

See HIPS Settings > Activities to Monitor to view a list of definitions of the Action Names listed above and the implications of choosing the action from 'Ask', 'Allow' or 'Block' for each setting as shown below:
- Exceptions to your choice of 'Ask', 'Allow' or 'Block' can be specified for the ruleset by clicking the 'Modify' link on the right.
- Select the 'Allowed Files/Folders' or 'Blocked Files/Folders' tab depending on the type of exception you wish to create.
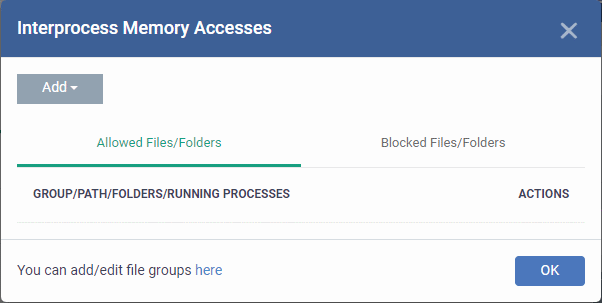
- Click the 'Add' button at the top to choose which applications or file groups you wish this exception to apply to. (click here for an explanation of available options).
-
Protection Settings - Protection Settings determine how protected the application or file group in your ruleset is against activities by other processes. These protections are called 'Protection Types'.
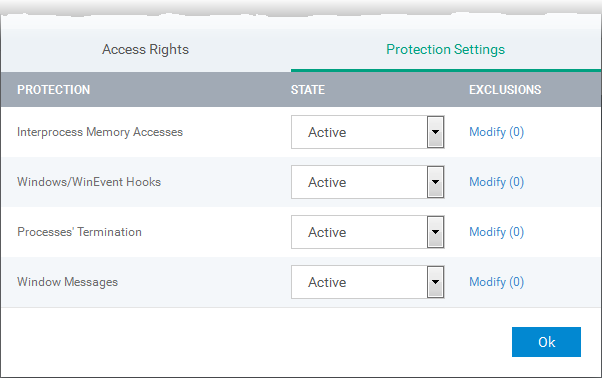
- Select 'Active' to enable monitoring and protect the application or file group against the process listed in the 'Protection State' column. Select 'Inactive' to disable such protection.
Click here to view a list of definitions of the 'Protection Types' listed above and the implications of activating each setting.
Exceptions to your choice of 'Active' or 'Inactive' can be specified in the application's Ruleset by clicking the 'Modify' link on the right.
-
Click 'OK' to confirm your settings.
A Pre-defined ruleset
is a set of access
rights and protection settings that has been saved and can be re-used and deployed on
multiple applications or groups. Each ruleset is comprised of a
number of rules and each of these rules is defined by a set of
conditions/settings/parameters. Rulesets concern an application's
access rights to memory, other programs, the registry etc.
The Rulesets screen under the the 'HIPS' tab displays the list of rulesets and allows you to add and manage new rulesets.
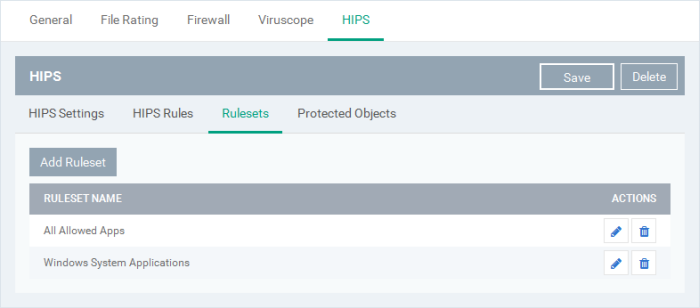
Add a new ruleset
- Click the 'Add Ruleset' button above the list of rulesets.
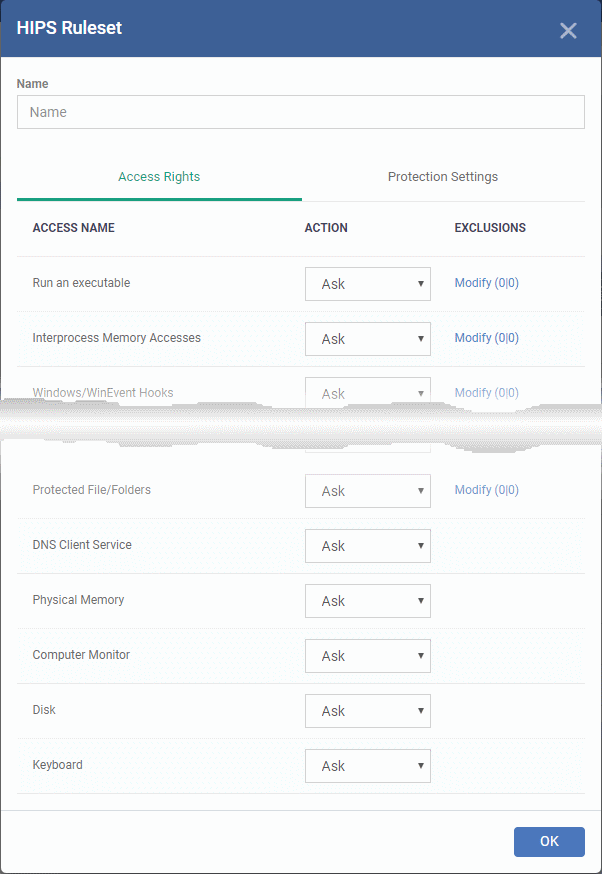
- Enter a name for the ruleset
- Configure the Actions, states and exclusions for 'Access Rights' and 'Protection Settings' as explained above. Any changes you make here are automatically rolled out to all applications that are covered by the ruleset. The new ruleset will be available for deployment to HIPS rule for applications/application groups from the HIPS Rules interface
- To edit a ruleset, click the Edit button under the Actions in the Rulesets interface. The Editing process is similar to the Ruleset creation process explained above.
The 'Protected Objects' panel under 'HIPS' tab lets you specify items at the managed computers to be protected against access or modification by unauthorized processes and services. These include files and folders, system critical registry keys and COM interfaces.
The 'Show' drop-down allows you to choose the category of protected objects to be displayed in the list and add and manage the protected objects of that category. You can add following categories of protected objects:
- Protected Files - Allows you to view and specify programs, applications, files an file groups that are to be protected from changes
- Registry Keys - Allows you to view and specify registry keys that are to be protected from changes
- COM Interfaces - Allows you to view and specify COM interfaces that are to be protected from changes
The 'Protected Files' list under 'Protected Objects' interface allows you to view and manage list of files and file groups that are to be protected from access by other programs, especially malicious programs such as virus, Trojans and spyware at the managed computer. It is also useful for safeguarding very valuable files (spreadsheets, databases, documents) by denying any user and any program the ability to modify the file - avoiding the possibility of accidental or deliberate sabotage. If a file is 'Protected' it can still be accessed and read by users, but not altered. A good example of a file that ought to be protected is your 'hosts' file (c:/windows/system32/drivers/etc/hosts). Placing this in the 'Protected Files and Folders' area would allow web browsers to access and read from the file as per normal. However, should any process attempt to modify it then Xcitium Client Security blocks this attempt and produces a 'Protected File Access' pop-up alert.
If you add a file to 'Protected Files', but want to allow trusted application to access it, then rules can be defined in HIPS Rulesets. See adding 'Exceptions' at the end of this section for more details about how to allow access to files placed in Protected Files.
- To view the list of Protected Files, choose 'Protected Files' from the 'Show' drop-down in the 'Protected Objects' interface
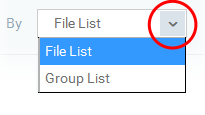
The Protected File list is displayed under two categories, which can be selected from the drop-down at the right.
 |
|
You can add individual files, programs, applications or file/groups to 'Protected Files'.
Add an individual file, program or an application
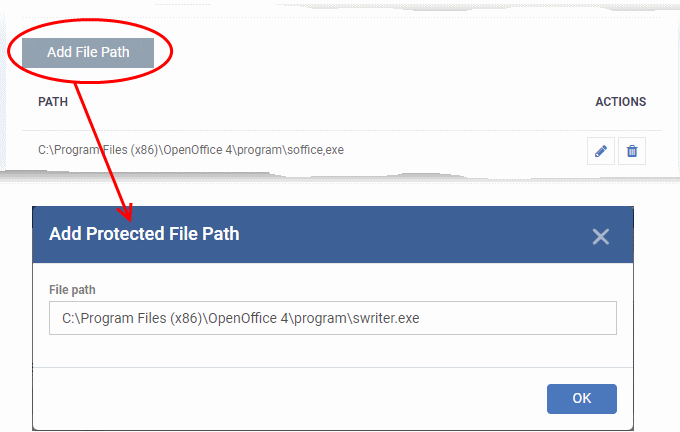
- Choose 'File List' from the drop-down at the right and click the 'Add File Path' button.
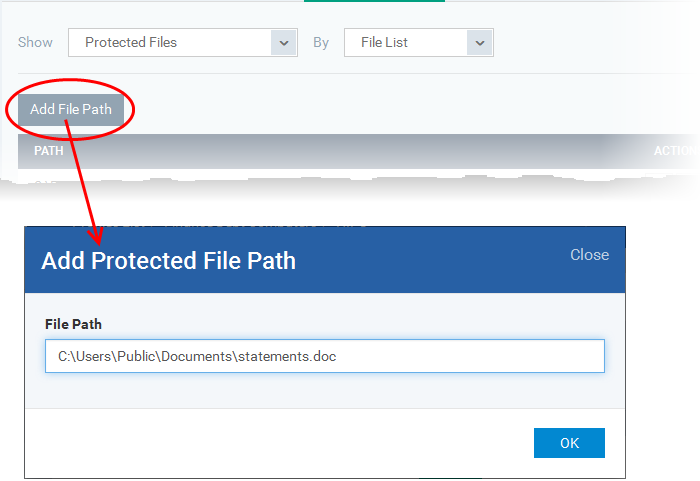
- Enter the installation/storage path with file name of the file to be protected, in the managed computers, in the 'Add Protected File Path' dialog and click 'OK'.
- Repeat the process to add more files.
- To edit the path of an item in the list, click the Edit icon under the 'Actions' in the list.
- To remove an item from the list, click the thrash can icon under 'Actions' in the list
Add an application/file group to the Protected Files list
-
Choose 'Group List' from the drop-down at the right and click the 'Add Protected Group' button
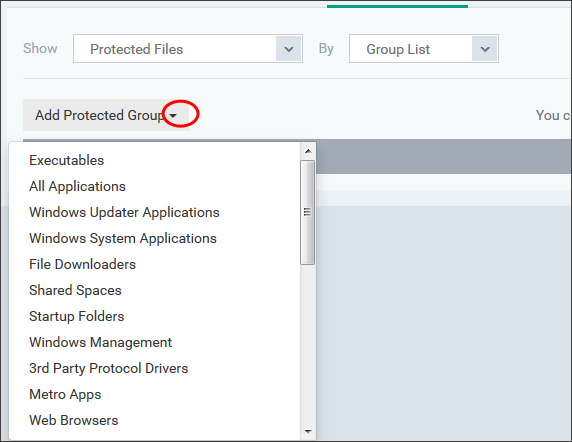
- Choose the file group from the drop-down and click 'OK'.
|
Note: Endpoint Manager ships with a set of predefined file groups containing collections of files under respective categories. You can also create custom file groups with required applications. All the pre-defined and the custom file groups will be available in the drop-down. The custom file groups can be created under 'Settings' > 'System Templates' > 'File Groups Variables' interface. See Create
and Manage File Groups for more details. |
- Repeat the process to add more file groups.
- To edit the path of an item in the list, click the Edit icon under the 'Actions' in the list.
- To remove an item from the list, click the thrash can icon under 'Actions' in the list
You can choose to selectively allow another application (or file group) to modify a protected file by affording the appropriate 'Access Right' in 'HIPS Rules' interface. A simplistic example would be the imaginary file 'Accounts.ods'. You would want the 'Open Office Calc' program to be able to modify this file as you are working on it, but you would not want it to be accessed by a potential malicious program. You would first add the spreadsheet to the 'Protected Files' area. Once added to 'Protected Files', you would go into 'HIPS Rules' and create an exception for 'scalc' so that it alone could modify 'Accounts.ods'.
- First add Accounts.ods to 'Protected Files' area as explained above.
- Then go to 'HIPS Rules' interface and add it to the list of applications.
- In the 'HIPS Rule' interface, enter the file name as account.ods, choose 'Use a Custom Ruleset' and select a ruleset from the 'Copy From' drop-down.
- Under 'Access Rights' tab, set all the rules to 'Ask'
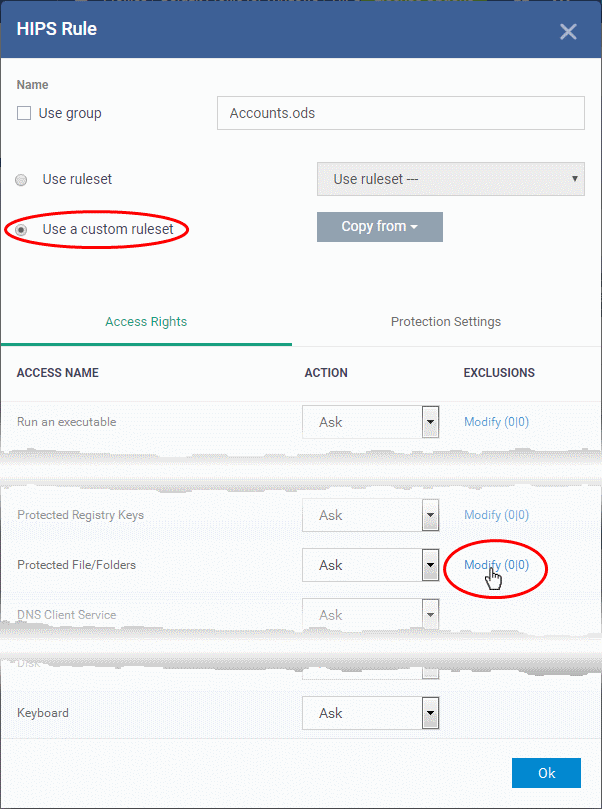
- Click
the 'Modify' beside 'Protected File/Folders'
- Under the 'Access Rights' section, click the link 'Modify' beside the entry 'Protected Files/Folders'.
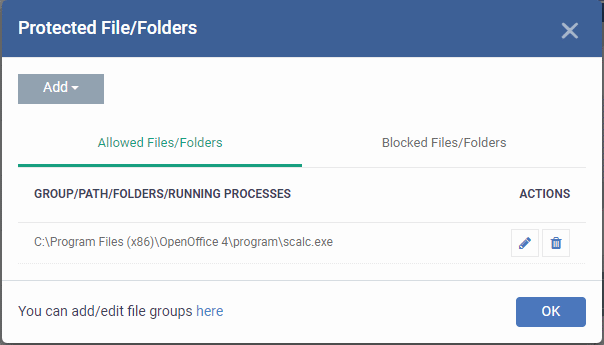
The 'Protected Files/Folders' interface will appear.
-
Under the 'Allowed Files/Folders' section, click 'Add' > 'Files' and add scalc.exe as exceptions to the 'Ask' or 'Block' rule in the 'Access Rights'.
Another
example of where protected files should be given selective access is
the Windows system directory at 'c:/windows/system32'. Files in this
folder should be off-limits to modification by anything except
certain, Trusted, applications like Windows Updater Applications. In
this case, you would add the directory c:windowssystem32* to the
'Protected Files area (* = all files in this directory). Next go to
'HIPS Rules',
locate the file group 'Windows Updater Applications' in the list and
follow the same process outlined above to create an exception for
that group of executables.
The 'Registry Keys' list under 'Protected Objects' interface allows you to view and manage list of critical registry keys and registry groups to be protected against modification. Irreversible damage can be caused to the managed endpoint if important registry keys are corrupted or modified in any way. It is essential that the registry keys are protected against any type of attack.
To view the list of Protected Registry Keys, choose 'Registry Keys' from the 'Show' drop-down in the 'Protected Objects' interface.
The Protected Registry Keys list is displayed under two categories, which can be selected from the drop-down at the right.
 |
|
You can add individual registry keys and Registry groups to Protected Registry Keys list.
-
Choose 'Key List' from the drop-down at the right and click the 'Add Registry Key' button.
- Enter the key name to be protected in the 'Add Registry Key' dialog and click 'OK'.
- Repeat the process to add more keys.
- To edit an item in the list, click the 'Edit' icon under the 'Actions' in the list.
- To remove an item from the list, click the thrash can icon under 'Actions' in the list
Add a Registry group to the Protected Registry Keys list
-
Choose 'Group List' from the drop-down at the right and click the 'Add Protected Files' button
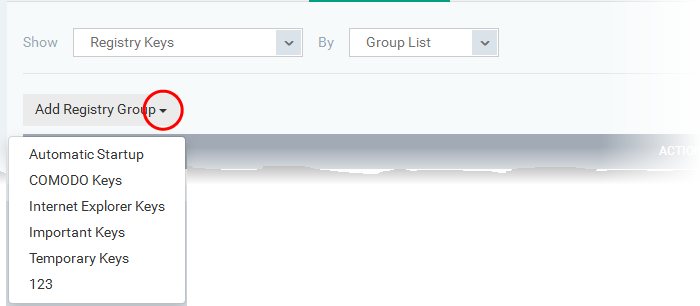
- Choose the Registry group from the drop-down and click 'OK'.
|
Note: Endpoint Manager ships with a set of predefined Registry groups containing collections of registry keys under respective categories. You can also create custom Registry groups with required key values. All the pre-defined and the custom Registry groups will be available in the drop-down. The custom Registry groups can be created under 'Settings' > 'System Templates' > 'Registry Variables' interface. See Create and Manage Registry Groups for more details. |
- Repeat the process to add more Registry groups.
- To edit the an item in the list, click the Edit icon under the 'Actions' in the list.
- To remove an item from the list, click the thrash can icon under 'Actions' in the list
Component Object Model (COM) is Microsoft's object-oriented programming model that defines how objects interact within a single application or between applications - specifying how components work together and inter-operate. COM is used as the basis for Active X and OLE - two favorite targets of hackers and malicious programs to launch attacks on a computer. It is a critical part of any security system to restrict processes from accessing the Component Object Model - in other words, to protect the COM interfaces.
The 'COM Interfaces' list under 'Protected Objects' interface allows you to view and manage list of individual COM classes and COM groups that are to be protected by the Xcitium Client Security at the managed computer against modification, corruption and manipulation by malicious processes.
View the list of Protected COM interfaces
- Choose 'COM Interfaces' from the 'Show' drop-down in the 'Protected Objects' interface
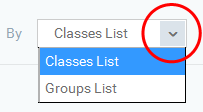
The Protected COM Interfaces list is displayed under two categories, which can be selected from the drop-down at the right.
 |
|
You can add individual COM Interfaces/Classes and/or pre-defined COM groups to 'Protected COM Objects' list.
- Choose 'Classes List' from the drop-down at the right and click the 'Add COM Class' button
- Click ‘Add’
- Repeat the process to add multiple procedures to the profile
- Click 'Save' to add the procedures to the profile
- To remove an item from the list, click the trash can icon under 'Actions' in the list
Add a predefined COM Group to the Protected COM objects list
- Choose 'Group List' from the drop-down at the right and click the 'Add COM Group' button
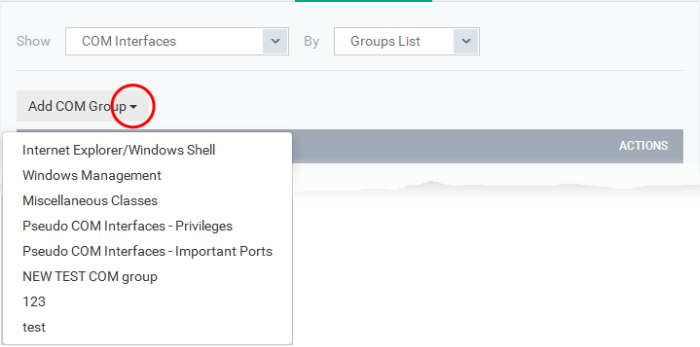
- Choose the file group from the drop-down and click 'OK'.
|
Note: Endpoint Manager ships with a set of predefined COM groups containing collections of COM interfaces under respective categories. You can also create custom COM groups with required COM objects. All the pre-defined and the custom file groups will be available in the drop-down. The custom COM groups can be created under 'Settings' > 'System Templates' > 'COM Variables' interface. See Create and Manage COM Groups for more details. |
- Repeat the process to add more COM groups.
- To edit an item in the list, click the Edit icon under the 'Actions' in the list.
- To remove an item from the list, click the thrash can icon under 'Actions' in the list.


