Configure Role Based Access Control for Users
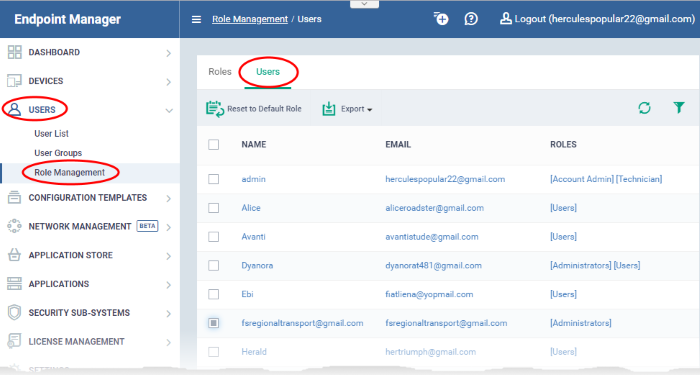
- Click 'Users' > 'Role Management'
- User privileges depend on the roles assigned to them. Admins can create roles with different access privileges and assign them to users as required. A single user can be assigned to any number of roles.
- Staff created in ITarian can be added to any role for any company. This allows you to assign different roles to the same staff member for different companies.
- You can restrict a role to specific companies/groups. Staff can only manage the devices of companies/groups allowed by their role.
- You can also create roles with read-only privileges. These allow staff to view assigned interfaces but not make changes.
The role management area has two tabs:
- Roles - View and edit each role's permissions. You can also create custom roles here.
- Users - View users and assign them to roles
- The 'Roles' interface allows you to create and manage user roles.
- Each role defines a staff member's rights to access EM modules and to manage users/devices belonging to different companies. You can restrict a role to manage specific companies and specific device groups.
- Endpoint Manager ships with four roles, 'Account Admin', 'Administrators', 'Technician' and 'Users'.
- The 'Account Admin' role can be viewed but not edited. The permissions in the other three roles can be modified. You can also create custom roles according to your requirements.

- Custom roles and built-in roles are available for selection when adding a new user.
- Admins can add or remove roles at any time. You can also change the role of any user at any time.
- New users are assigned the 'User' role by default. However, you have the option to make any role the default.
|
Roles - Column Descriptions |
|
|---|---|
|
Column Heading |
Description |
|
Name |
Role label.
|
|
Description |
A short description of the role. |
|
Number of Users |
Shows how many users are assigned to the role.
|
|
Controls |
|
|
Add Role |
Create new roles and assign them to users. See Create a New Role for more details. |
|
Export |
Save the list of user
roles as a comma separated values (CSV) file. The exported .csv is available in 'Dashboard' > 'Reports'. See Export the List of Roles for more details. |
- Click a column header to sort the table according to the items in the column.
- Click the
 funnel
  on the right to implement more filters.
- Click 'Users' > 'Role Management'.
- Select the 'Roles' tab
- Click the 'Export' button above the table then choose 'Export to CSV':


- The CSV file will be available in 'Dashboard' > 'Reports'
- See Reports in The Dashboard for more details.
- The 'Users' interface lets you view users added to EM and the roles assigned to them.
- You can also edit the roles assigned to each user from this interface.
- Click the 'Users' tab to switch to the 'Users' interface:


|
Users - Column Descriptions |
|
|---|---|
|
Column Heading |
Description |
|
Name |
The login username of the user.
|
|
|
The registered email address of the user. |
|
Roles |
The user roles assigned to the user. Click a role name to view and manage permissions assigned to the role. See 'Manage Permissions and Assigned Users to a Role' for more details. |
|
Controls |
|
|
Reset to Default Role |
Revert the user's role to the ITarian system default role. Applies only to users imported from ITarian console. It doesn't apply to users added via EM. See Restore user role in Manage Roles Assigned to a User for more. |
|
Export |
Save the list of users as
a comma separated values (CSV) file. The exported .csv is available in 'Dashboard' > 'Reports'. See Export the List of Users for more details. |
- Click a column header to sort the table according to the items in the column.
- Click the
 funnel
  on the right to implement more filters.
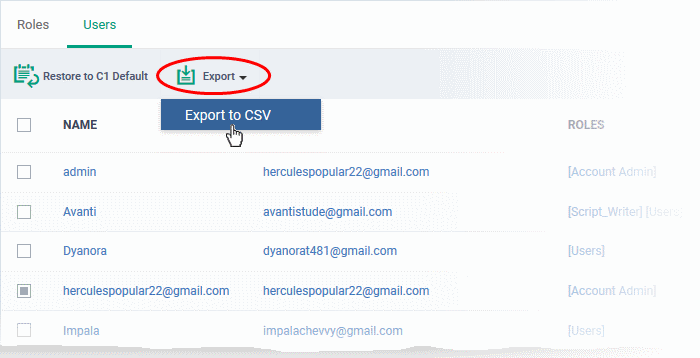
- Click 'Users' > 'Role Management'
- Select the 'Users' tab
- Click the 'Export' button above the table then choose 'Export to CSV':


- The CSV file will be available in 'Dashboard' > 'Reports'
- See Reports in The Dashboard for more details.


