ITarian Help

Find the desired product help

IT Endpoint Manager

IT Endpoint Manager

Endpoint Manager Administrator Guide 6.43

English

Print Help Download Help
Configuration Templates > Data Loss Prevention Rules > Create DLP Discovery Rules And Add Them To Profiles
  • Introduction To Endpoint Manager
    • Key Concepts
    • Best Practices
    • Quick Start
    • Sign Up For An ITarian Account
    • Login Into The Admin Console
  • The Admin Console
  • The Dashboard
  • Devices And Device Groups
    • Manage Device Groups
      • Create Device Groups
      • Edit A Device Group
      • Assign Configuration Profiles To A Device Group
      • Remove A Device Group
      • Run Procedures On Customer Groups
    • Manage Devices
      • Add New Devices
      • Manage Windows Devices
        • View And Edit Device Name
        • View Summary Information
        • View Hardware Information
        • View Network Information
        • View Maintenance Windows Associated With Device
        • View And Manage Profiles Associated With A Device
        • View And Manage Applications Installed On A Device
        • View The Files On A Device
        • View Exported Configurations And Import Profiles
        • View MSI Files Installed On A Device Through Endpoint Manager
        • View And Manage Patches For Windows And 3rd Party Applications
        • View Antivirus Scan History
        • View And Manage Device Group Memberships
        • View Device Logs
      • Manage Mac OS Devices
        • View And Edit Mac OS Device Name
        • Summary Information Of Mac Device
        • View Installed Applications
        • View Quarantined Files
        • View And Manage Profiles Associated With A Device
        • View Mac OS Packages Installed On A Device Through Endpoint Manager
        • View And Manage Device Group Memberships
        • View Mac Device Logs
      • Manage Linux Devices
        • View And Edit Linux Device Name
        • Summary Information Of Linux Device
        • View Network Information Of A Linux Device
        • View And Manage Profiles Associated With A Linux Device
        • View Linux Packages Installed On A Device Through Endpoint Manager
        • View And Manage Device Group Memberships
      • Manage Android Devices
        • View And Edit Device Name
        • View Summary Information
        • Manage Installed Applications
        • View And Manage Profiles Associated With A Device
        • View Sneak Peek Pictures To Locate Lost Devices
        • View The Location Of The Device
        • View And Manage Device Group Memberships
      • Manage IOS Devices
        • View Summary Information Of An IOS Device
        • View And Edit Device Name Of An IOS Device
        • View Applications Installed On An IOS Device
        • View And Manage Profiles Associated With An IOS Device
        • View The Location Of An IOS Device
        • View And Manage Group Memberships Of An IOS Device
      • View User Information
      • Remove A Device
      • Remote Management Of Windows And Mac OS Devices
        • Transfer Items To / From The Remote Computer
      • Remotely Manage Folders And Files On Windows Devices
      • Manage Processes On Remote Windows Devices
      • Manage Services On Remote Windows Devices
      • Use The Command Prompt On Remote Windows Devices
      • Apply Procedures To Windows And Mac Devices
      • Remotely Install And Manage Packages On Windows Devices
      • Remotely Install Packages On Mac OS Devices
      • Remotely Install Packages On Linux Devices
      • Send Enrollment Link To IOS Devices
      • Install Apps On Android/iOS Devices
      • Generate An Alarm On Android Devices
      • Remotely Lock Mobile And Mac OS Devices
      • Wipe Selected Mobile And Mac Devices
      • Assign Configuration Profiles To Selected Devices
      • Set / Reset Screen Lock Password For Mobile Devices
      • Update Device Information
      • Send Text Messages To Mobile Devices
      • Restart Selected Windows Devices
      • Shutdown Windows Devices
      • Wake Offline Device
      • Change A Devices Owner
      • Change The Ownership Status Of A Device
      • Add Custom Notes And Tags On Devices
      • Generate Device List Report
    • Bulk Enrollment Of Devices
      • Enroll Windows, Mac OS And Linux Devices By Installing The Communication Client
        • Enroll Windows Devices Via AD Group Policy
        • Enroll Windows, Mac OS And Linux Devices By Offline Installation Of Agent
        • Enroll Windows Devices Using Auto Discovery And Deployment Tool
      • Enroll The Android And IOS Devices Of AD Users
    • Download And Install The Remote Control Tool
  • Users And User Groups
    • Manage Users
      • Create New User Accounts
        • Manually Add Users
        • Import Users From A CSV File
      • Enroll User Devices For Management
        • Enroll Android Devices
        • Enroll IOS Devices
        • Enroll Windows Endpoints
        • Enroll Mac OS Endpoints
        • Enroll Linux OS Endpoints
      • View User Details
        • Update The Details Of A User
      • Assign Configuration Profiles To User Devices
      • Remove A User
      • Generate New Password For A User
      • Reset Two Factor Authentication Token For A User
      • Run Procedures On User Devices
    • Manage User Groups
      • Create A New User Group
      • Edit A User Group
      • Assign Configuration Profiles To A User Group
      • Remove A User Group
      • Run Procedures On Group Devices
    • Configure Role Based Access Control For Users
      • Create A New Role
      • Manage Permissions And Users Assigned To A Role
      • Remove A Role
      • Manage Roles Assigned To A User
  • Configuration Templates
    • Create Configuration Profiles
      • Profiles For Android Devices
      • Profiles For IOS Devices
      • Profiles For Windows Devices
        • Create Windows Profiles
          • Associated Devices Settings
          • Remote Control Settings
          • Client Access Control
          • Client Proxy Settings
          • Communication Client Update Settings
          • Client UI Settings
          • Remote Tools Settings
          • Monitors
          • Procedure Settings
          • Patch Management Settings
          • Maintenance Window Settings
          • Global Proxy Settings
          • Communication Client Rebranding
          • Client Logging Settings
          • Antivirus Settings
          • Firewall Settings
          • HIPS Settings
          • File Rating Settings
          • Containment Settings
          • VirusScope Settings
          • Xcitium Verdict Cloud
          • Agent Discovery Settings
          • External Devices Control Settings
          • Miscellaneous Settings
          • Script Analysis Settings
          • Data Loss Prevention Settings
          • Xcitium Client Security Access Control
          • XCS Updates
          • Xcitium Client Security UI Settings
          • XCS Logging Settings
          • Thumbnails Settings
          • Performance Settings
          • Chat Settings
        • Import Windows Profiles
      • Profiles For Mac OS Devices
        • Create A Mac OS Profile
          • Antivirus Settings For Mac OS Profile
          • Certificate Settings For Mac OS Profile
          • Restrictions Settings For Mac OS Profile
          • VPN Settings For Mac OS Profile
          • Wi-Fi Settings For Mac OS Profile
          • Remote Control Settings For Mac OS Profile
          • External Device Control Settings For Mac OS Profile
          • Valkyrie Settings For MacOS Profile
          • Procedure Settings For Mac Profiles
          • Monitor Settings For Mac OS Profile
      • Profiles For Linux Devices
        • Create A Linux Profile
          • Antivirus Settings For Linux Profile
          • Communication Client And Comodo Client - Security Application Update Settings For Linux Profile
          • User Interface Settings For Linux Profile
          • Logging Settings For Linux Profile
          • Clients Access Control Settings For Linux Profile
          • Valkyrie Settings For Linux Profile
    • View And Manage Profiles
      • Export And Import Configuration Profiles
      • Clone A Profile
    • Edit Configuration Profiles
    • Manage Default Profiles
    • Manage Alerts
      • Create A New Alert
      • Edit / Delete An Alert
    • Manage Procedures
      • View And Manage Procedures
      • Create A Custom Procedure
      • Combine Procedures To Build Broader Procedures
      • Review / Approve / Decline New Procedures
      • Add A Procedure To A Profile / Procedure Schedules
      • Import / Export / Clone Procedures
      • Change Alert Settings
      • Apply Procedures To Devices
      • Edit / Delete Procedures
      • View Procedure Results
    • Manage Monitors
      • Create Monitors And Add Them To Profiles
        • Monitors For Windows Devices
        • Monitors For Mac OS Devices
      • View And Edit Monitors
    • Data Loss Prevention Rules
      • Create DLP Discovery Rules And Add Them To Profiles
      • View And Edit DLP Discovery Rules
      • Create DLP Monitoring Rules And Add Them To Profiles
      • View And Edit DLP Monitoring Rules
  • Security Systems
    • Security Dashboards
      • View Security Events By Time
      • View Security Events By Files
      • View Security Events By Device
    • View Contained Applications
    • Manage File Trust Ratings On Windows Devices
      • File Ratings Explained
    • View List Of Valkyrie Analyzed Files
    • Antivirus And File Rating Scans
      • Run Antivirus And/or File Rating Scans On Devices
      • Handle Malware On Scanned Devices
      • Update Virus Signature Database On Windows, Mac OS And Linux Devices
    • View And Manage Identified Malware
    • View And Manage Quarantined Items
    • View Android Threat History
    • View And Manage Autorun Items
    • View History Of External Device Connection Attempts
    • Data Loss Prevention Scans
      • DLP Logs
      • DLP Quarantined Files
  • Network Management
    • Create And Run Network Discovery Tasks
    • Manage Profiles For Network SNMP Devices
    • Manage Network Devices
      • Manage SNMP Devices
        • SNMP Device Details Interface
      • Discovered Devices
    • Manage Network Monitors
  • Application Store
    • IOS Apps
      • Add IOS Apps And Install Them On Devices
      • Manage IOS Apps
    • Android Apps
      • Add Android Apps And Install Them On Devices
      • Manage Android Apps
    • Windows Apps
      • Install Windows Apps On Devices
  • Applications
    • View Applications Installed On Android And IOS Devices
      • Blacklist And Whitelist Applications
    • Patch Management
      • Manage OS Patches On Windows Endpoints
      • Install 3rd Party Application Patches On Windows Endpoints
        • EM Supported 3rd Party Applications
    • View And Manage Applications Installed On Windows Devices
      • Uninstall A Windows Application From Selected Devices
      • Uninstall A Windows Application From All Devices
    • Vulnerability Management
  • License Management
    • Manage Your Licenses
    • Manage License Allocation
    • Bill Forecast
  • Configure Endpoint Manager
    • Email Notifications, Templates And Custom Variables
      • Configure Email Templates
      • Configure Email Notifications
      • Create And Manage Custom Variables
      • Create And Manage Registry Groups
      • Create And Manage COM Groups
      • Create And Manage File Groups
      • View And Manage Pattern Variables
      • View And Manage Keyword Groups
    • Endpoint Manager Portal Configuration
      • Import User Groups From LDAP
      • Configure Communication And Security Client Settings
        • Configure The EM Android Client
          • Configure Android Client General Settings
          • Configure Android Client Antivirus Settings
          • Add Google Cloud Messaging (GCM) Token
        • Add Apple Push Notification Certificate
        • Configure Windows Clients
          • Configure Communication Client Settings
          • Configure Client Security Settings
      • Manage Endpoint Manager Extensions
      • Configure Endpoint Manager Reports
      • Device Removal Settings
      • Account Security Settings
      • Set-up Administrators Time Zone And Language
      • Configure Audit Log Settings
    • Integrate Apple DEP With Endpoint Manager
      • Link Endpoint Manager With Apple DEP
      • Manage Apple DEP Devices
      • Manage Apple DEP Profiles
      • Configure Apple DEP Notifications
    • View Version And Support Information
  • Appendix 1a - Endpoint Manager Services - IP Nos, Host Names And Port Details - EU Customers
  • Appendix 1b - Endpoint Manager Services - IP Nos, Host Names And Port Details - US Customers
  • Appendix 2 – Endpoint Manager License Types
  • Appendix 3 - Pre-configured Profiles
  • About ITarian

Create DLP Discovery Rules and Add them to Profiles


Process in brief


Step 1 – Add keywords to keyword groups. See View and Manage Keyword Groups for more details.


Step 2 – Create custom data patterns, if required. See View and Manage Pattern Variables for more details.


Step 3 – Create a DLP discovery rule using the predefined and custom data patterns and keyword groups. See this section.


Step 4 – Add the DLP rule to profiles. See Data Loss Prevention Settings for more details.


Step 5 – Deploy profiles on devices.See View and Manage Profiles Associated with Device for more details.

  • Click 'Configuration Templates' > 'Data Loss Prevention' > 'Create’ button > ‘Discovery Rule'

DLP discovery rules allow you to identify sensitive information in files on managed devices, including card numbers, social security numbers, bank routing numbers and more.


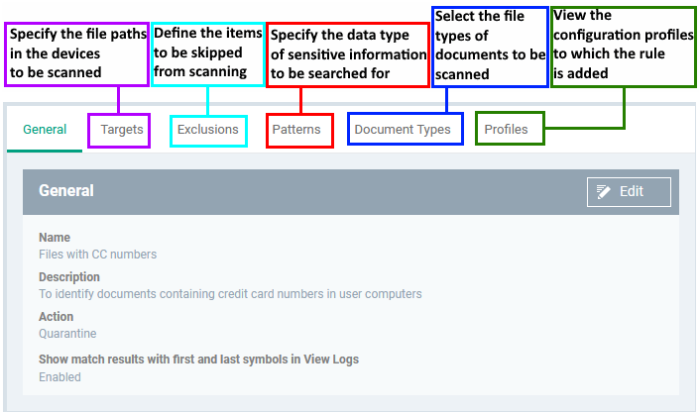
You will define the following items when you create a discovery rule:

  • Location - The folders or drives that you want to scan on the target devices. For example, ‘C:/Users/’.
  • File types - The file extensions you want to inspect. For example, .doc., .xls., .txt.
  • Search pattern - The type of data you want to search for. For example, card numbers, bank account numbers, social security numbers, dates-of-birth, etc.
  • Action - The response Endpoint Manager should take when the rule conditions are met. The options are ‘ignore’ and ‘quarantine’.

You can then add the discovery rule to a profile, which is in turn applied to target devices or users.


Create a DLP discovery rule

  • Click 'Configuration Templates' > 'Data Loss Prevention'
  • Click 'Create' button then ‘Discovery Rule’


Complete the following fields:


Name - Enter a label for the rule


Description - Add a short note for your reference


Action - The response Endpoint Manager should take on files which meet the rule conditions. The options are:

  • Ignore – Take no action on the file. You can still review the files at ‘Security Sub-systems’ > ‘Data Loss Prevention’ > ‘Logs’.
  • Quarantine – The file is moved from its original location on the endpoint and placed in a secure holding area. Users cannot open quarantined files. You can review quarantined files as follows:
  • Local Endpoint - Open Comodo Client Security > Click ‘Tasks’ > ‘DLP Tasks’ > ‘Data Loss Prevention Quarantine’. You can restore the files to original location from here if required.
  • Endpoint Manager - Click ‘Security Sub-Systems’ > ‘Data Loss Prevention’ > ‘Logs’.

Show match results with first and last symbols in view logs - If enabled, the log file shows the actual data discovered in the file. Only the first and last characters of the record are shown. For example, a name with seven digit account number would be shown as J**e S***h 1*****7.


Click 'Create’ to move to the rule configuration screen:


Targets / scan locations
  • Click the 'Targets' tab > 'Edit'
  • The path 'C:/Users' is included by default
  • Click 'Add' > 'File Path' to add a new scan location:


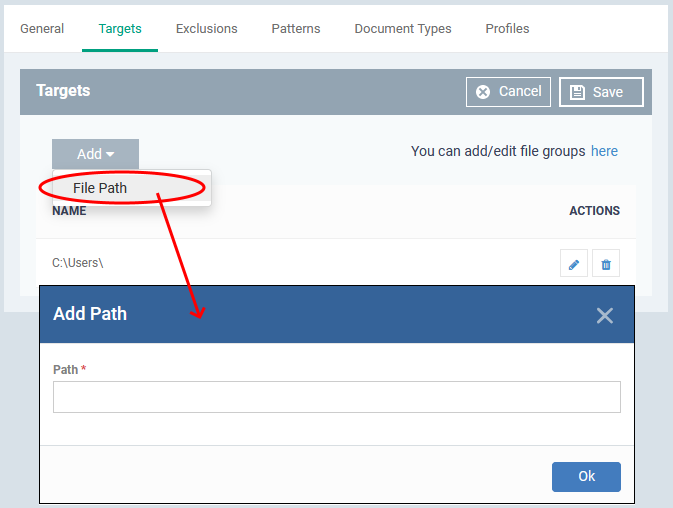
  • Enter the location you want to scan then click 'Ok'
  • Repeat the process to add more locations
  • Click the pencil icon in the 'Action' column to edit a location
  • Click 'Save'

Exclusions


You can omit specific locations and/or file types from your discovery scan.

  • Click the 'Exclusions' tab then click 'Edit'
  • Click 'Add'
  • File path - Exclude a folder or file
  • File Groups - Exclude a specific set of file types:


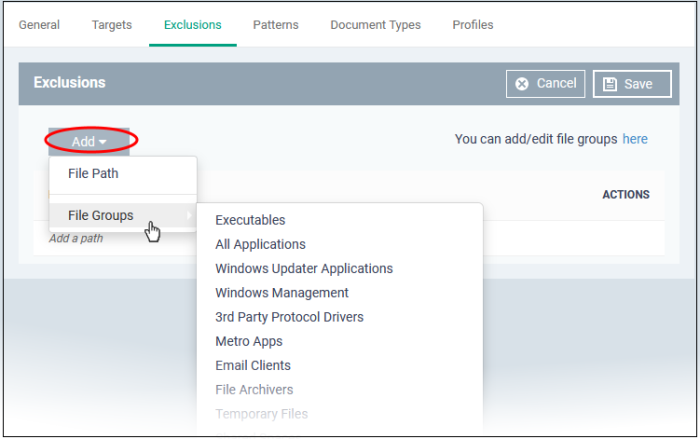
File groups make it easy to exclude an entire class of file. Choose the group you want to exclude then click ‘Save’.

  • Click 'Settings' > 'System Templates' > 'File Group Variables' if you want to view and manage file groups
  • See 'File Groups' if you want help with them.

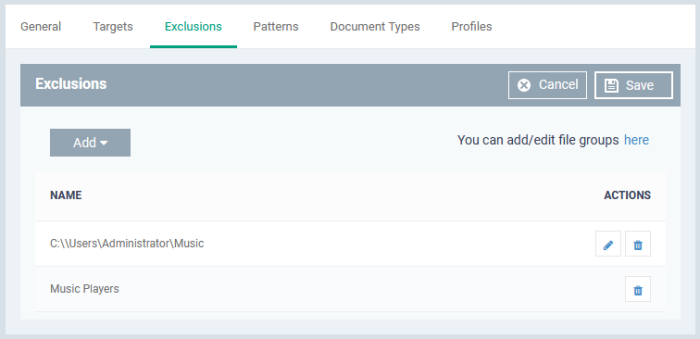
Repeat the process to add more exclusions.


Pattern

The patterns tab is where you tell the scan what types of data you want to search for.

  • A 'pattern' is the format used by the type of data you want to find. Each pattern is a combination of a keyword group and information format.
  • For example, the ‘Name with SSN’ pattern consists of:
  • Keyword group = ‘Names’ group.
  • Information format = 9 digit number in a 3-2-4 format, like '123-45-6789'.
  • Endpoint Manager ships with a number of patterns which you can use to search for sensitive data.
    • You can also create custom patterns to search for specific data.
    • Click 'Settings' > 'System Templates' > 'Pattern Variables' to view all available patterns and create custom patterns.
      • See View and Manage Pattern Variables if you need more help on patterns.
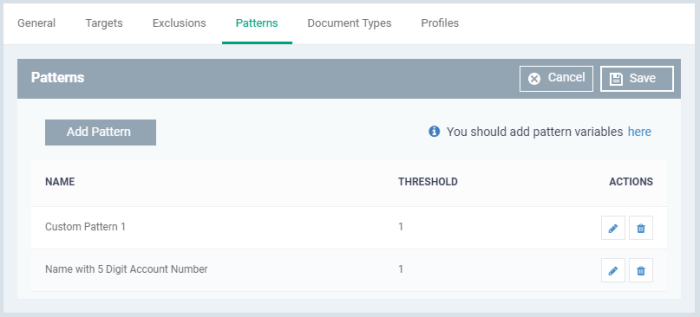
      Patterns

      • Click the 'Patterns' tab then 'Edit'
      • Click 'Add Pattern'


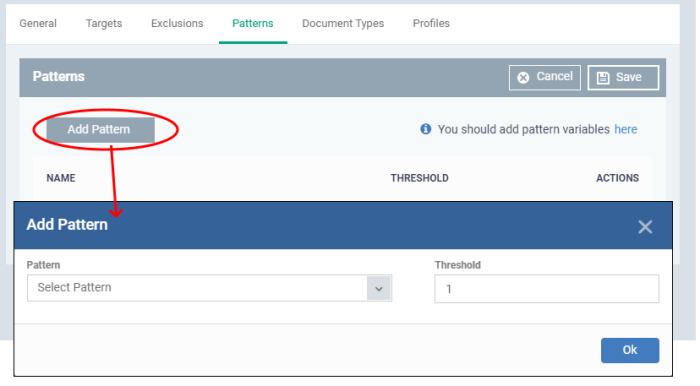
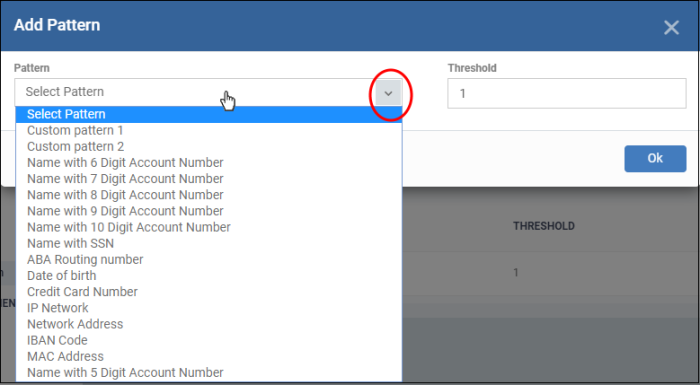
      • Select Pattern - Choose the type of information that you want to search for in scanned locations. For example, credit card numbers, social security numbers and more. You can also select custom pattern that you created in pattern variables screen.
      • Threshold - The number of times that data matching the pattern must be found in a document. Endpoint Manager will flag a document if it contains the threshold quantity of pattern examples. 


      • Note - You MUST add keywords to the keyword group or the search will not work.
      • You can add keywords to keyword groups at 'Settings' > 'System Templates' > 'Keyword Variables'
      • See View and Manage Keyword Groups for help to manage keyword groups.


      Predefined Pattern

      Description

      Name with 5 Digit Account Number

       Consists of Keyword Group 'Names' and 5 digit bank account number.

      Name with 6 Digit Account Number

      Consists of Keyword Group 'Names' and 6 digit bank account number.

      Name with 7 Digit Account Number

      Consists of Keyword Group 'Names' and 7 digit bank account number.

      Name with 8 Digit Account Number

      Consists of Keyword Group 'Names' and 8 digit bank account number.

      Name with 9 Digit Account Number

      Consists of Keyword Group 'Names' and 9 digit bank account number.

      Name with 10 Digit Account Number

      Consists of Keyword Group 'Names' and 10 digit bank account number.

      Name with SSN

      Consists of Social Security Number and Keyword Group 'Names'.

      ABA Routing number

      Consists of American Bankers Association (ABA) routing number. This is the nine digit bank code printed in negotiable instruments in the US.

      Date of birth

      Consists of Birth Date.

      Credit Card Number

      Consists of Credit Card Number.

      IP Network

      Consists of IPv4 and IPv6 IP Addresses.


      Examples:


      192.0.2.0/24


      198.51.100.0


      2001:0db8:85a3:0000:0000:8a2e:0370:7334


      2001:db8:1234::/48

      Network Address

      Consists of URLs, and domain names.


      Examples:


      http://domain.name


      https://domain.name


      www.domain.name


      domain.com


      local.net

      IBAN Code

      Bank account number in International Bank Account Number (IBAN) format.

      MAC Address

      Searches for mac addresses, the unique identifier assigned to network cards.


      • Click 'Ok'.

      The pattern configuration dialog depends on the selected pattern. The image below is shown for ‘Name with 5 digit account number’:


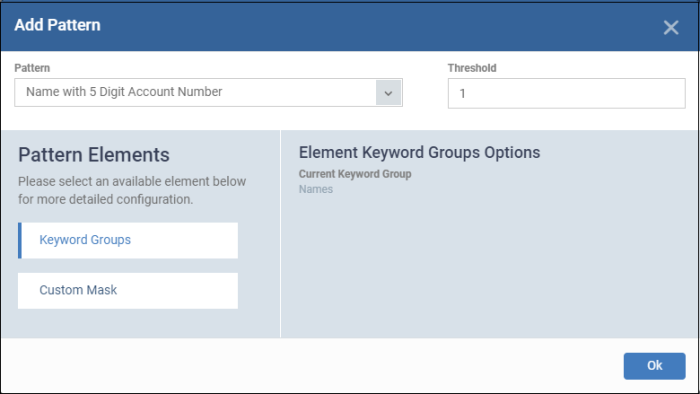
      Pattern Elements – Available for ‘name with account numbers’ predefined patterns

      • Keyword Groups - ‘Names’ keyword group is added by default for ‘name with account numbers’ predefined patterns. You cannot edit this.
      • Custom Mask - (optional) Specify the number(s) that you want to scan and identify. The number of digit fields shown here depends on the selected pattern. For example, six fields are shown if you select ‘name with 6 digit account number’.

      Click ‘Custom Mask’.


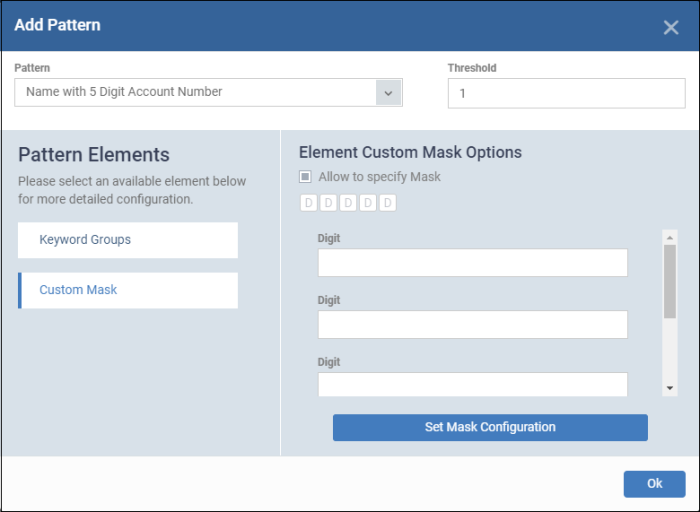
      • Allow to specify Mask – Enable this if you want to search for specific numbers. 
      • Enter the number in each field. For example if you want to search for account numbers ending with 345, then leave the first two fields blank and enter 3, 4 and 5 in third, fourth and fifth fields. 
      • Click ‘Set Mask Configuration’ then ‘Ok’.

      The pattern type is added to the list.

      • Repeat the process to add more patterns


      • Click the pencil icon in the 'Action' column to edit a pattern selection and / or its threshold.
      • Click 'Save'.


      Document types

      • This tab lets you choose which types of file you want to scan for sensitive data.
      • You can choose PDFs, Word documents, HTML files, text files and/or ZIP files.
      • The scan will search the content of all files which have a matching file extension in the locations you specified.

      Click the 'Document Types' tab then 'Edit':


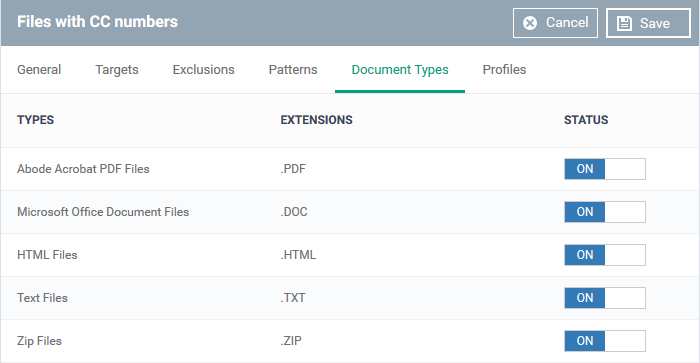
      • Use the switches in the status column to choose which types of files you want to scan
      • Click 'Save'
      You can now add the rule to the 'Data Loss Prevention' section of a Windows profile.
      • See Data Loss Prevention Settings for help to add a DLP scan to a profile.
      Comodo Help
      • IT Platform:
      • Help
      • Scripts
      • Wiki
      • Forum
      • Developer
      • RMM
      • Patch Management
      • Service Desk
      • ITSM
      • Managed Service Provider
      • Managed Detection and Response
      • Ticketing System
      • Helpdesk
      • ITIL

      Copyright 2025 Itarian