


Profiles for Android Devices
Android profiles let you configure a device's network access rights, security restrictions, scan schedule, and other settings.
Process in brief:
- Click 'Configuration Templates' > 'Profiles'
- Click 'Create' > 'Create Android Profile'
- Type a name and description for your profile then click the 'Create' button. The profile now appears in 'Configuration Templates' > 'Profiles'.
- Once you have fully configured your profile you can apply it to devices, device groups, users and user groups.
- You can make any profile a 'Default' profile by selecting the 'General' tab then clicking the 'Edit' button.
Create an Android profile
- Click 'Configuration Templates' > 'Profiles'
- Click the 'Create' button > 'Create Android Profile':
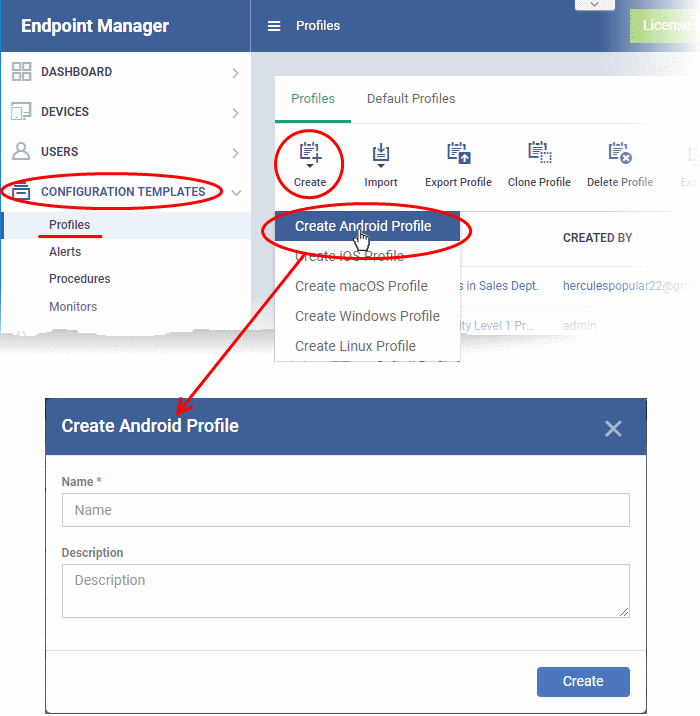
- Enter a name and description for the profile
- Click the 'Create' button
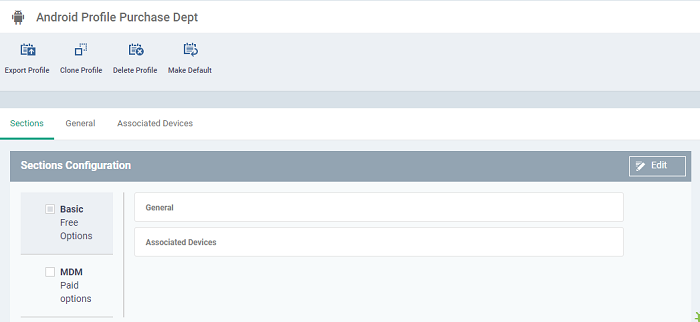
- The 'Sections' tab split into two parts ,the left side shows the license that tells you if they are paid features or not and the right where you can configure the enabled features.
- Basic - All of the sections included within the ITarian Basic license
- MDM- All of the sections are included within ITarian Device license, if you enable more than one requires one license per device.
- Select the profile section you need to configure. Select the box next to the license / group of items you want to configure so the profile will enable.
- Click 'Save' to update the profile and section view.
- After saving the profile the system will display the new sections as shown above.
- You need to configure the highlighted 'Yellow warning text' sections and 'Plug icon' on section title
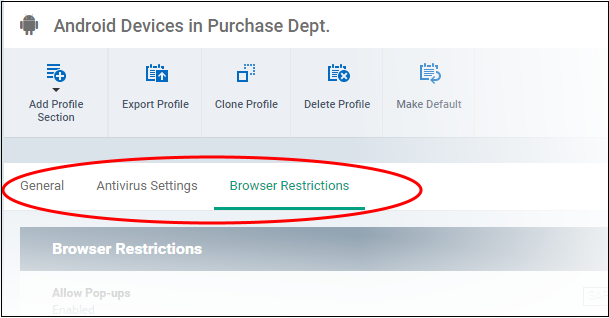
View General section
- Click 'General' tab,this will provide you the summary of the created profile.
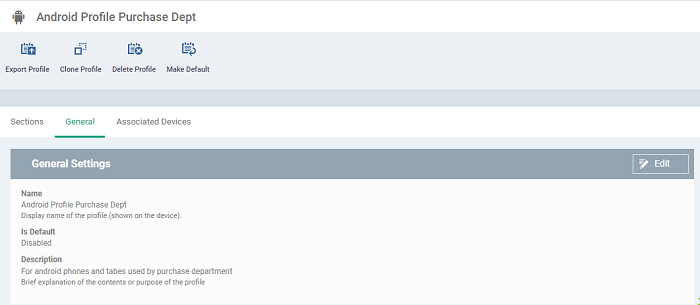
- A 'default' profile is one that is applied automatically to any device which matches its operating system. You can have multiple 'default' profiles per operating system.
- Click the 'Make Default' button if you want this profile to be a default.
- Alternatively, click the 'Edit' button on the right of the 'General' settings screen and enable 'Is Default'.
- Click 'Save'.
|
Tip: You can set any profile as default profile in the 'Profiles' screen. See Edit Configuration Profiles for more details. |
Configure Associated Device Settings
-
Click 'Configuration Templates' > 'Profiles'
-
Click on the name of a Windows profile to open it's details page
-
Click the 'Associated Devices' tab

The interface displays all the added source profile.
|
Column Heading |
Description |
|
OS |
The operating system of the device. |
|
Device Name |
Name of the device that source profile associated |
|
Owner name |
The name of the owner to which the source profile is associated. |
|
Source Associated |
Name where the source profile added like device, users or default |
Add a source to profile
-
Click 'Configuration Templates' > 'Profiles'
-
Open the Windows profile you want to configure
-
Click 'Associated Devices ' > 'Assign Source to Profile'

- Select the and start typing the name which you need to add and select the name from the displayed result
- The options are :
- Selected user(s)
- Selected user groups(s)
- Selected device(s)
- Selected device group(s)
- Device(s) of selected customer(s)
- User(s)
- Click 'Add' to assign a source to profile
- Select a device to remove the profile configiration
- Click 'Remove Device. The assigned source profile will be removed from the device
- Click the funnel button at the right end to open the filter options.

- To filter the items or search for a device based on its device name and owner name. Enter the search criteria in part or full in the text box and click 'Apply'.
- To display all the items again, remove / deselect the search key from filter and click 'OK'.
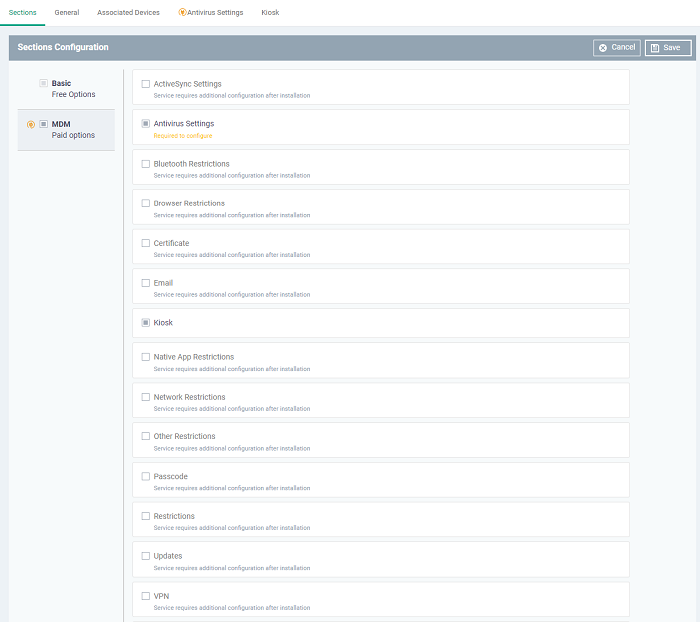
The next step is to add profile sections.
- Each profile section contains a range of settings for a specific security or management feature.
- For example, there are profile sections for 'Browser Restrictions', 'Antivirus Settings', 'Network Restrictions', 'VPN' and so on.
- You can add as many different sections as you want when building your device profile.
- To get started:
- Click 'Add Profile Section'
- Select the security component that you want to include in the profile:


|
Note:
Many Android profile settings have small information boxes next to
them which indicate the OS and/or device required for the setting
to work correctly. For example, the following box indicates that the setting supports KNOX 2.0+ (Samsung For Enterprises) devices and tablets only.
|

The settings screen for the selected component is shown. After saving, it is available as a link at the top.
The following sections explain more about each of the sections:
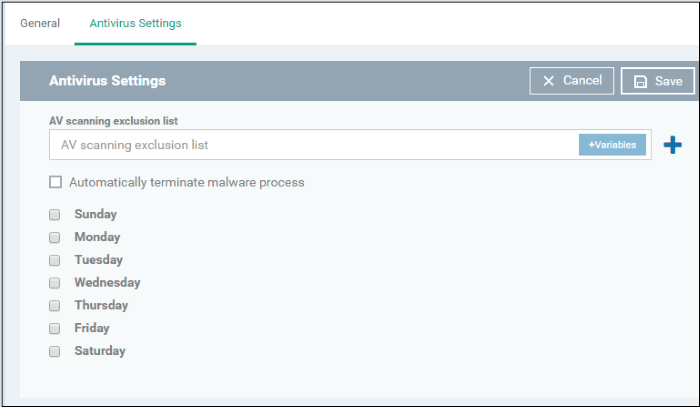
Configure Antivirus settings
- Click 'Antivirus Settings' in the 'Add Profile Section' drop-down
|
Antivirus Settings - Table of Parameters |
||
|---|---|---|
|
Form Element |
Type |
Description |
|
AV scanning exclusion list |
Text Field |
Lets you add trusted apps. Trusted apps are excluded from real-time, on-demand and scheduled antivirus scans run on the devices. You can add apps installed from the Google Play Store and apps installed through the EM App store.
For more details on getting the bundle identifier for an app, see explanation given below this table. Click the variables button
|
|
Automatically terminate malware process |
Checkbox |
If enabled, any malware found is stopped from running. From this point it might be ignored (allowed to remain on the device) or uninstalled, depending on the settings in Android client antivirus settings.
|
|
Schedule scan |
Checkbox |
Select if you want to automate the process of antivirus scanning. Select the checkbox beside the day(s) that you want the scheduled scan to run. |
 to insert dynamic values. See
 to add more 'AV scanning exclusions list' fields.
 to remove an item from the 'AV scanning
exclusion list ' field.
to remove an item from the 'AV scanning
exclusion list ' field.- Click the 'Save' button.
Obtain Bundle/Package Identifier
The bundle identifier is a string that identifies the .apk package used to installing the app.
For Google Play Apps:
The bundle identifier can be found at the end of the app's Google Play download URL.
For example, 'com.comodo.batterysaver' is the Comodo Battery Saver app id in the URL
https://play.google.com/store/apps/details?id=com.comodo.batterysaver
For Enterprise Apps installed through EM App Store:
The bundle identifier can be viewed from the App Details screen of the App.
- Click 'App Store' from the left and choose Android
- Click on the app from the list displayed at the right
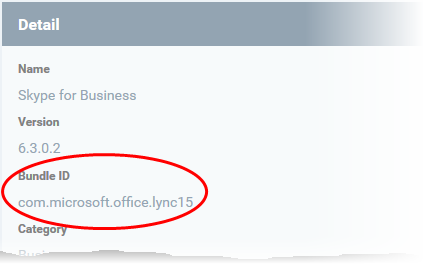
The bundle identifier is displayed in the 'Bundle ID' field.
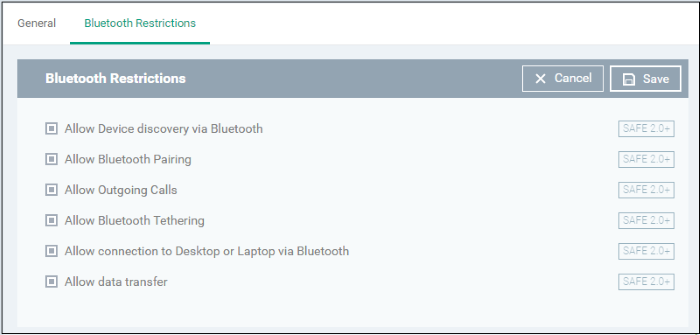
Configure Bluetooth Restrictions settings
The feature is supported for Samsung for Enterprise (SAFE) devices only.
- Click 'Bluetooth Restrictions' from the 'Add Profile Section' drop-down
|
Bluetooth Restrictions Settings - Table of Parameters |
||
|---|---|---|
|
Form Element |
Type |
Description |
|
Allow Device discovery via Bluetooth |
Checkbox |
Allows discovery of other devices via Bluetooth. |
|
Allow Bluetooth Pairing |
Checkbox |
Allows users' devices to pair with other their devices via Bluetooth. |
|
Allow Headset |
Checkbox |
Allows the use of bluetooth headsets connected with the device |
|
Allow Hands Free |
Checkbox |
Allows to use the device with Bluetooth headsets and hands-free kits |
|
Allow A2DP |
Checkbox |
Allows the transmission of stereo audio from the device to a set of Bluetooth headphones or stereo system. |
|
Allow Outgoing Calls |
Checkbox |
Allows users to make calls using Bluetooth enabled devices (eg. hands-free devices) |
|
Allow Bluetooth Tethering |
Checkbox |
Allows users to enable/disable Bluetooth tethering option. |
|
Allow connection to Desktop or Laptop via Bluetooth |
Checkbox |
Allow users to enable/disable Bluetooth connection with Desktop or Laptop. |
|
Allow data transfer |
Checkbox |
Allows data transfer between devices via Bluetooth. |
- Click the 'Save' button.
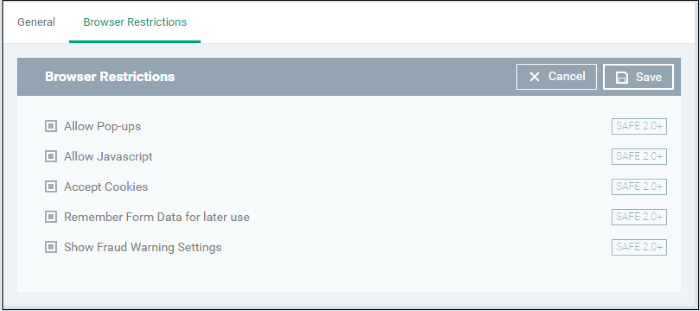
Configure Browser Restrictions settings
The feature is supported for
Samsung for Enterprise (SAFE) devices only.
- Click 'Browser Restrictions' from the 'Add Profile Section' drop-down
The 'Browser Restrictions' settings screen will be displayed.
|
Browser Restrictions Settings - Table of Parameters |
||
|---|---|---|
|
Form Element |
Type |
Description |
|
Allow Pop-ups |
Checkbox |
Pop-ups in browsers will be allowed in the user devices. |
|
Allow Javascript |
Checkbox |
Java scripts will be allowed on user devices. |
|
Accept Cookies |
Checkbox |
Users will be allowed to modify Cookies settings on their devices. |
|
Remember Form Data for later use |
Checkbox |
Users will be allowed to use Auto Fill settings on their devices. |
|
Show Fraud Warning Settings |
Checkbox |
Users will be allowed to view Fraud Warning Settings on their devices. |
- Click the 'Save' button.
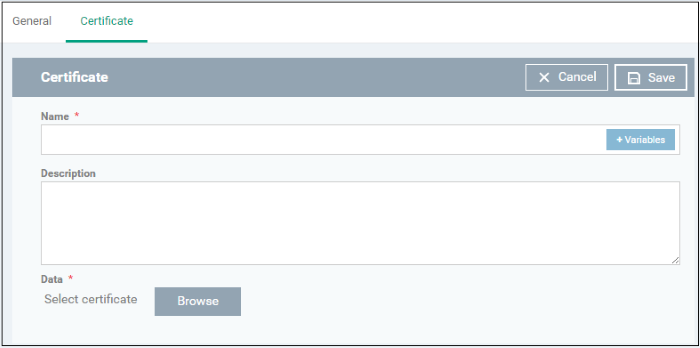
Configure Certificate settings
The 'Certificate' settings section is used to upload certificates and will act as a repository from which certificates can be selected for use in other areas like 'Wi-Fi, 'Exchange Active Sync' and 'VPN'.
- Click 'Certificate' from the 'Add Profile Section' drop-down
The 'Certificate' settings screen will be displayed.
|
Certificate Settings - Table of Parameters |
||
|---|---|---|
|
Form Element |
Type |
Description |
|
Name |
Text Field |
Enter the label of the certificate. Click the variables button |
|
Description |
Text Field |
Enter an appropriate description for the certificate. |
|
Data |
Browse button |
Browse to the location of the stored certificate and select the certificate. Note: Only certificate files with extensions 'pub', 'crt' or 'key' can be uploaded. |
-
Click the 'Save' button.
The certificate will be added to the certificate store.
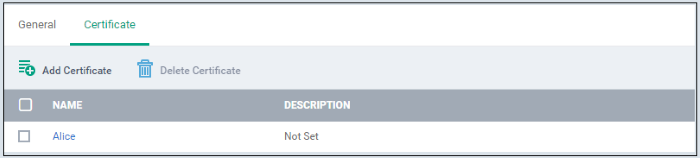
- Click 'Add Certificate' and repeat the process to add more certificates.
- Click on the name of the certificate to view the certificate key and edit the name
|
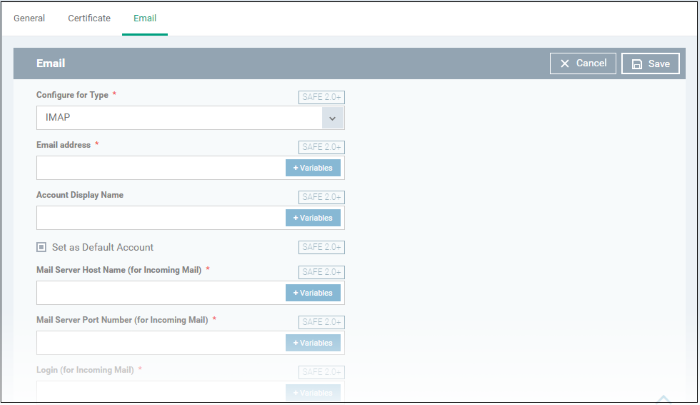
Note: The feature is supported for Samsung for Enterprise (SAFE) devices only. This area allows administrators to configure email settings on devices. |
- Click 'Email' from the 'Add Profile Section' drop-down
|
Email Settings - Table of Parameters |
||
|---|---|---|
|
Form Element |
Type |
Description |
|
Configure for Type* |
Drop-down |
Choose the protocol for incoming mail server from IMAP and POP. |
|
Email address* |
Text Field |
Enter the email address of the user at the incoming mail server If the profile is for a single user. Click the variables button to insert dynamic values if the profile is for several users. The email address of the
users to whom the profile is associated are automatically added
to the profile while rolling out the same to the devices. See Create and Manage Custom Variables for more details on variables. |
|
Account Display Name |
Text Field |
Enter a label to identify the user's email account at the incoming mail server, if the profile is for a single user. Click
the variables button See Create and Manage Custom Variables for more details on variables. The email address of the users to whom the profile is associated are automatically added to the profile while rolling out the same to the devices. |
|
Set as Default Account |
Checkbox |
The email account is set as default for the users. |
|
Mail Server Host Name (for Incoming Mail) * |
Text Field |
Enter the host name or IP address of the incoming mail server, if the profile is for a single user. Click
the variables button See Create and Manage Custom Variables for more details on variables. |
|
Mail Server Port Number (for Incoming Mail) * |
Text Field |
Enter the server port number used for incoming mail service for a single user. For POP3, it is usually 110 and if SSL is enabled it is 995. For IMAP, it is usually 143 and if SSL is enabled it is 993. Click
the variables button See Create and Manage Custom Variables for more details on variables. |
|
Login (for Incoming Mail)* |
Text Field |
Enter the username for the email account of the user at the incoming mail server if the profile is for a single user. Click
the variables button See Create and Manage Custom Variables for more details on variables. The email usernames of the users to whom the profile is associated are automatically added to the profile while rolling out to the devices. |
|
Password (for Incoming Mail)* |
Text Field |
Enter the password for the email account of the user at the incoming mail server if the profile is for a single user. Click
the variables button See Create and Manage Custom Variables for more details on variables. The email passwords of the users to whom the profile is associated are automatically added to the profile while rolling out to the devices. |
|
Use SSL Incoming |
Checkbox |
Communication between incoming mail server and devices is encrypted using SSL (Secure Socket Layer Protocol). |
|
Accept All Certificates (for Incoming Mail) |
Checkbox |
The device automatically accepts all SSL certificates from the incoming mails. |
|
Accept TLS Certificates (for Incoming Mail) |
Checkbox |
The device automatically accepts all secure certificates for TLS (Transport Secure Layer Protocol) from the incoming mails. |
|
Mail Server Host Name (for Outgoing mail)* |
Text box |
Enter the host name or IP address of the outgoing (SMTP) mail server for a single user. Click
the variables button See Create and Manage Custom Variables for more details on variables. |
|
Mail Server Port Number (for Outgoing Mail) * |
Text box |
Enter the server port number used for outgoing (SMTP) mail service, if the profile is for single user. If no port number is specified then ports 25, 587 and 465 are used in the given order. Click
the variables button See Create and Manage Custom Variables for more details on variables. |
|
Login (for outgoing Mail)* |
Text Field |
Enter the username for the email account of the user at the outgoing (SMTP) mail server if the profile is for a single user. Click
the variables button See Create and Manage Custom Variables for more details on variables. The email usernames of the users to whom the profile is associated are automatically added to the profile while rolling out to the devices. |
|
Password (for outgoing Mail)* |
Text Field |
Enter the password for the email account of the user at the outgoing (SMTP) mail server if the profile is for a single user. Click
the variables button See Create and Manage Custom Variables for more details on variables. The email passwords of the users to whom the profile is associated are automatically added to the profile while rolling out to the devices. |
|
Use SSL (for Outgoing Mail) |
Checkbox |
Communication between outgoing mail server and devices is encrypted using SSL. |
|
Accept All Certificates (for Outgoing Mail) |
Checkbox |
The device automatically accepts all SSL certificates from outgoing mails. |
|
Accept TLS Certificates (for Outgoing Mail) |
Checkbox |
The device automatically accepts all secure certificates for TLS (Transport Secure Layer Protocol) from outgoing mails. |
|
Sender Name |
Text Field |
Enter the name that should appear in the 'From' field of the sent emails from the device if the profile is for a single user. Click
the variables button See Create and Manage Custom Variables for more details on variables. |
|
Set Signature |
Text Field |
Enter the signature and
other details that appears at the end of the mails sent from the
device. Click
the variables button See Create and Manage Custom Variables for more details on variables. |
|
Prevent Moving Mail to other Accounts |
Checkbox |
The user cannot move sent or received mails to another account. |
|
Always Vibrate on New Email Notification |
Checkbox |
The device vibrates in addition to sound alert when a new email is received. |
|
Vibrate on New Email Notification if device is silent |
Checkbox |
The device vibrates when a new email is received, when the device is in silent mode. |
- Click the 'Save' button.
ActiveSync settings allows you to configure user access to Exchange Server mail accounts.
|
Note: Please make sure users are not blocked from using the email client on their devices in Native App Restriction. |
- Click 'ActiveSync Settings' from the 'Add Profile Section' drop-down

|
ActiveSync Settings - Table of Parameters |
||
|---|---|---|
|
Form Element |
Type |
Description |
|
Email Address * |
Text Field |
Click the 'Variables'
button |
|
User Name * |
Text Field |
Click the 'Variables'
button |
|
Domain * |
Text Field |
Enter the domain name in the field.
Click
the variables button |
|
Server Address * |
Text Field |
Enter the server address
of the ActiveSync. Click
the variables button |
|
Password * |
Text Field |
Leave the field blank. The user need to enter the password while configuring the email account for the first time. After it is validated, the users can access the email account without entering the password. |
|
Account Display Name |
Text Field |
Enter a label to identify the user's email account at the exchange server. Click
the variables button |
|
Email Signature |
Text Field |
Enter the signature and
other details that appears at the end of the mails sent from the
device. Click
the variables button |
| Maximum Email Size | Comodo Box |
The maximum size of email that the user can download from the server. Click
the variables button |
|
Sync Emails |
Drop-down |
Choose the period for which the emails are to be kept synchronized between the device and the exchange server from the recent past, from the drop-down. |
|
Sync Calendar |
Drop-down |
Select the period for which the calendar events are to be synchronized between the device and the exchange server, from the drop-down. |
|
Use SSL |
Checkbox |
Communication between the device and the exchange server is encrypted using SSL (Secure Socket Layer Protocol). |
|
As default account |
Checkbox |
The email address is used as default for sending out emails. |
|
Accept all certificates |
Checkbox |
The device automatically accepts all SSL certificates. |
|
Can sync contacts |
Checkbox |
Allows synchronization of user contacts between device and exchange server. |
|
Can sync calendar |
Checkbox |
Allows synchronization user created calendar events between the device and the exchange server. |
|
Can sync tasks |
Checkbox |
Allows synchronization of user scheduled tasks between the device and the exchange server. |
|
Manual roaming sync |
Checkbox |
The user can use the sync feature manually while away from the home network. |
 beside '%u.mail' from the User Variables' list. The email address
of the users to whom the profile is associated are
automatically filled. For more details on variables, see
beside '%u.mail' from the User Variables' list. The email address
of the users to whom the profile is associated are
automatically filled. For more details on variables, see Fields with * are
mandatory.
- Click the 'Save' button.
The settings are saved and shown under the 'ActiveSync Settings' tab. You can edit the settings or remove the section from the profile at anytime. See 'Edit Configuration Profiles' for more details.
| Note: This feature is only supported by Samsung for Enterprise (SAFE) devices. Background: Kiosk mode is a feature intended to help administrators lock-down mobile devices by limiting the applications that are able to run on a device. 'Locking' a device to particular applications can prevent users from opening other applications or straying into important device configuration areas. You can also block aspects of the OS should you wish. An example is a retail or school environment where only certain apps should be used on the device. |
- Click 'Kiosk' from the 'Add Profile Section' drop-down
|
Kiosk Settings - Table of Parameters |
||
|---|---|---|
|
Form Element |
Type |
Description |
|
Kiosk Mode Type |
Drop-down |
The two Kiosk modes are:
Restrictions on access to other device functions, such as task manager and the status bar, can also be configured for either mode. |
|
If 'Single App' is selected as Kiosk Mode Type: |
||
|
Enter ID of Kiosk Apps |
Text Field |
Enter the Package ID of the app that will run in Kiosk mode.
Click
the variables button See Obtain Bundle/Package Identifier for more details on Package ID. |
|
If 'Default mode' is selected as Kiosk Mode Type: |
||
|
Enter ID of Kiosk Apps |
Text Field |
Enter the ID of the apps that will run in Kiosk mode. Click
the variables button See Obtain Bundle/Package Identifier for more details on Package ID. Click Click the |
|
Block Multi-Window Mode |
Checkbox |
Users cannot open multiple windows. |
|
Block Task Manager |
Checkbox |
Users cannot access task manager screen. |
|
Hide Navigation Bar |
Checkbox |
The navigation bar is not shown on the devices. |
|
Hide System Bar |
Checkbox |
The system bar is not shown on the devices. |
|
SMS/MMS blocking |
Checkbox |
All SMSs and MMSs to the device are blocked. |
|
Block Keys |
Drop-down |
This feature lets you selectively block touch keys and icons available on device screen.
For example, if you do not want the
device owners to use 'Caps Lock' key you can block it. Click in the 'Block Keys' field:
Scroll down to view the full list and select the key. Repeat the process to add more keys to the blocked
keys list. |
|
The following features are visible if 'Default mode' is selected as Kiosk Mode Type: |
||
|
Show messenger App |
Checkbox |
Allows the messenger app on the device. |
|
Show email App |
Checkbox |
Allows the email app on the device. |
|
Show dialer App |
Checkbox |
Allows the phone dialer app on the device. |
|
Show admin bypass button |
Checkbox |
Adds the 'Admin bypass' button to the device screen. The user can tap the button and enter the password to exit from the Kiosk mode. |
|
Admin bypass password |
Text Field |
Enter the password required to exit the Kiosk
mode.
Click
the variables button |

-
Click the 'Save' button.
The settings are saved and shown under the 'Kiosk' tab. You can edit the settings or remove the section from the profile at anytime. See 'Edit Configuration Profiles' for more
details.
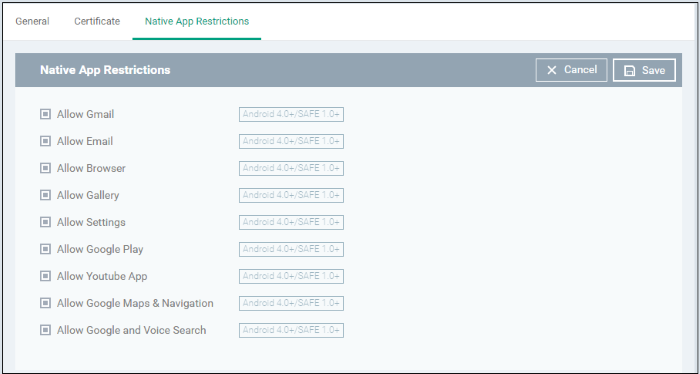
Configure Native App Restriction settings
Native applications are those applications that come with the device operating system. Examples include the email and gallery apps. Admins can restrict users from accessing these native applications if required.
Note - Native app restrictions are only available on Samsung devices which support KNOX 1.0 +
- Click 'Add Profile Section' > 'Native App Restrictions'
|
Native Application Restrictions Settings - Table of Parameters |
||
|---|---|---|
|
Form Element |
Type |
Description |
|
Allow Gmail |
Checkbox |
Users can the access Gmail app. |
|
Allow Email |
Checkbox |
Users can the access the default email app. |
|
Allow Browser |
Checkbox |
Users can access the default Android browser on their devices. |
|
Allow Gallery |
Checkbox |
Users can access Gallery on their devices. |
|
Allow Settings |
Checkbox |
Users can change their device settings. |
|
Allow Google Play |
Checkbox |
Users can access Google Play on their mobile devices. |
|
Allow YouTube App |
Checkbox |
Users can access the YouTube app. |
|
Allow Google Maps & Navigation |
Checkbox |
Users can access Google Maps and Navigation app on their devices. |
|
Allow Google and Voice Search |
Checkbox |
Users can use Google and Voice Search services. |
- Click the 'Save' button.
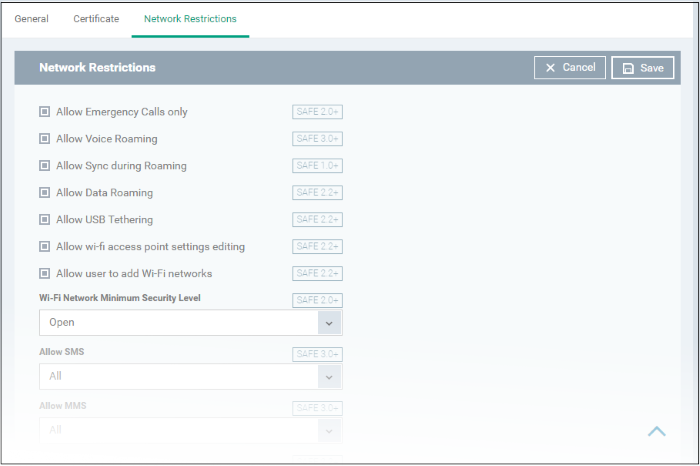
Configure Network
Restriction settings
The feature is supported for
Samsung for Enterprise (SAFE) devices only.
- Click 'Network Restrictions' from the 'Add Profile Section' drop-down
|
Network Restrictions Settings - Table of Parameters |
||
|---|---|---|
|
Form Element |
Type |
Description |
|
Allow Emergency Calls only |
Checkbox |
Allows users to make only emergency calls. |
|
Allow Voice Roaming |
Checkbox |
Allows users to make/receive voice call during roaming. |
|
Allow Sync during Roaming |
Checkbox |
Allows the use of Sync feature while roaming. |
|
Allow Data Roaming |
Checkbox |
Allows users to enable 'Data Roaming' option on their devices to access data services during roaming. |
|
Allow USB Tethering |
Checkbox |
Allows users to enable 'USB Tethering' option for sharing their data connection through USB tethering. |
|
Allow Wi-Fi access point settings editing |
Checkbox |
Allows users to edit the Wi-Fi access point settings to create a Wi-Fi hotspot for sharing their data connection. |
| Allow user to add Wi-Fi networks | Checkbox | Allows users to add Wi-Fi networks. |
|
Wi-Fi Network Minimum Security Level |
Drop-down |
Select the minimum security level required for the user to access the Wi-Fi network. The options available are:
|
|
Allow SMS |
Drop-down |
Allows text messages as per the option selected:
|
|
Allow MMS |
Drop-down |
Allows multimedia messages as per the option selected:
|
|
Blacklisted SSIDs |
Text Field |
Specify the name (SSID)
of the wireless network that should be blacklisted.
Click
the variables button Click the Click the minus |
- Click the 'Save' button.
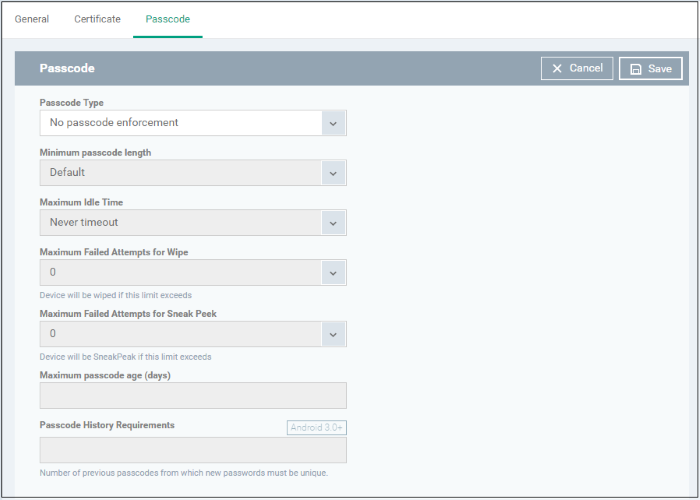
- Click 'Passcode' from the 'Add Profile Section' drop-down
|
Passcode Settings - Table of Parameters |
||
|---|---|---|
|
Form Element |
Type |
Description |
|
Passcode Type |
Drop-down |
Select the type of passcode from the drop-down that the user should configure for unlocking screen lock. The options available are:
|
|
Minimum Passcode Length |
Drop-down |
Select the minimum number of passcode characters that can be configured by the user. (4-16 characters). |
|
Maximum Idle Time |
Drop-down |
Select the maximum time period that can be set as idle time out period for device screen lock, from the drop-down. |
|
Maximum Failed Attempts for Wipe |
Drop-down |
Select the maximum number of allowed unsuccessful login attempts for device wipe (4-16). Set the value as '0' for unlimited. If the number of failed attempts crosses this value, the data in the device will be automatically wiped off. This is useful to prevent the data from the device being stolen, if somebody, other than the user, tries to login to the device by entering guessed passcodes. |
|
Maximum Failed Attempts for Sneak Peek |
Drop-down |
Select the maximum number of allowed unsuccessful login attempts for 'Sneak Peek' feature (4-16). Set the value as '0' for unlimited. The 'Sneak Peek' feature makes the device take a photograph with the front-facing camera if the wrong passcode is entered a certain number of times - hopefully getting a picture of the person holding a lost/stolen device. Photographs are forwarded to the EM server. The photograph(s) sent by the device can be viewed from the 'Device Details' interface that can be accessed by clicking 'Devices' > 'Device List' > the device name > 'Sneak Peek' tab. See View Sneak Peak Pictures for more details. Note: If the device does not have a front camera, the rear camera will capture a photograph and forward to the EM server. |
|
Maximum Passcode Age (days) |
Text Field |
Enter the maximum period in days for which a passcode can be valid. After the number of days specified in this field, the passcode will expire. The user needs to change the passcode before the current one expires. |
|
Passcode History Requirements |
Text Field |
Set how many unique, new passcodes must be created before the user can re-use an old password. This feature is available for Android 3.0 and later versions only. |
- Click the 'Save' button.
The settings are saved and shown under the 'Passcode' tab. You can edit the settings or remove the section from the profile at any time. See 'Edit Configuration Profiles' for more
details.
Configure Restrictions
settings
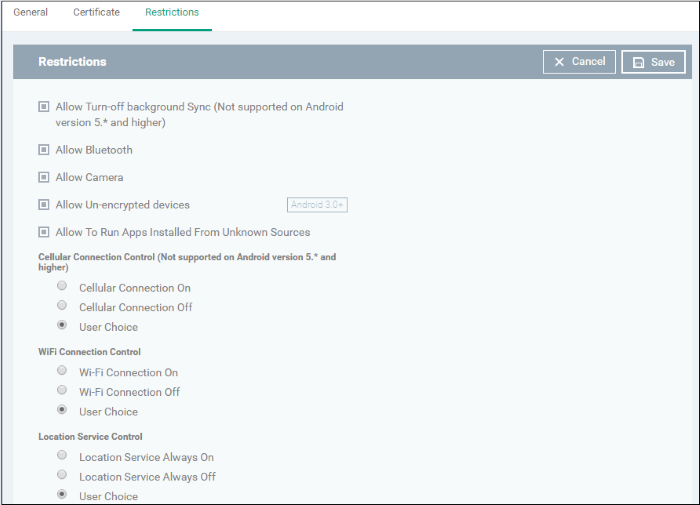
- Click 'Restrictions' from the 'Add Profile Section' drop-down
|
Restrictions Settings - Table of Parameters |
||
|---|---|---|
|
Form Element |
Type |
Description |
|
Allow Turn-off background Sync (Not supported on Android version 5.* and higher) |
Checkbox |
Select this to allow users to disable background synchronization setting on their devices. |
|
Allow Turn-off background Sync |
Checkbox |
Select this to allow users to disable background synchronization setting on their devices. |
|
Allow Bluetooth |
Checkbox |
Select this to allow users to enable/disable Bluetooth on their devices. |
|
Allow Camera |
Checkbox |
Select this to allow users to use the camera |
|
Disable Storage Encryption |
Checkbox |
Select this to enable users to use device without turning on the storage encryption feature. This feature is available for Android 3.0 and later versions only. |
|
Allow to run Apps installed from unknown sources |
Checkbox |
Select this to allow users to run installed applications that were download from unknown sources. |
|
Cellular Connection Control |
Radio Buttons |
Choose whether or not to allow the device to connect to the internet through a cellular network (2G/3G/4G):
|
|
WiFi Connection Control |
Radio Buttons |
Choose whether or not to allow the device to connect to WiFi networks and hotspots from the options.
|
- Click the 'Save' button.
|
Note: The feature is supported for only Samsung for Enterprise (SAFE) devices. |
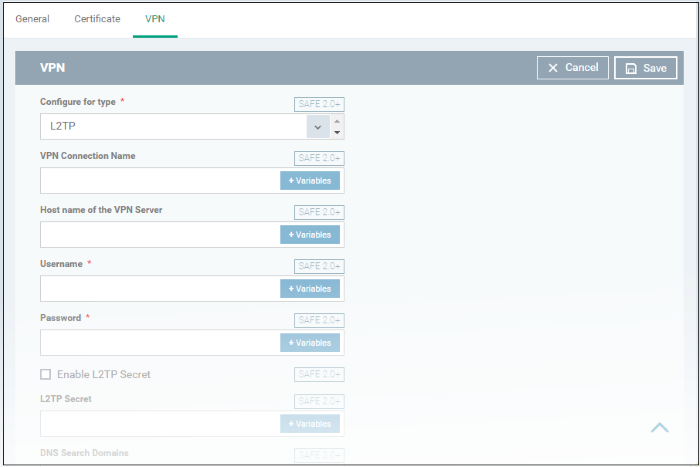
- Click 'VPN' from the 'Add Profile Section' drop-down
|
Form Element |
Description |
|---|---|
|
Configure for type |
Choose the VPN connection type from drop-down. The options available are:
|
|
VPN Connection Name |
Enter a label for the connection. This is shown on the device. Click
the variables button |
|
Host name of the VPN Server |
Enter the IP address or
host name of the VPN server. Click
the variables button |
|
Username / Password |
Enter the login credentials for the device to connect to the VPN server. Click
the variables button |
|
DNS Search Domains |
Enter the IP address or
hostname of the DNS server that devices will use for
searching domain names. Click
the variables button |
|
For L2TP |
|
|
If enabled, the pre-shared L2TP should be entered in the next field L2TP Secret. |
|
If L2TP Secret is enabled, then the pre-shared key should be entered here by the user or selected from 'Variables'. |
|
For PPTP |
|
|
If selected, the connection is encrypted between the devices and the VPN server. |
|
For L2TP/IPSec PSK |
|
|
If enabled, the pre-shared L2TP should be entered in the next field L2TP Secret. |
|
If L2TP Secret is enabled, then the pre-shared key should be entered here by the user or selected from 'Variables' |
|
If IP Sec Identifier is enabled, then the pre-shared key should be entered here by the user or selected from 'Variables' |
|
For IPSec Xauth PSK |
|
|
Enter the IPSec
identifier in the field. Click the variables button to insert dynamic values. See Create and Manage Custom Variables for more details on variables. |
|
If IP Sec Identifier is enabled, then the pre-shared key should be entered here by the user or selected from 'Variables'. |
|
Use for persistent connect |
Forcibly maintains the VPN connection always at the enabled state, irrespective of user's settings through 'Settings' > 'Wireless and Networks' in the device. In order to enable this feature, the following conditions are to be satisfied:
|
 to insert dynamic values. See
 - Click the 'Save' button after entering or selecting the parameters.
The VPN settings is added to the profile.

- Click 'Add VPN' and repeat the process to add more VPN connections
- Click the name of a connection to view and edit its settings
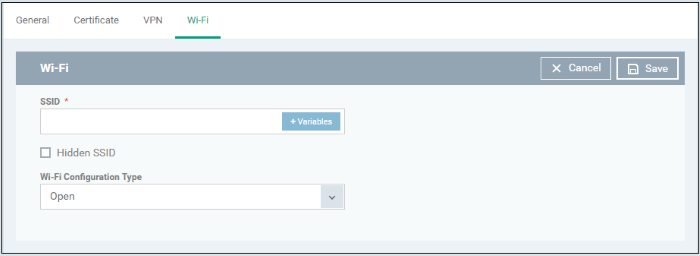
- Click 'Wi-Fi' from the 'Add Profile Section' drop-down
|
Wi-Fi Settings - Table of Parameters |
||
|---|---|---|
|
Form Element |
Type |
Description |
|
SSID* |
Text Field |
Enter the Service Set Identifier (SSID), the name of the wireless network that a device should connect to. Click
the variables button |
|
Hidden SSID |
Checkbox |
If enabled, users will be able to access the hidden wireless network too. Users must know the hidden SSID details and the required credentials. |
|
Wi-Fi Configuration Type |
Drop-down |
Select the type of encryption used by the wireless network from the drop-down. The options available are:
The settings for each type is explained in the next table Wi-Fi configuration type settings. |
 to insert dynamic values. See
 Fields marked * are mandatory.
Wi-Fi Configuration Type settings
|
Wi-Fi Configuration Type Settings - Table of Parameters |
|
|---|---|
|
Security Configuration Type |
Description |
|
Open |
No password is required for accessing the Wi-Fi network by the user. |
|
WEP |
Encryption Key - Enter the password to access the Wi-Fi network. Click
the variables button |
|
WPA / WPA2 - PSK |
Encryption Key - Enter the password to access the Wi-Fi network. Click
the variables button |
|
EAP 802 |
1. EAP Authentication Protocol - Select the EAP authentication protocol from the drop-down. Applicable for Samsung for Enterprise devices SAFE 1.0 + version.
2. Phase 2 Authentication Protocol - Select the Phase 2 authentication protocol from the drop-down. Applicable for Samsung for Enterprise devices SAFE 1.0 + version.
3. Certificate - Select the user certificate from the drop-down or upload it using the 'Add New' button. 4. CA Certificate - Select the CA certificate from the drop-down or upload it using the 'Add New' button. 5. Authentication Username - Enter the username for Wi-Fi authentication. Applicable for Samsung for Enterprise devices SAFE 1.0 + version. 6. Authentication Password - Enter the password for Wi-Fi authentication. Applicable for Samsung for Enterprise devices SAFE 1.0 + version. 7. Authentication Domain - Enter the details for RADIUS Server authentication. Applicable for Samsung for Enterprise devices SAFE 1.0 + version. 8. Anonymous
Identity - Enter the username that can be used for anonymous
access. Applicable for Samsung for Enterprise devices SAFE 1.0 +
version.
Click
the variables button |
- Click the 'Save' button after entering or selecting the parameters.

- Click 'Add Wi-Fi' and repeat the process to add more Wi-Fi networks.
- Click the SSID of the network to view and edit its settings.
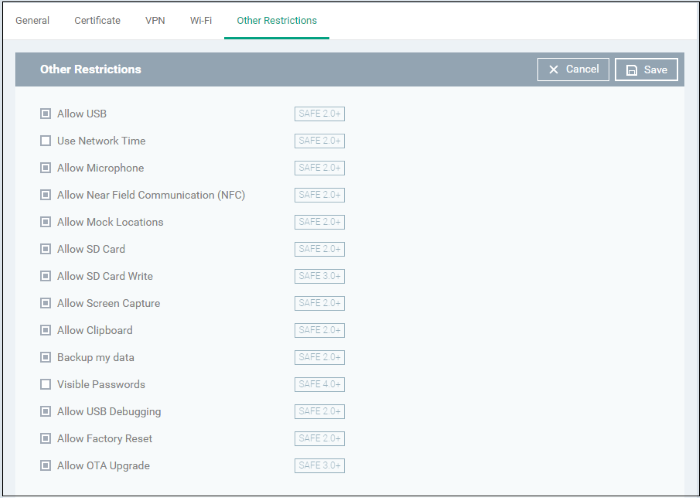
Configure 'Other Restrictions' settings
The feature
is supported for Samsung for Enterprise (SAFE) devices only.
- Click 'Other Restrictions' from the 'Add Profile Section' drop-down
|
Other Restrictions Settings - Table of Parameters |
||
|---|---|---|
|
Form Element |
Type |
Description |
|
Allow USB |
Checkbox |
Allows users to establish connections via USB ports. |
|
Use Network Time |
Checkbox |
Allows users to enable/disable network provided values in Date & Time settings. |
|
Allow Microphone |
Checkbox |
Allows users to use microphone. If this is disabled, users can use microphone for receiving and making calls only. |
|
Allow Near Field Communication (NFC) |
Checkbox |
Allows devices to establish connection via NFC. |
|
Use GPS satellites for Location Detection |
Checkbox |
Allows users to enable/disable GPS system for location detection. |
|
Use Wireless Networks / Google's Location Service for Location Detection |
Checkbox |
Allows users to enable /disable Wireless Networks / Google's Location Service for location detection |
|
Allow Mock Locations |
Checkbox |
Allows users to enable/disable 'Mock Location' in developer mode settings. |
|
Allow SD Card |
Checkbox |
Users can use SD card on their devices. |
|
Allow SD Card Write |
Checkbox |
Users can store data on the SD card. |
|
Allow Screen Capture |
Checkbox |
Users can take screenshot of the device screen. |
|
Allow Clipboard |
Checkbox |
Users will be allowed to use clipboard memory. |
|
Backup my data |
Checkbox |
Users will be allowed to take a backup of data in their devices. |
|
Visible Passwords |
Checkbox |
Allows users to enable/disable show password feature. |
|
Allow USB Debugging |
Checkbox |
Allows users to enable/disable 'USB Debugging' option in developer mode settings. |
|
Allow Google Crash Report |
Checkbox |
Crash reports will be sent to Google. |
|
Allow Factory Reset |
Checkbox |
Allows users to reset the device to factory settings. |
|
Allow OTA Upgrade |
Checkbox |
Allows devices to receive Over-the-air (OTA) upgrade for software updates. |
- Click the 'Save' button.
The settings are saved and shown under 'Other Restrictions' tab. You can edit the settings or remove the section from the profile at anytime. See 'Edit Configuration Profiles' for more details.
The updates section of a Android profile lets you configure when managed devices should check for new version updates.
- Click 'Updates' from the 'Add Profile Section' drop-down

- Allow agent to show new version availability pop-up - Forces the endpoint to check the new version update pop-up. Deselect if you want to disable auto-updates.(Default = Enabled)
- Update Check Period - Choose how often the agent should check for updates. (Default = 1 hour, Maximum = 1 day)
The available options are:
- Choice of every one hour to 1 day.You can increase the update check period by moving the blue coloured dot icon.
- The agent checks for a new version update within the selected period.
- Click the 'Save' button.
- The settings are saved and shown under 'Updates' tab. You can edit the settings or remove the section from the profile at anytime. See 'Edit Configuration Profiles' for more details.