Import Users from a CSV File
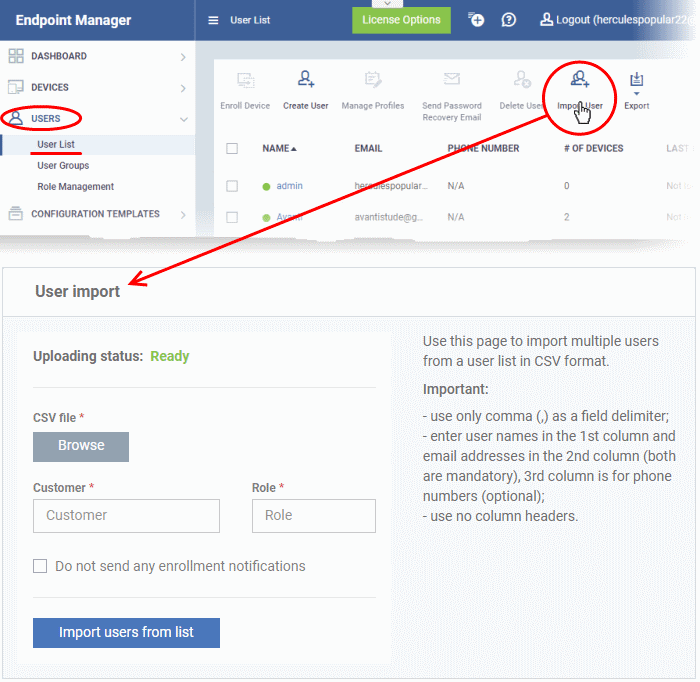
- Click 'Users' > 'User List' > 'Import User'
- You can load a list of new users by importing them from a comma separated values (CSV) file
- You can also specify the role to be assigned to all users in the list
- After adding a user, you can enroll Windows, Android, iOS, Mac OS and Linux devices for them
Process in brief
- Create a CSV file containing the list of users using spreadsheet applications like Microsoft Excel or OpenOffice Calc and save it on your admin computer
- The file should contain the following, separated values: 'Username' (mandatory), 'Email address' (mandatory) and 'Phone number' (optional).
- The file should not contain column headers and each line should contain a single user.
- In the EM admin console, click 'Users' > 'User List' > 'Import User'
- Browse to and select the CSV file you want to import
- Select a customer and a role for the imported users
- Upload the file
- The users will be imported and enrolled to EM
Requirements for .csv file
There are two
mandatory fields and one optional field per user account:
- Username (mandatory)
- Email address (mandatory)
- Phone number (optional)
- Each line in the CSV file should contain one user entry
- The CSV file should not contain column headers
Example:
"james", "james@ditherscons.com", "9876543210"
Import users from a list
- Click 'Users' > 'User List'
- Click 'Import User' on the top

|
'User Import' Form – Table of Parameters |
|
|---|---|
|
Parameter |
Description |
|
CSV File |
Click 'Browse' navigate to the location of the CSV file and select the file. |
|
Customer |
The customer to which the users belong.
|
|
Role |
The role to be assigned to all users in the list.
EM ships with four default roles:
You can create custom roles which grant access to selected areas of EM. These roles can be assigned to users as required. All roles created in EM and ITarian will appear in the 'Role' drop-down when importing new users. See. See Configure Role Based Access Control for Users for more details. |
|
Do not send any enrollment notifications |
Select whether or not the account creation notification mail or account activation mail is to be sent to the imported users. Note: The notification mails will not be sent if you select Users role for the new users. |
- Configure the parameters and click 'Import users from List'

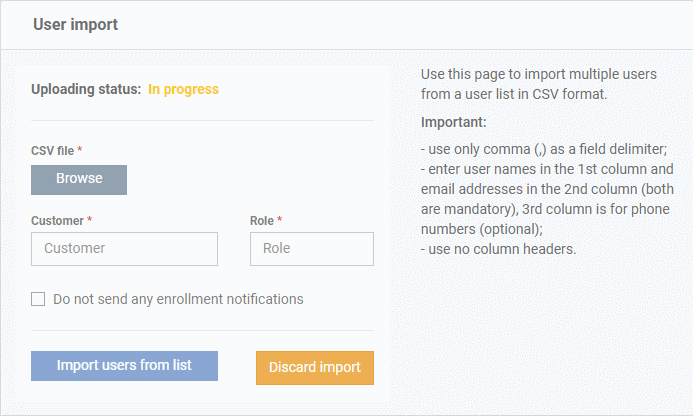
The progress will be displayed.
- If you want to stop the import process, click 'Discard Import'
- Once the users have been imported, you can enroll devices for them.
- Users will receive an account activation mail if they are assigned a role that has access to the admin console. This includes the standard ' Administrator' and 'Technician' roles.
- Tip - Enable 'Do not send any enrollment notifications' in the import screen if you do not want to send these mails.
- Users click the link in the mail to activate their account and configure their password.
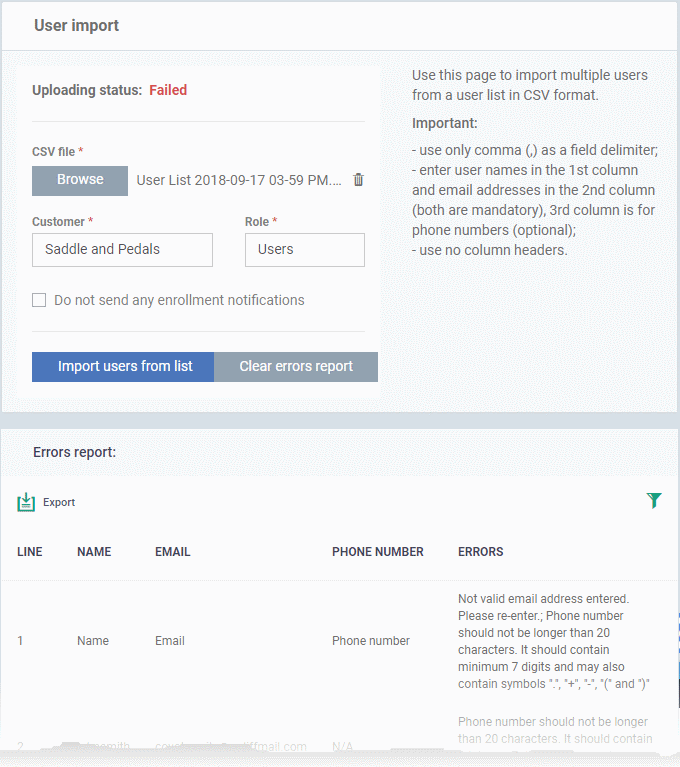
- You will receive an error report if the import fails. See the following screenshot:

- The report can help pinpoint errors so you can rectify them.
- Click 'Export' to download the error report in .csv format
- Click 'Clear errors report' to remove the report and retry the import.


