


- Introduction To Endpoint Manager
- The Admin Console
- The Dashboard
- Advanced Reports
- Devices And Device Groups
- Manage Device Groups
- Manage Devices
- Add New Devices
- Manage Windows Devices
- View And Edit Device Name
- View Summary Information
- View Hardware Information
- View Network Information
- View Maintenance Windows Associated With Device
- View And Manage Profiles Associated With A Device
- View And Manage Applications Installed On A Device
- View The Files On A Device
- View Exported Configurations And Import Profiles
- View MSI Files Installed On A Device Through Endpoint Manager
- View And Manage Patches For Windows And 3rd Party Applications
- View Antivirus Scan History
- View And Manage Device Group Memberships
- View Device Logs
- Manage Mac OS Devices
- Manage Linux Devices
- Manage Android Devices
- Manage IOS Devices
- View User Information
- Remove A Device
- Remote Management Of Windows And Mac OS Devices
- Remotely Manage Folders And Files On Windows Devices
- Manage Processes On Remote Windows Devices
- Manage Services On Remote Windows Devices
- Use The Command Prompt On Remote Windows Devices
- Apply Procedures To Windows And Mac Devices
- Remotely Install And Manage Packages On Windows Devices
- Remotely Install Packages On Mac OS Devices
- Remotely Install Packages On Linux Devices
- Send Enrollment Link To IOS Devices
- Install Apps On Android/iOS Devices
- Generate An Alarm On Android Devices
- Remotely Lock Mobile And Mac OS Devices
- Wipe Selected Mobile And Mac Devices
- Assign Configuration Profiles To Selected Devices
- Set / Reset Screen Lock Password For Mobile Devices
- Update Device Information
- Send Text Messages To Mobile Devices
- Restart Selected Windows Devices
- Shutdown Windows Devices
- Wake Offline Device
- Change A Devices Owner
- Change The Ownership Status Of A Device
- Add Custom Notes And Tags On Devices
- Generate Device List Report
- Bulk Enrollment Of Devices
- Download And Install The Remote Control Tool
- Users And User Groups
- Manage Users
- Manage User Groups
- Configure Role Based Access Control For Users
- Configuration Templates
- Create Configuration Profiles
- Profiles For Android Devices
- Profiles For IOS Devices
- Profiles For Windows Devices
- Create Windows Profiles
- Associated Devices Settings
- Remote Control Settings
- Client Access Control
- Client Proxy Settings
- Communication Client Update Settings
- Client UI Settings
- Remote Tools Settings
- Monitors
- Procedure Settings
- Patch Management Settings
- Maintenance Window Settings
- Global Proxy Settings
- Communication Client Rebranding
- Client Logging Settings
- Antivirus Settings
- Firewall Settings
- HIPS Settings
- File Rating Settings
- Containment Settings
- VirusScope Settings
- Xcitium Verdict Cloud
- Agent Discovery Settings
- External Devices Control Settings
- Miscellaneous Settings
- Script Analysis Settings
- Data Loss Prevention Settings
- Xcitium Client Security Access Control
- XCS Updates
- Xcitium Client Security UI Settings
- XCS Logging Settings
- Thumbnails Settings
- Performance Settings
- Chat Settings
- Import Windows Profiles
- Create Windows Profiles
- Profiles For Mac OS Devices
- Create A Mac OS Profile
- Antivirus Settings For Mac OS Profile
- Certificate Settings For Mac OS Profile
- Restrictions Settings For Mac OS Profile
- VPN Settings For Mac OS Profile
- Wi-Fi Settings For Mac OS Profile
- Remote Control Settings For Mac OS Profile
- External Device Control Settings For Mac OS Profile
- Valkyrie Settings For MacOS Profile
- Procedure Settings For Mac Profiles
- Monitor Settings For Mac OS Profile
- Create A Mac OS Profile
- Profiles For Linux Devices
- View And Manage Profiles
- Edit Configuration Profiles
- Manage Default Profiles
- Manage Alerts
- Manage Procedures
- View And Manage Procedures
- Create A Custom Procedure
- Combine Procedures To Build Broader Procedures
- Review / Approve / Decline New Procedures
- Add A Procedure To A Profile / Procedure Schedules
- Import / Export / Clone Procedures
- Change Alert Settings
- Apply Procedures To Devices
- Edit / Delete Procedures
- View Procedure Results
- Manage Monitors
- Data Loss Prevention Rules
- Create Configuration Profiles
- Security Systems
- Security Dashboards
- View Contained Applications
- Manage File Trust Ratings On Windows Devices
- View List Of Valkyrie Analyzed Files
- Antivirus And File Rating Scans
- View And Manage Identified Malware
- View And Manage Quarantined Items
- View Android Threat History
- View And Manage Autorun Items
- View History Of External Device Connection Attempts
- Data Loss Prevention Scans
- Network Management
- Endpoint Intelligence
- Application Store
- Applications
- License Management
- Configure Endpoint Manager
- Email Notifications, Templates And Custom Variables
- Endpoint Manager Portal Configuration
- Integrate Apple DEP With Endpoint Manager
- View Version And Support Information
- Appendix 1a - Endpoint Manager Services - IP Nos, Host Names And Port Details - EU Customers
- Appendix 1b - Endpoint Manager Services - IP Nos, Host Names And Port Details - US Customers
- Appendix 2 – Endpoint Manager License Types
- Appendix 3 - Pre-configured Profiles
- About ITarian
Quick Start: Your First Report in 5 Minutes
Goal: see which software vendors appear most often, as a pie chart, and save it.
- Click 'Create report'.
- In 'Pick your data', click your database.
- Type Software Inventory in the search box and click the table with that name. A table of rows opens.
- Click 'Summarize'. The side panel opens with 'Count' already selected.
- Under 'Group by', type Vendor in 'Find...' and click 'Software Vendor'. The report becomes a bar chart.
- Click 'Done' to close the panel.
- Click 'Visualization' (bottom left) and choose 'Pie'. Click 'Done'.
- Click 'Save', type a clear name (for example Software count by Vendor), keep 'Your personal collection', and click 'Save'.
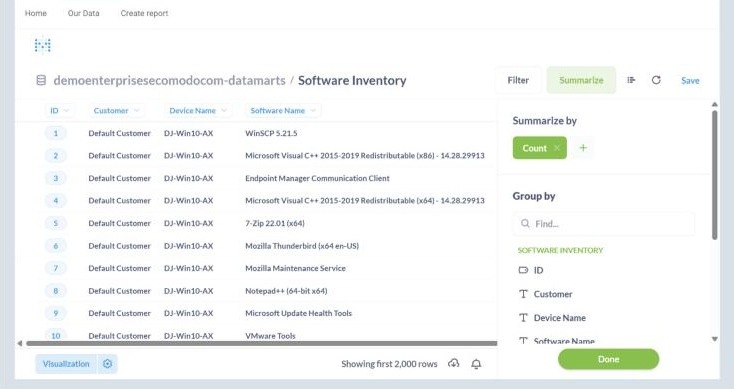
Steps 4 and 5: the 'Summarize' panel. 'Count' is chosen. Pick a field under 'Group by'.
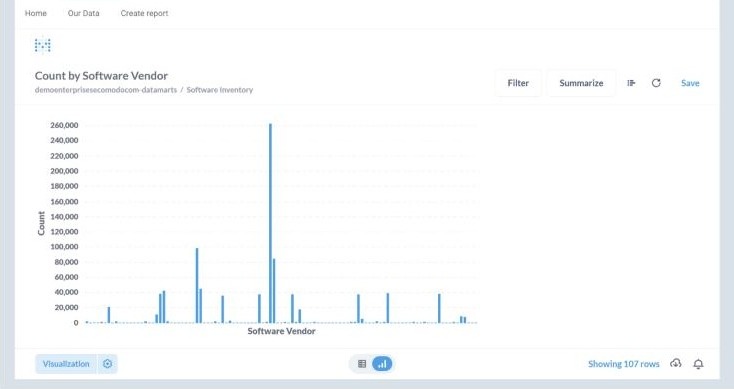
Step 5: grouping by 'Software Vendor' gives a bar chart automatically.
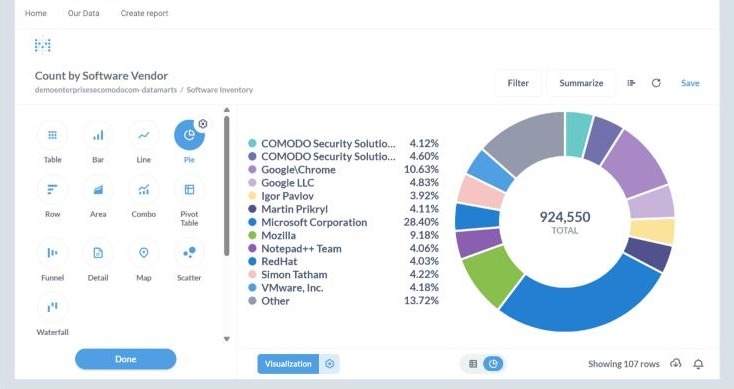
Step 7: 'Visualization' > 'Pie' shows each vendor's share and the total.
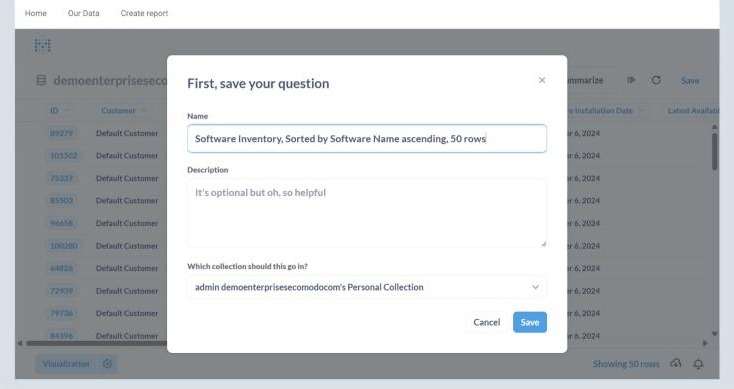
Step 8: the 'Save' dialog. Change the name and keep your personal collection.
Note: After saving, a prompt asks 'Add this to a dashboard?'. Choose 'Not now'. Dashboards are not available to every account (see 'Limits and Things That Are Not Available').
Tip: Search for a table in the main search box too. Results show both tables and saved reports, each labelled with where it lives, so you can start from a report someone else already built.