ITarian Help

Find the desired product help

IT Endpoint Manager

IT Endpoint Manager

Endpoint Manager Administrator Guide 6.43

English

Print Help Download Help
Advanced Reports > Common Tasks In Advanced Reporting
  • Introduction To Endpoint Manager
    • Key Concepts
    • Best Practices
    • Quick Start
    • Sign Up For An ITarian Account
    • Login Into The Admin Console
  • The Admin Console
  • The Dashboard
  • Advanced Reports
    • What Advanced Reporting Is
    • Open Advanced Reporting
    • A Tour Of The Screen
    • Quick Start: Your First Report In 5 Minutes
    • Common Tasks In Advanced Reporting
    • Worked Examples
    • Reference: Buttons, Charts And Options
    • Troubleshooting
    • Limits And Things That Are Not Available
    • Tips For Better Reports
    • Glossary
  • Devices And Device Groups
    • Manage Device Groups
      • Create Device Groups
      • Edit A Device Group
      • Assign Configuration Profiles To A Device Group
      • Remove A Device Group
      • Run Procedures On Customer Groups
    • Manage Devices
      • Add New Devices
      • Manage Windows Devices
        • View And Edit Device Name
        • View Summary Information
        • View Hardware Information
        • View Network Information
        • View Maintenance Windows Associated With Device
        • View And Manage Profiles Associated With A Device
        • View And Manage Applications Installed On A Device
        • View The Files On A Device
        • View Exported Configurations And Import Profiles
        • View MSI Files Installed On A Device Through Endpoint Manager
        • View And Manage Patches For Windows And 3rd Party Applications
        • View Antivirus Scan History
        • View And Manage Device Group Memberships
        • View Device Logs
      • Manage Mac OS Devices
        • View And Edit Mac OS Device Name
        • Summary Information Of Mac Device
        • View Installed Applications
        • View Quarantined Files
        • View And Manage Profiles Associated With A Device
        • View Mac OS Packages Installed On A Device Through Endpoint Manager
        • View And Manage Device Group Memberships
        • View Mac Device Logs
      • Manage Linux Devices
        • View And Edit Linux Device Name
        • Summary Information Of Linux Device
        • View Network Information Of A Linux Device
        • View And Manage Profiles Associated With A Linux Device
        • View Linux Packages Installed On A Device Through Endpoint Manager
        • View And Manage Device Group Memberships
      • Manage Android Devices
        • View And Edit Device Name
        • View Summary Information
        • Manage Installed Applications
        • View And Manage Profiles Associated With A Device
        • View Sneak Peek Pictures To Locate Lost Devices
        • View The Location Of The Device
        • View And Manage Device Group Memberships
      • Manage IOS Devices
        • View Summary Information Of An IOS Device
        • View And Edit Device Name Of An IOS Device
        • View Applications Installed On An IOS Device
        • View And Manage Profiles Associated With An IOS Device
        • View The Location Of An IOS Device
        • View And Manage Group Memberships Of An IOS Device
      • View User Information
      • Remove A Device
      • Remote Management Of Windows And Mac OS Devices
        • Transfer Items To / From The Remote Computer
      • Remotely Manage Folders And Files On Windows Devices
      • Manage Processes On Remote Windows Devices
      • Manage Services On Remote Windows Devices
      • Use The Command Prompt On Remote Windows Devices
      • Apply Procedures To Windows And Mac Devices
      • Remotely Install And Manage Packages On Windows Devices
      • Remotely Install Packages On Mac OS Devices
      • Remotely Install Packages On Linux Devices
      • Send Enrollment Link To IOS Devices
      • Install Apps On Android/iOS Devices
      • Generate An Alarm On Android Devices
      • Remotely Lock Mobile And Mac OS Devices
      • Wipe Selected Mobile And Mac Devices
      • Assign Configuration Profiles To Selected Devices
      • Set / Reset Screen Lock Password For Mobile Devices
      • Update Device Information
      • Send Text Messages To Mobile Devices
      • Restart Selected Windows Devices
      • Shutdown Windows Devices
      • Wake Offline Device
      • Change A Devices Owner
      • Change The Ownership Status Of A Device
      • Add Custom Notes And Tags On Devices
      • Generate Device List Report
    • Bulk Enrollment Of Devices
      • Enroll Windows, Mac OS And Linux Devices By Installing The Communication Client
        • Enroll Windows Devices Via AD Group Policy
        • Enroll Windows, Mac OS And Linux Devices By Offline Installation Of Agent
        • Enroll Windows Devices Using Auto Discovery And Deployment Tool
      • Enroll The Android And IOS Devices Of AD Users
    • Download And Install The Remote Control Tool
  • Users And User Groups
    • Manage Users
      • Create New User Accounts
        • Manually Add Users
        • Import Users From A CSV File
      • Enroll User Devices For Management
        • Enroll Android Devices
        • Enroll IOS Devices
        • Enroll Windows Endpoints
        • Enroll Mac OS Endpoints
        • Enroll Linux OS Endpoints
      • View User Details
        • Update The Details Of A User
      • Assign Configuration Profiles To User Devices
      • Remove A User
      • Generate New Password For A User
      • Reset Two Factor Authentication Token For A User
      • Run Procedures On User Devices
    • Manage User Groups
      • Create A New User Group
      • Edit A User Group
      • Assign Configuration Profiles To A User Group
      • Remove A User Group
      • Run Procedures On Group Devices
    • Configure Role Based Access Control For Users
      • Create A New Role
      • Manage Permissions And Users Assigned To A Role
      • Remove A Role
      • Manage Roles Assigned To A User
  • Configuration Templates
    • Create Configuration Profiles
      • Profiles For Android Devices
      • Profiles For IOS Devices
      • Profiles For Windows Devices
        • Create Windows Profiles
          • Associated Devices Settings
          • Remote Control Settings
          • Client Access Control
          • Client Proxy Settings
          • Communication Client Update Settings
          • Client UI Settings
          • Remote Tools Settings
          • Monitors
          • Procedure Settings
          • Patch Management Settings
          • Maintenance Window Settings
          • Global Proxy Settings
          • Communication Client Rebranding
          • Client Logging Settings
          • Antivirus Settings
          • Firewall Settings
          • HIPS Settings
          • File Rating Settings
          • Containment Settings
          • VirusScope Settings
          • Xcitium Verdict Cloud
          • Agent Discovery Settings
          • External Devices Control Settings
          • Miscellaneous Settings
          • Script Analysis Settings
          • Data Loss Prevention Settings
          • Xcitium Client Security Access Control
          • XCS Updates
          • Xcitium Client Security UI Settings
          • XCS Logging Settings
          • Thumbnails Settings
          • Performance Settings
          • Chat Settings
        • Import Windows Profiles
      • Profiles For Mac OS Devices
        • Create A Mac OS Profile
          • Antivirus Settings For Mac OS Profile
          • Certificate Settings For Mac OS Profile
          • Restrictions Settings For Mac OS Profile
          • VPN Settings For Mac OS Profile
          • Wi-Fi Settings For Mac OS Profile
          • Remote Control Settings For Mac OS Profile
          • External Device Control Settings For Mac OS Profile
          • Valkyrie Settings For MacOS Profile
          • Procedure Settings For Mac Profiles
          • Monitor Settings For Mac OS Profile
      • Profiles For Linux Devices
        • Create A Linux Profile
          • Antivirus Settings For Linux Profile
          • Communication Client And Comodo Client - Security Application Update Settings For Linux Profile
          • User Interface Settings For Linux Profile
          • Logging Settings For Linux Profile
          • Clients Access Control Settings For Linux Profile
          • Valkyrie Settings For Linux Profile
    • View And Manage Profiles
      • Export And Import Configuration Profiles
      • Clone A Profile
    • Edit Configuration Profiles
    • Manage Default Profiles
    • Manage Alerts
      • Create A New Alert
      • Edit / Delete An Alert
    • Manage Procedures
      • View And Manage Procedures
      • Create A Custom Procedure
      • Combine Procedures To Build Broader Procedures
      • Review / Approve / Decline New Procedures
      • Add A Procedure To A Profile / Procedure Schedules
      • Import / Export / Clone Procedures
      • Change Alert Settings
      • Apply Procedures To Devices
      • Edit / Delete Procedures
      • View Procedure Results
    • Manage Monitors
      • Create Monitors And Add Them To Profiles
        • Monitors For Windows Devices
        • Monitors For Mac OS Devices
      • View And Edit Monitors
    • Data Loss Prevention Rules
      • Create DLP Discovery Rules And Add Them To Profiles
      • View And Edit DLP Discovery Rules
      • Create DLP Monitoring Rules And Add Them To Profiles
      • View And Edit DLP Monitoring Rules
  • Security Systems
    • Security Dashboards
      • View Security Events By Time
      • View Security Events By Files
      • View Security Events By Device
    • View Contained Applications
    • Manage File Trust Ratings On Windows Devices
      • File Ratings Explained
    • View List Of Valkyrie Analyzed Files
    • Antivirus And File Rating Scans
      • Run Antivirus And/or File Rating Scans On Devices
      • Handle Malware On Scanned Devices
      • Update Virus Signature Database On Windows, Mac OS And Linux Devices
    • View And Manage Identified Malware
    • View And Manage Quarantined Items
    • View Android Threat History
    • View And Manage Autorun Items
    • View History Of External Device Connection Attempts
    • Data Loss Prevention Scans
      • DLP Logs
      • DLP Quarantined Files
  • Network Management
    • Create And Run Network Discovery Tasks
    • Manage Profiles For Network SNMP Devices
    • Manage Network Devices
      • Manage SNMP Devices
        • SNMP Device Details Interface
      • Discovered Devices
    • Manage Network Monitors
  • Endpoint Intelligence
    • Overview
    • Dashboard
    • Device Queries
    • Query Library
    • Monitors
    • Alert Behavior
  • Application Store
    • IOS Apps
      • Add IOS Apps And Install Them On Devices
      • Manage IOS Apps
    • Android Apps
      • Add Android Apps And Install Them On Devices
      • Manage Android Apps
    • Windows Apps
      • Install Windows Apps On Devices
  • Applications
    • View Applications Installed On Android And IOS Devices
      • Blacklist And Whitelist Applications
    • Patch Management
      • Manage OS Patches On Windows Endpoints
      • Install 3rd Party Application Patches On Windows Endpoints
        • EM Supported 3rd Party Applications
    • View And Manage Applications Installed On Windows Devices
      • Uninstall A Windows Application From Selected Devices
      • Uninstall A Windows Application From All Devices
    • Vulnerability Management
  • License Management
    • Manage Your Licenses
    • Manage License Allocation
    • Bill Forecast
  • Configure Endpoint Manager
    • Email Notifications, Templates And Custom Variables
      • Configure Email Templates
      • Configure Email Notifications
      • Create And Manage Custom Variables
      • Create And Manage Registry Groups
      • Create And Manage COM Groups
      • Create And Manage File Groups
      • View And Manage Pattern Variables
      • View And Manage Keyword Groups
    • Endpoint Manager Portal Configuration
      • Import User Groups From LDAP
      • Configure Communication And Security Client Settings
        • Configure The EM Android Client
          • Configure Android Client General Settings
          • Configure Android Client Antivirus Settings
          • Add Google Cloud Messaging (GCM) Token
        • Add Apple Push Notification Certificate
        • Configure Windows Clients
          • Configure Communication Client Settings
          • Configure Client Security Settings
      • Manage Endpoint Manager Extensions
      • Configure Endpoint Manager Reports
      • Device Removal Settings
      • Account Security Settings
      • Set-up Administrators Time Zone And Language
      • Configure Audit Log Settings
    • Integrate Apple DEP With Endpoint Manager
      • Link Endpoint Manager With Apple DEP
      • Manage Apple DEP Devices
      • Manage Apple DEP Profiles
      • Configure Apple DEP Notifications
    • View Version And Support Information
  • Appendix 1a - Endpoint Manager Services - IP Nos, Host Names And Port Details - EU Customers
  • Appendix 1b - Endpoint Manager Services - IP Nos, Host Names And Port Details - US Customers
  • Appendix 2 – Endpoint Manager License Types
  • Appendix 3 - Pre-configured Profiles
  • About ITarian

Common Tasks in Advanced Reporting


Step-by-step instructions for the common tasks in Advanced Reporting.

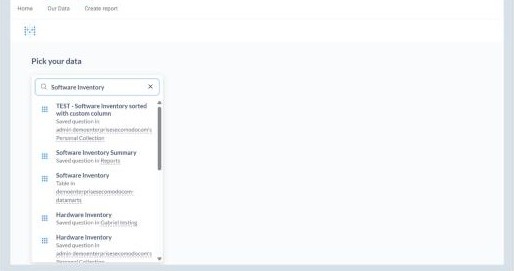
Pick the Data I Want

  1. Click 'Create report'.

  2. Click the database, then scroll or search the table list. Or type a name in the top search box.

  3. Click the table. The first rows appear in a grid (up to 2,000 rows shown).
IT_Endpoint_Manager_v2_1.png


Searching shows tables and saved reports, each labelled with where it lives.

Available Tables

Antivirus Health History, Antivirus Scan History, Av Db States, Device Group, Hardware Inventory, Metadata, Os, Patch Compliance Devices, Patch Compliance Patches, Patches Ref, Remote Tools Sessions, Software Inventory, Software Version History, Threat Activity, Time By Day, Tmp Device Group and User.

Tip: You can also start from 'Saved Questions' to build on a report that already exists.

Filter Rows


Filter by Date

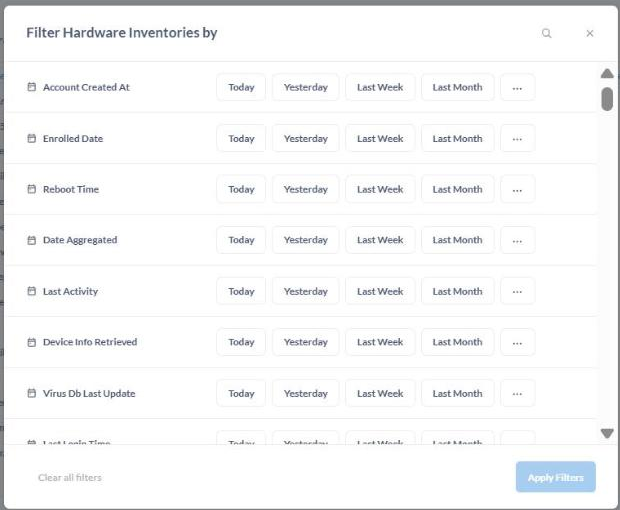
  1. Click 'Filter'. A list of every field in the table opens.

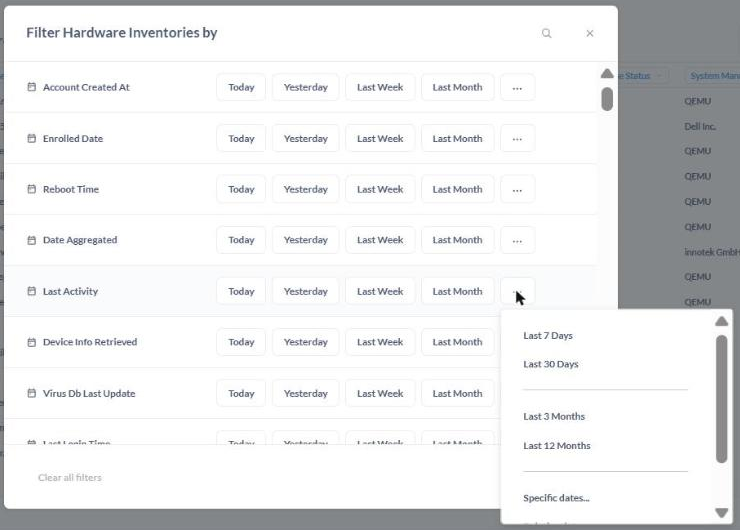
  2. For a date field, click a quick button: 'Today', 'Yesterday', 'Last Week' or 'Last Month'. Click '...' for more: 'Last 7 Days', 'Last 30 Days', 'Last 3 Months', 'Last 12 Months', 'Specific dates...'.

  3. Click 'Apply Filters'.

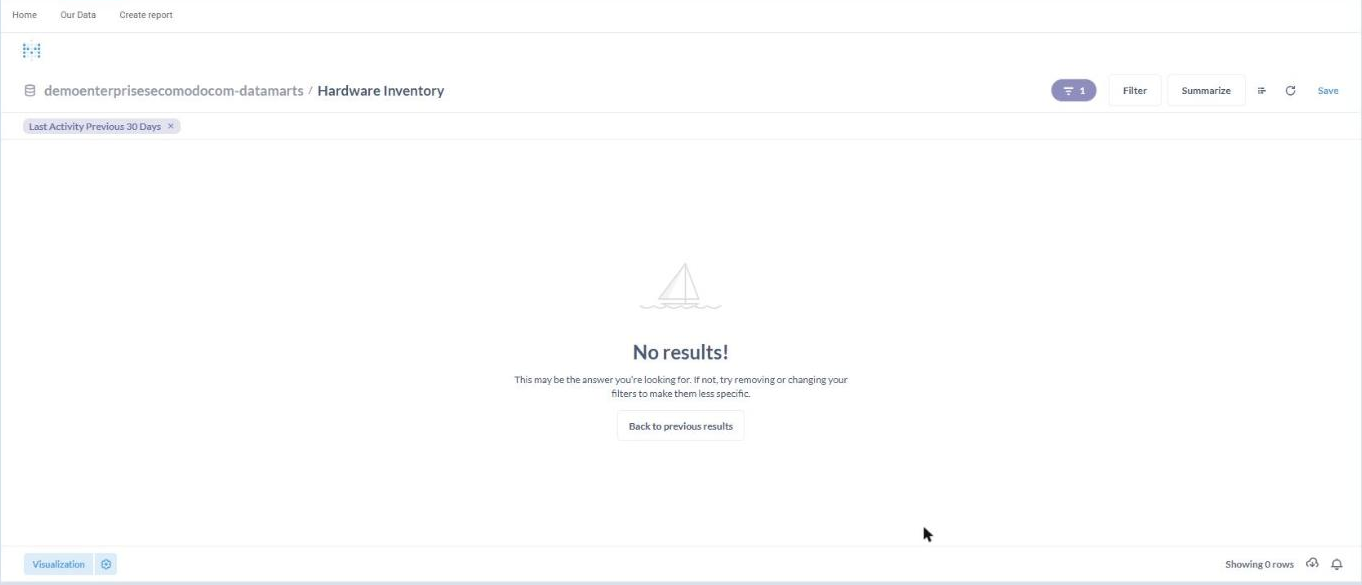
  4. Your filter shows as a chip under the title. Click the x on the chip to remove it.
IT_Endpoint_Manager_v2_2.png


The 'Filter' window lists every field. Date fields have quick buttons.
IT_Endpoint_Manager_v2_3.png


The '...' menu next to a date field: 'Last 7 Days', 'Last 30 Days', 'Last 3 Months' and more.


Use the search icon at the top of the dialog to find a field by name, and 'Clear all filters' to start over. A number badge next to the 'Filter' button shows how many filters are
active.


Note:
If your filter leaves nothing, the screen says 'No results!' with a 'Back to previous results' button. Remove or widen the filter.
IT_Endpoint_Manager_v2_4.png


A filter that removes every row shows 'No results!' with a 'Back to previous results' button. The filter chip sits under the title.


Filter by Text

  1. Click 'Filter' and find a text field, for example 'Device Name'.

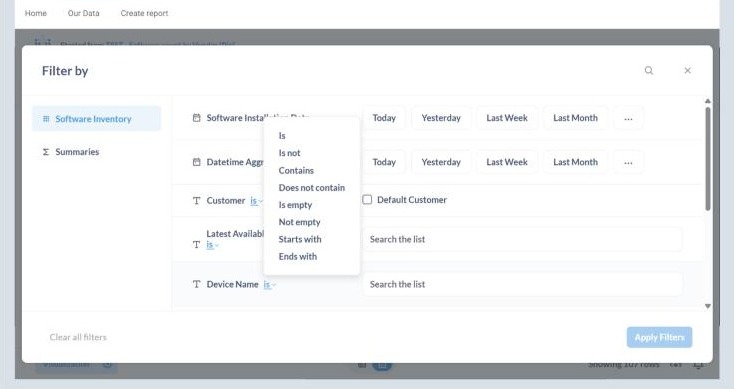
  2. Click the small operator link next to the field name (it says 'is') and choose one: 'Is', 'Is not', 'Contains', 'Does not contain', 'Is empty', 'Not empty', 'Starts with', 'Ends with'.

  3. Click the box and start typing. Matching values are suggested as you type.

  4. Click the value you want in the suggestion list.

  5. Click 'Apply Filters'. The chip shows the field, the operator and the value.
IT_Endpoint_Manager_v2_5.png

Step 2: the operator list for a text field ('Is', 'Is not', 'Contains' and so on).
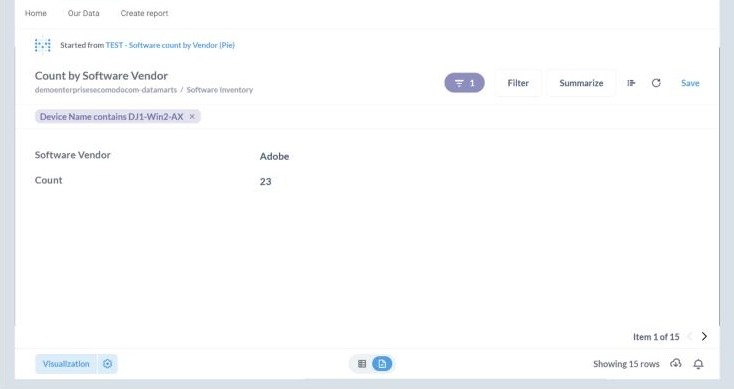
IT_Endpoint_Manager_v2_6.png


The applied text filter shows as a chip under the report title.

Note: If you type part of a name and press Enter, the first suggestion is chosen, not the text you typed. To filter on a part of a name, pick the exact value from the suggestions, or choose the value you really want.

Some short lists, such as 'Customer', show a tick box (for example 'Default Customer') instead of a text box. Tick the value you want.

The filter window has a list on the left. Your table name holds filters on the original rows. 'Summaries' holds filters on totals that you have calculated (for example only vendors with a count above 100).

Count and Group (Summarize)

  1. Click 'Summarize'.

  2. 'Summarize by' starts as 'Count'. Click '+' to add another measure, or x to remove one.

  3. Under 'Group by', click one or more fields, or type in 'Find...' to search.

  4. Click 'Done'. The report title updates itself, for example 'Count by Software Vendor'.

Tip: For number and date fields, click the group-by chip to change how values are bucketed (for example 'Auto binned').


Add More Measures to a Summary

  1. Click 'Summarize', then the '+' next to 'Count'.

  2. In 'Basic Metrics', choose one: 'Count of rows', 'Number of distinct values of...', 'Cumulative count of rows', 'Minimum of...', 'Maximum of...' and others further down the list. The '?' beside each one explains it.

  3. For measures that apply to a field, pick the field (for example 'Software Name').

  4. Click 'Done'. Each measure becomes its own column or series, and the title updates, for example 'Count and Distinct values of Software Name by Software Vendor'.
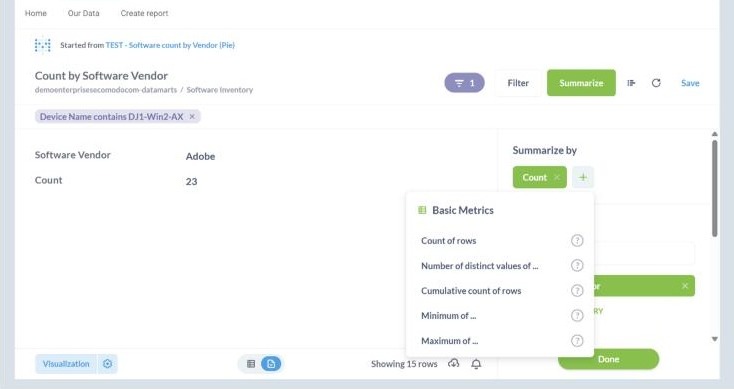
IT_Endpoint_Manager_v2_7.png

Step 2: the 'Basic Metrics' list after clicking '+' next to 'Count'.
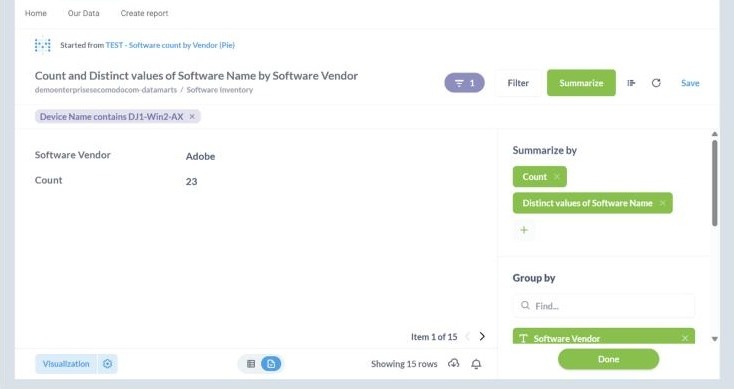
IT_Endpoint_Manager_v2_8.png


Two measures in one summary. The title updates automatically.


Use the x on a measure chip to remove it. Add more than one 'Group by' field to split the summary further.


Change How It Looks (Chart or Table)

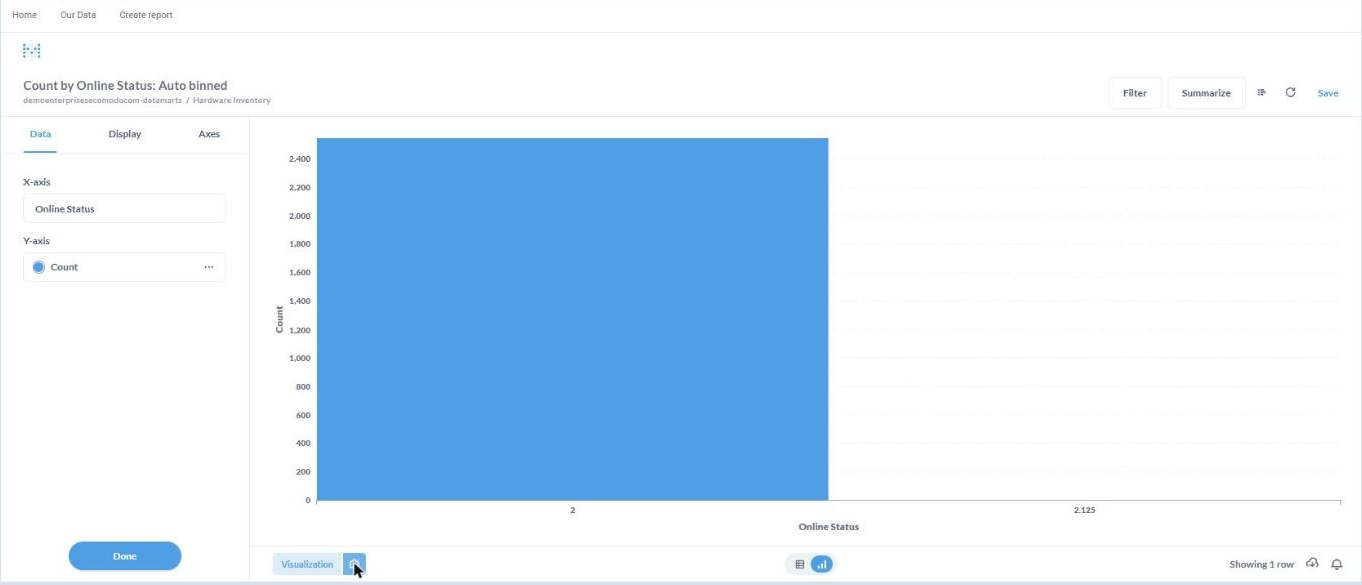
  1. Click 'Visualization' at the bottom left.

  2. Click a chart type (see 'Chart Types').

  3. Click 'Done'.

  4. Use the small table / chart switch at the bottom to flip between the data table and the chart.
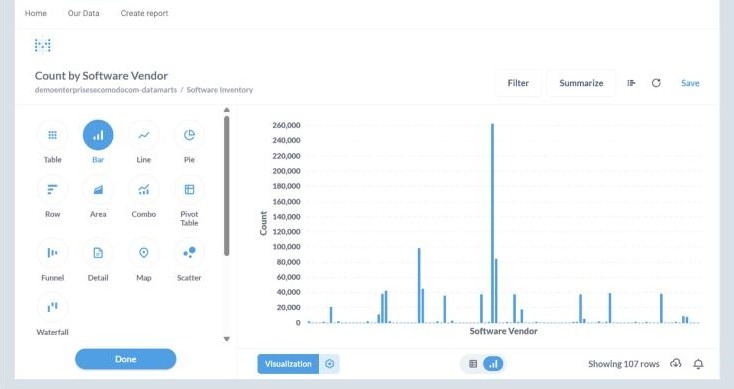
IT_Endpoint_Manager_v2_9.png


The Visualization picker lists the chart types that suit your data.


Note: When you change a saved report (filter, summarize, chart type) the original is not overwritten. The header shows 'Started from' and the report name, and the changes only become permanent if you click 'Save'. This makes it safe to experiment.

Fine-Tune a Chart

  1. Click the gear next to 'Visualization' (or the gear on the selected chart type).

  2. 'Data' - choose the X-axis field and Y-axis series.

  3. 'Display' - turn on 'Goal line' or 'Show values on data points'.

  4. 'Axes' - set 'Show label', 'Label', 'Show lines and marks' and 'Scale' for each axis.
  5. Click 'Done'.

IT_Endpoint_Manager_v2_10.png


Chart settings (gear): the 'Data', 'Display' and 'Axes' tabs open on the left.

Build a Multi-Step Report (Editor)

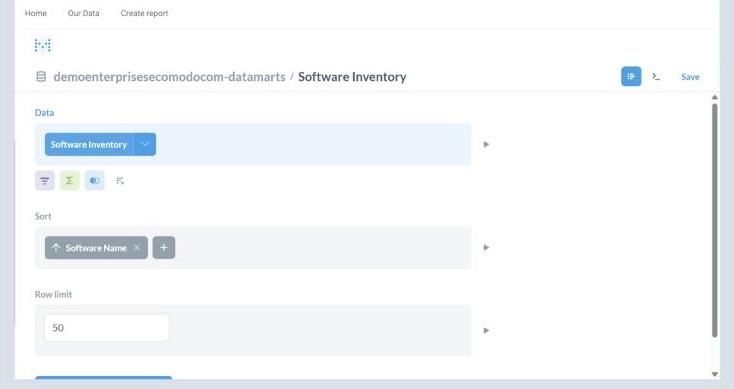
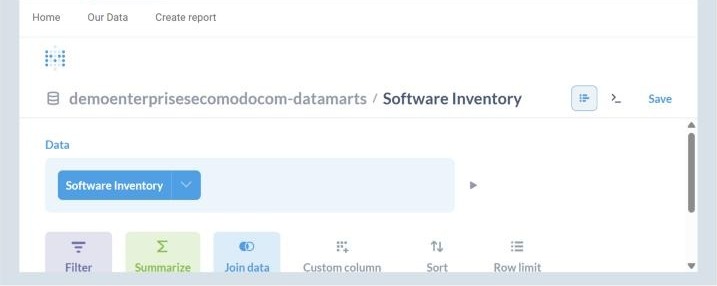
Click the editor icon (the list icon in the toolbar). Your report appears as steps you can edit:

  • 'Data' - the table you started from. Small icons under it add a 'Filter', 'Summarize', 'Join', 'Custom column' or 'Sort' directly.

  • 'Filter', 'Summarize', 'Join data', 'Custom column', 'Sort', 'Row limit' - add these steps with the buttons under the last step.

  • 'Visualize' - runs the report.

Click 'Visualize' after any change to run the report again.
IT_Endpoint_Manager_v2_11.png


The editor: the 'Data' step, with 'Filter', 'Summarize', 'Join data', 'Custom column', 'Sort' and 'Row limit' buttons below.

Sort the Results

  1. In the editor, click 'Sort'.

  2. Choose the field to sort by.

  3. Click the arrow on the chip to switch between ascending and descending. Click '+' to add a second sort field, or x to remove one.

  4. Click 'Visualize'.

IT_Endpoint_Manager_v2_12.png


A 'Sort' step with one field. Click the arrow to change direction, and '+' to add another field.

Limit the Number of Rows

  1. In the editor, click 'Row limit'.

  2. Type a number in 'Enter a limit' (for example 50).

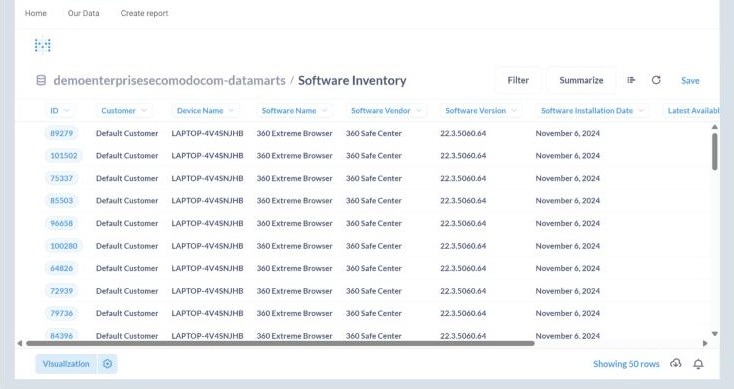
  3. Click 'Visualize'. The bottom right shows 'Showing 50 rows'.


Add a Calculated (Custom) Column

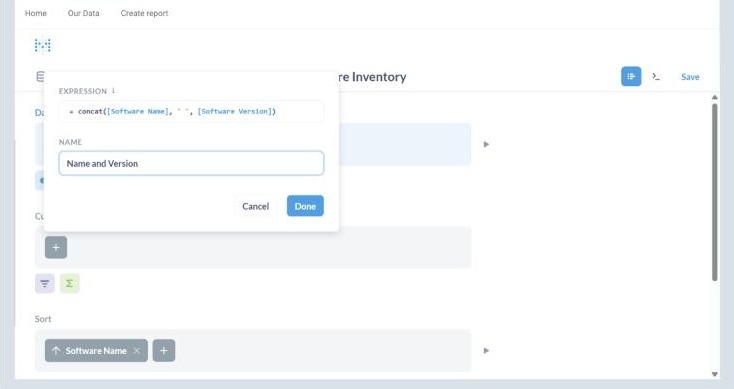
  1. In the editor, click 'Custom column'.

  2. In 'Expression', type a formula using field names in square brackets. Example: concat([Software Name], " ", [Software Version]).

  3. In 'Name', type a clear column name, for example Name and Version.

  4. Click 'Done', then 'Visualize'. The new column appears at the right end of the table.


Tip:
Click the small 'i' next to 'Expression' for the list of functions you can use.
IT_Endpoint_Manager_v2_13.png


The 'Custom column' dialog with an expression and a name.
IT_Endpoint_Manager_v2_14.png


The finished report: 50 rows ('Row limit'), sorted by 'Software Name'.


Combine Two Tables (Join)

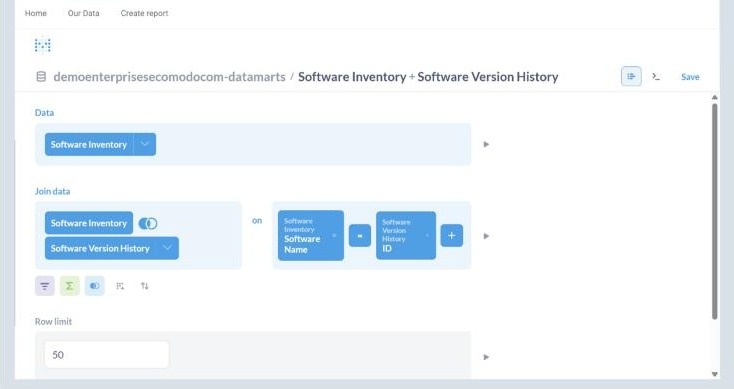
  1. In the editor, click 'Join data'.

  2. Choose the second table.

  3. Choose the field from the first table, then the matching field from the second table. Click '+' to add another matching pair.

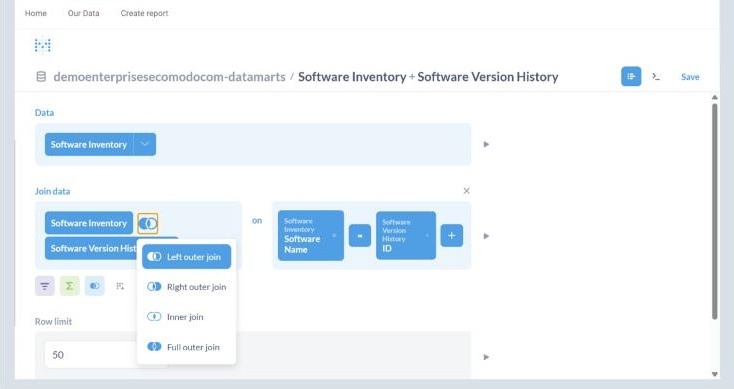
  4. Click the join-type icon between the table names and choose: 'Left outer join' (all rows from the first table), 'Right outer join', 'Inner join' (only matching rows) or 'Full outer join'.

  5. Click 'Visualize'.

IT_Endpoint_Manager_v2_15.png


A 'Join data' step: two tables and the matching fields. The '+' adds another pair.
IT_Endpoint_Manager_v2_16.png


The join-type icon opens: 'Left outer', 'Right outer', 'Inner' and 'Full outer join'.

Note: Match fields that mean the same thing (for example 'Device ID' to 'Device ID'). Matching unrelated fields causes the error 'There was a problem with your question'.
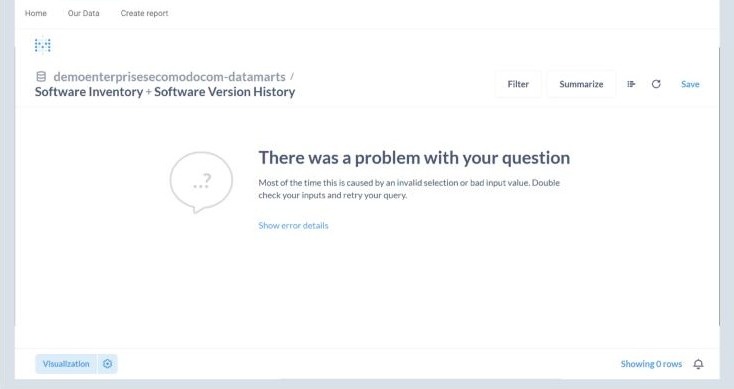
IT_Endpoint_Manager_v2_17.png


Joining unrelated fields gives 'There was a problem with your question'. Fix or remove the last step.

To remove a join, click the x at the top right of the 'Join data' step.

Save a Report

  1. Click 'Save'.

  2. Type a 'Name'. A name is suggested from your settings. Replace it with something clear.

  3. Add a 'Description' (optional but helpful).

  4. Check 'Which collection should this go in?'. The default is your personal collection.

  5. Click 'Save'.

Open, Review and Organise Saved Reports

  1. Open 'Home' > 'Your personal collection' (or search for the name) to find a saved report.

  2. Click the 'i' icon to see the description and history (who created it and when).

  3. Click the bookmark icon to mark a report as a favourite.

  4. Click '...' for more actions: 'Move', 'Duplicate', 'Turn into a model', 'Archive' and 'Add to dashboard'.

  5. 'Duplicate' asks for a name (it adds ' - Duplicate'), a description and a collection. Use it before experimenting with a report you want to keep.

  6. 'Move' shows your collections and '+ New collection'. Pick one and click 'Move'.
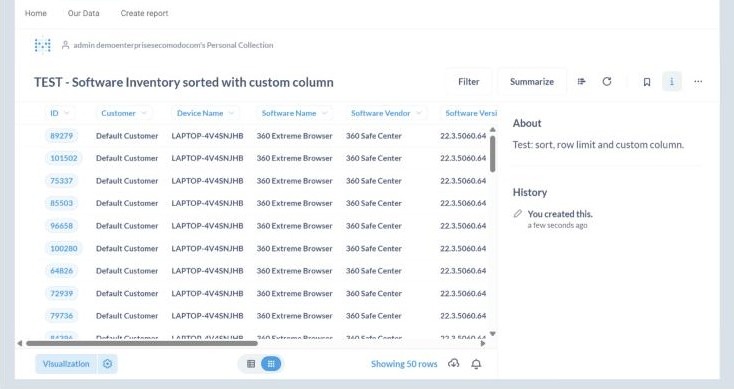
IT_Endpoint_Manager_v2_18.png


A saved report: breadcrumb, title, toolbar, bookmark, info ('i') and '...' icons. The info panel shows the description and history.
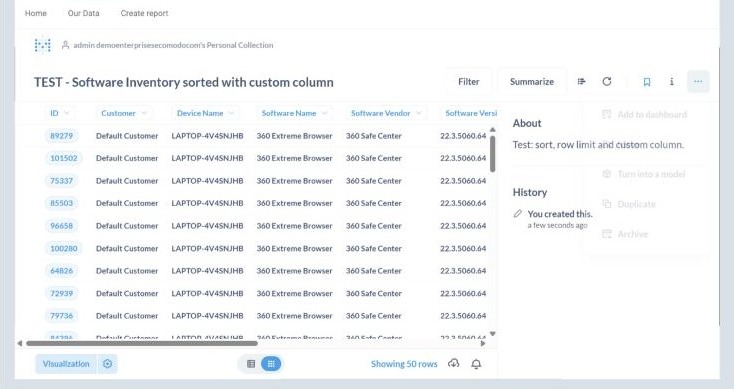
IT_Endpoint_Manager_v2_19.png


The '...' menu: 'Add to dashboard', 'Move', 'Turn into a model', 'Duplicate', 'Archive'.
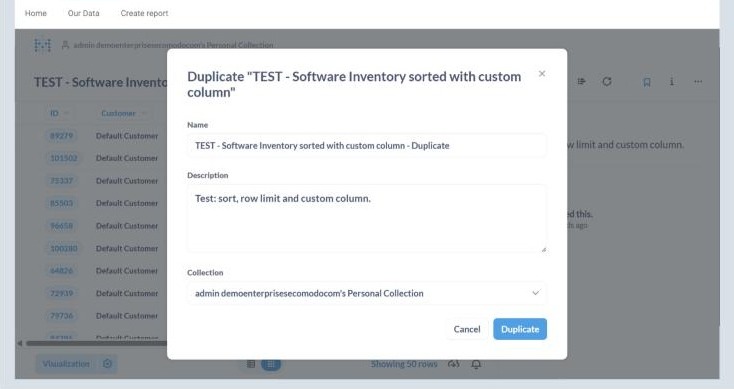
IT_Endpoint_Manager_v2_20.png


'Duplicate' asks for a name, a description and a collection.
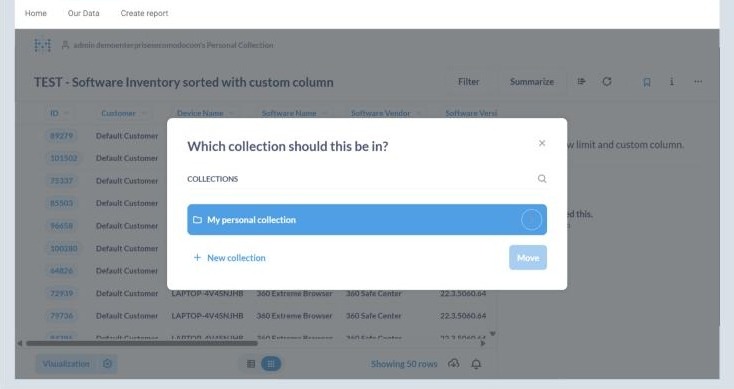
IT_Endpoint_Manager_v2_21.png


'Move': choose a collection or create a new one.

Note: 'Archive' removes a report from normal view. Only use it when you mean to.


Download Results


  1. Click the cloud / download icon at the bottom right.

  2. Under 'Download full results', choose .csv, .xlsx or .json.
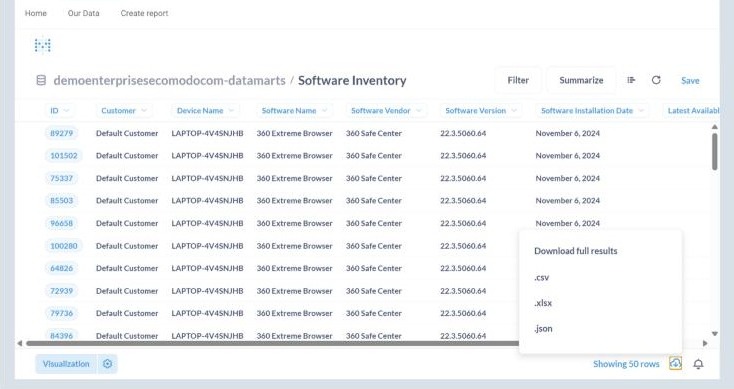
IT_Endpoint_Manager_v2_22.png


'Download full results': .csv, .xlsx or .json.

See the SQL Behind a Report

In the editor, click the '>_' icon. 'SQL for this question' shows the query that was generated.

Note: Do not click 'Convert this question to SQL' unless you want a SQL-only report. The change cannot be undone. Duplicate the report first.


Comodo Help
  • IT Platform:
  • Help
  • Scripts
  • Wiki
  • Forum
  • Developer
  • RMM
  • Patch Management
  • Service Desk
  • ITSM
  • Managed Service Provider
  • Managed Detection and Response
  • Ticketing System
  • Helpdesk
  • ITIL

Copyright 2026 Itarian